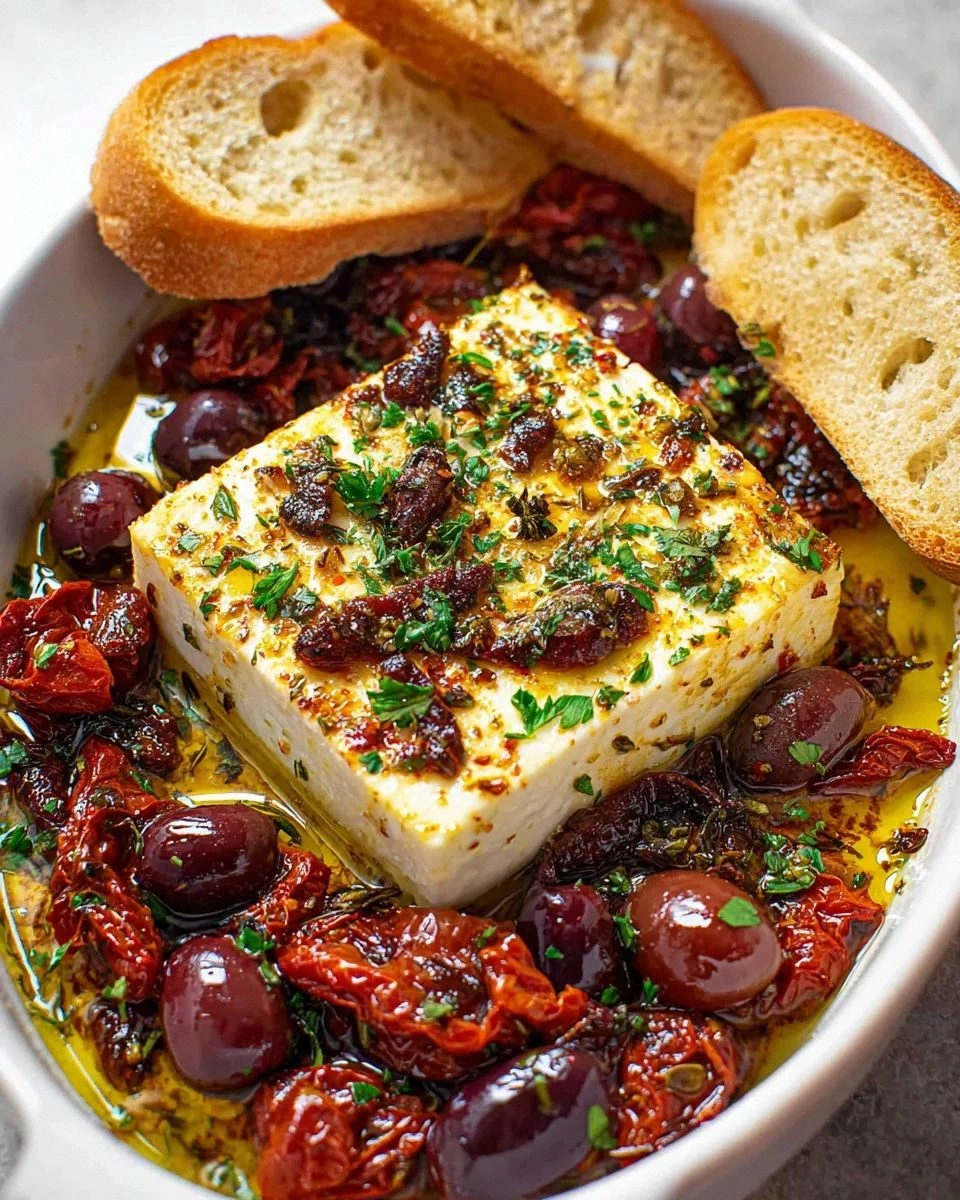
I still remember the first time I tasted baked feta. It was a Tuesday night that had spiraled into complete chaos — my roommate had texted me at 5 PM that eight people were coming over for game night in two hours, and the only thing in my fridge was a sad block of feta, a jar of olives, and some questionable sun-dried tomatoes swimming in oil. Instead of panicking (okay, I panicked a little), I threw everything into a baking dish, muttered a quick prayer to the kitchen gods, and shoved it into the oven. What emerged twenty-five minutes later was nothing short of miraculous — a bubbling, golden-topped, insanely fragrant cheese situation that had people abandoning their charcuterie boards and hovering around the oven like vultures. The feta had transformed into this creamy, spreadable dream that tasted like a vacation to the Greek islands, and the tomatoes had burst into sweet little pockets of umami bombs. Even my friend who claims to "hate olives" was scraping the dish clean with a piece of crusty bread, mumbling something about how this was "the best thing I've ever put in my mouth." That's the moment I knew I had stumbled onto something legendary.
Here's the thing though — most baked feta recipes online are doing it completely wrong. They're using crumbled feta (sacrilege!), not enough olive oil (tragic!), and baking at temperatures that turn this beautiful cheese into a rubbery mess. I've spent the last year perfecting this method, testing different feta brands, olive varieties, and herb combinations until I landed on what I genuinely believe is the ultimate version. The secret lies in using a whole block of high-quality feta, bathing it in a luxurious olive oil pool, and surrounding it with ingredients that bring both sweetness and briny depth. When you pull this out of the oven, the edges of the feta develop these gorgeous golden frills while the inside stays lusciously creamy, and the oil becomes infused with garlic, herbs, and the essence of every ingredient in that dish.
What makes this version absolutely irresistible is how it hits every single flavor note — salty, sweet, tangy, herby, and that addictive savoriness that keeps you coming back for "just one more bite" until suddenly the entire dish is empty and you're licking the spoon like some kind of appetizer-obsessed maniac. The textures are equally compelling — you've got the molten cheese that spreads like butter, the chewy sun-dried tomatoes, the meaty olives, and that olive oil that's taken on all these flavors and begs to be sopped up with bread. I dare you to serve this at your next gathering and watch how quickly it disappears. Actually, I double-dog dare you, because I've seen this convert self-proclaimed feta-haters into raving fans and turn casual snackers into full-on disciples of the baked cheese cult.
If you've ever struggled with appetizers that feel fussy or require a culinary degree to execute, this recipe is about to become your new best friend. It takes all of five minutes to assemble, uses pantry staples, and delivers restaurant-quality results that'll have everyone asking for the recipe. Picture yourself pulling this bubbling beauty out of the oven, the aroma of garlic and herbs wafting through your kitchen, your guests' eyes lighting up like kids on Christmas morning. Let me walk you through every single step — by the end, you'll wonder how you ever made it any other way.
What Makes This Version Stand Out
Block Not Crumbled: Using a whole block of feta instead of pre-crumbled cheese is an absolute game-changer. The block maintains its structure while the exterior caramelizes into golden perfection, creating that coveted contrast between the crispy edges and the creamy center that makes people close their eyes in blissful appreciation.
Olive Oil Bath: Most recipes skimp on the oil, but we're using a generous third cup that creates a luxurious pool for the feta to swim in. This isn't just about richness — the oil transfers heat evenly, prevents the cheese from drying out, and becomes infused with all the flavors, turning into liquid gold you'll want to drizzle on everything.
Mixed Olive Magic: Combining Kalamata and green olives isn't just about pretty colors. The Kalamatas bring that deep, winey intensity while the green ones add a bright, almost citrusy pop. Together they create a complex olive experience that makes each bite interesting rather than monotonously briny.
Herb Harmony: The trio of oregano, thyme, and rosemary isn't arbitrary — each plays a specific role. Oregano brings that classic Mediterranean earthiness, thyme adds subtle floral notes, and rosemary contributes those pine-like aromatics that make your kitchen smell like you've been transported to a hillside in Provence.
Garlic Technique: Thinly slicing rather than mincing the garlic prevents those bitter burnt bits while ensuring each slice becomes a tender, mellow flavor bomb that you can actually taste rather than losing in the mix.
Make-Ahead Marvel: This beauty can be assembled up to two days ahead, wrapped tightly, and baked when needed. The flavors actually meld and intensify during the wait, making it the perfect stress-free entertaining solution that'll have you looking like the most prepared host ever.
Quality Investment: Using premium feta packed in brine rather than the dry, pre-crumbled stuff from the salad bar makes all the difference. The better cheese has a creamier texture and more complex flavor that elevates this from good appetizer to legendary status.
Alright, let's break down exactly what goes into this masterpiece...
Inside the Ingredient List
The Flavor Base
The feta is undeniably the star here, but not all feta is created equal. Skip the pre-crumbled stuff that's been drying out in plastic containers — you want a creamy block that's been lounging in brine, keeping itself supple and flavorful. An eight-ounce block is the perfect size for a small gathering, giving you enough to generously coat about twenty slices of baguette without leaving you with sad leftovers that turn into science experiments in the back of your fridge. When selecting your feta, give it a gentle press through the packaging — it should feel springy, not crumbly, and the brine should look clear, not cloudy or murky like it's been through a war.
That third cup of olive oil might seem excessive, but trust me on this one. We're not just preventing sticking here — we're creating a flavor-infused elixir that you'll want to bottle and sell. The oil carries the heat evenly around the feta, ensuring it melts into creamy perfection rather than seizing up into a chalky mess. Plus, as it heats, it pulls all those flavors from the garlic, herbs, and tomatoes, becoming this incredible condiment that you'll drizzle over everything for the next week. Go for a decent extra virgin olive oil here — not the fancy stuff you'd save for finishing, but something with character that can stand up to bold flavors.
The Texture Crew
The olive situation is where many recipes go wrong by using just one type. A mix of Kalamata and green olives creates a textural and flavor symphony that keeps each bite interesting. The Kalamatas bring that deep, almost wine-like intensity with their soft, meaty texture that practically melts into the oil. Green olives add a firmer bite and a brighter, more acidic note that cuts through the richness of the feta like a knife through butter. Make sure you get pitted olives unless you enjoy watching your guests perform dental acrobatics while trying to maintain polite conversation.
Sun-dried tomatoes are the unsung heroes here, providing little bursts of concentrated sweetness that balance all that salty, briny goodness. The ones packed in oil are superior to the dry, leathery strips that taste like tomato-flavored cardboard. When they heat up, they plump back up and release their sweet-tart juices into the oil, creating these incredible pockets of flavor that make people close their eyes and make inappropriate food noises. Chop them roughly so you get nice big pieces that don't disappear into the mix but aren't so large that they dominate every bite.
The Unexpected Star
Garlic often gets abused in recipes — either raw and aggressive or burnt and bitter. Here, we're treating it with respect by slicing it thinly so it becomes tender and mellow during the bake. These golden slices become little treasures that people fish out with their bread, each one delivering a sweet, aromatic punch without the harsh bite of raw garlic or the acrid taste of burnt bits. Three cloves is the sweet spot — enough to perfume everything but not so much that you'll be breathing fire on your dinner companions.
The herb trio might seem like overkill, but each one brings something essential to the party. Oregano provides that classic pizza-parlor familiarity that makes everyone feel cozy and comforted. Thyme adds those subtle floral notes that make people ask "what's that amazing smell?" without being able to pinpoint it. Rosemary contributes those pine-like aromatics that transport you straight to the Mediterranean, even if you're in a studio apartment in the middle of winter. Half a teaspoon of each keeps things balanced — enough to make their presence known without turning this into a potpourri.
The Final Flourish
Kosher salt and fresh cracked pepper might seem redundant in a dish that's already bringing salt from the feta and olives, but a couple pinches make everything else sing. The salt actually enhances the sweetness of the tomatoes and the creaminess of the feta, while pepper adds that subtle heat that makes you reach for another bite. Go easy though — you can always add more at the table, but you can't un-salt an over-seasoned appetizer.
Fresh parsley at the end isn't just for pretty green specks — it adds a bright, almost grassy note that cuts through all that richness and makes the whole dish feel lighter and more balanced. Chop it just before serving so it stays vibrant and perky rather than wilting into sad green flecks. If you're feeling fancy, use flat-leaf parsley instead of the curly stuff — it has better flavor and texture that doesn't feel like you're eating garnish.
Everything's prepped? Good. Let's get into the real action...
The Method — Step by Step
- Preheat your oven to 400°F (200°C) and position a rack in the center. This temperature is crucial — hot enough to create those gorgeous golden edges on the feta but not so hot that everything dries out before the cheese reaches its creamy potential. While the oven heats up, grab a small to medium baking dish — something pretty enough to go from oven to table because trust me, you're going to want to serve this straight from the dish for maximum impact. I learned the hard way that using too small a dish makes everything steam instead of roast, while too large means your olive oil spreads too thin and you lose that gorgeous pool effect we're after.
- Pour the olive oil into your baking dish first, creating a luxurious base that covers the bottom in a shimmering layer about an eighth of an inch deep. This oil bath is going to be the foundation of flavor, so take a moment to appreciate how it catches the light like liquid gold. Tilt the dish around so the oil coats the bottom evenly — this prevents any sticking and ensures every bite will be infused with all those incredible flavors we're about to add. If your oil seems thick or cloudy from being stored in a cool place, don't worry — it'll thin out beautifully as it heats.
- Add the sliced garlic to the oil, scattering it around so the slices aren't clumped together. These thin coins are going to slowly poach in the oil, releasing their sweet, aromatic essence without any of that harsh raw bite. Make sure they're mostly in a single layer so they cook evenly rather than steaming in a pile. The oil should just barely cover the garlic slices — if they're drowning, you've got too much oil and need a bigger dish or less liquid gold.
- Sprinkle your herb mix — the oregano, thyme, and rosemary — over the oil and garlic. Don't just dump it in one spot — we're looking for even distribution so every bite has that perfect Mediterranean flavor profile. The herbs will start to perfume the oil immediately, and if you lean in close, you'll get a preview of the incredible aromas that are about to fill your kitchen. Give the dish a gentle swirl to help the herbs distribute through the oil without disturbing the garlic placement too much.
- Time for the feta! Unwrap your block and pat it dry with paper towels — this helps it brown properly instead of steaming in excess moisture. Place it right in the center of the dish, letting it sink into the oil bath so the bottom gets coated but the sides stay exposed. This positioning is strategic — we want the bottom to absorb all those flavors while the sides develop that gorgeous golden crust. If your feta block is too big and crowds the edges, trim it down slightly, but save those trimmings for salads or omelets.
- Scatter the olives around the feta like you're creating a protective barrier of briny goodness. Mix up the colors so you get that gorgeous contrast of deep purple Kalamatas against the bright green ones. They should be mostly submerged in the oil — this helps them heat through and release their flavors into the mix. Don't crowd them right up against the feta; give everything a little breathing room so the hot oil can circulate properly.
- Add the sun-dried tomatoes, distributing them evenly among the olives. These little gems are going to plump up beautifully in the hot oil, releasing their concentrated sweetness that balances all the salty elements. Try to get them mostly in the oil rather than sitting on top of other ingredients — they need that hot oil bath to transform from chewy to tender. If you're using oil-packed tomatoes, you can add a teaspoon of their packing oil to the mix for extra tomato essence.
- Season everything with a couple pinches of kosher salt and some fresh cracked pepper. Go lighter than you think — the feta and olives are bringing plenty of salt to the party, and you can always add more later. The pepper should be freshly ground for the best flavor; those pre-ground pepper dust has about as much personality as cardboard. Give the dish another gentle swirl to distribute the seasoning without disturbing your carefully arranged ingredients.
- Slide the dish into your preheated oven and set a timer for 25 minutes. This is not the time to wander off and start scrolling through social media — you want to be nearby to catch it at peak perfection. After about 15 minutes, you'll start smelling the most incredible aromas wafting through your kitchen. That's your cue to peek — the feta should be starting to develop golden edges, and the oil should be bubbling gently around the edges like a mini hot spring.
- At the 25-minute mark, check for doneness — the feta should have golden-brown edges and the center should look creamy and slightly puffed. The oil should be bubbling actively, and the garlic slices should be golden and tender. If it's not quite there, give it another 3-5 minutes, but stay close. When it's ready, remove from the oven and let it rest for exactly 5 minutes — this allows the cheese to set slightly so it doesn't completely collapse when you dig in, while keeping that molten interior we all crave.
- Right before serving, shower the whole dish with fresh chopped parsley. The heat from the feta will wilt the parsley slightly while keeping it vibrant green, creating beautiful color contrast against the golden cheese and jewel-toned olives. Serve immediately with plenty of crusty bread for scooping — this is not the time for delicate crackers that shatter under the weight of all that glorious cheese. Watch as your guests' eyes widen when they break through that golden crust and the creamy interior flows out like liquid gold.
That's it — you did it. But hold on, I've got a few more tricks that'll take this to another level...
Insider Tricks for Flawless Results
The Temperature Rule Nobody Follows
Here's what separates the amateurs from the pros: room temperature ingredients make all the difference. I know, I know — you're thinking "who has time for that?" but this is the difference between a mediocre appetizer and one that makes people write poetry. Take your feta out of the fridge 20-30 minutes before baking, and let your olives and sun-dried tomatoes lose their chill too. Cold ingredients straight from the refrigerator take longer to heat through, which means your feta edges might overcook before the center reaches that perfect creamy consistency. Room temp ingredients heat evenly, giving you that gorgeous molten center with perfectly set edges that makes people close their eyes in appreciation.
Why Your Nose Knows Best
Forget timers — your nose is the most reliable indicator of when this dish is ready. About 15 minutes into baking, you'll start smelling the most incredible aromas wafting from your oven. That's when the garlic is releasing its sweetness and the herbs are blooming in the hot oil. When the smell becomes almost intoxicatingly fragrant, that's your cue to peek. The feta should be developing golden edges, and the oil should be bubbling gently. If you wait for the timer alone, you might miss that perfect window where everything is molten and magical rather than dried out and sad. I learned this the hard way after serving what my friends now call "the hockey puck incident" — trust your nose, not just your clock.
The 5-Minute Rest That Changes Everything
This is the step that'll make you look like you went to culinary school: let the baked feta rest for exactly 5 minutes after removing it from the oven. I know it's torture — you've got hungry people hovering, the smell is driving everyone crazy, and that golden cheese is calling your name. But those five minutes allow the feta to set slightly so it holds together when you scoop into it, while keeping that molten center we all crave. Skip this step and you'll have a collapsed, spreading mess that still tastes incredible but looks like it lost a fight. Plus, this is the perfect time to warm your serving bread in the still-hot oven, creating the ultimate temperature contrast between hot, crusty bread and that perfectly molten cheese.
The Bread Selection Secret
Listen, you can have the most incredible baked feta in the world, but if you're serving it with the wrong vehicle, you're doing yourself a massive disservice. Skip those flimsy crackers that shatter under the weight of molten cheese and oil — you need something with backbone. A crusty baguette sliced diagonally gives you those perfect scooping shovels with plenty of surface area for maximum cheese-to-bread ratio. Toast it lightly for 2-3 minutes while the feta rests — the contrast between hot, crusty bread and molten cheese is what takes this from great to unforgettable. If you're feeling fancy, rub the warm bread with a cut garlic clove for extra flavor that plays beautifully with all those Mediterranean notes.
The Make-Ahead Game Changer
Here's a party trick that'll make you look like the most prepared host ever: assemble this entire dish up to two days ahead, cover it tightly, and refrigerate until you're ready to bake. The flavors actually meld and intensify during the wait, creating a more complex taste that's absolutely incredible. Just remember to let it sit at room temperature for 30 minutes before baking — cold glass dishes can crack in a hot oven, and cold ingredients won't heat properly. I've prepped this on Friday night for Saturday parties, and the results are even better than same-day assembly. Your future self will thank you when you're not frantically assembling appetizers while your guests are ringing the doorbell.
Creative Twists and Variations
This recipe is a playground. Here are some of my favorite ways to switch things up:
The Spicy Mediterranean
Add a teaspoon of crushed red pepper flakes to the oil for a gentle heat that builds slowly and makes people reach for their drinks in the best way. Swap half the olives for Castelvetrano olives — their buttery texture and mild flavor provide beautiful contrast to the spicy heat. Add some chopped Calabrian chilies along with the sun-dried tomatoes for an extra kick that turns this into a sophisticated appetizer with serious personality. This version pairs beautifully with a crisp white wine that can handle the heat.
The French Riviera Remix
Replace the oregano with herbes de Provence for a French twist that includes lavender and makes everything feel more sophisticated. Swap the Kalamata olives for Niçoise olives — they're smaller, more delicate, and have a nuanced flavor that screams "I summer in the South of France." Add some thin strips of roasted red pepper along with the sun-dried tomatoes for color and sweetness. Finish with fresh thyme flowers if you can find them — they're edible, beautiful, and make you look like you know what you're doing.
The Spanish Fiesta
This one's for the olive lovers — use a mix of Gordal and Arbequina olives for a Spanish twist that's completely addictive. Add a teaspoon of smoked paprika to the oil for that unmistakable Spanish flavor that makes everything taste like it came from a tapas bar in Seville. Throw in some chopped Spanish chorizo (the cured kind, not fresh Mexican chorizo) for little meaty surprises that make this feel like a complete meal. Finish with fresh parsley and a drizzle of sherry vinegar for brightness that cuts through all that richness.
The Greek Village Style
Keep it simple and authentic with just Greek Kalamata olives and add some capers for extra briny punch that makes your mouth water just thinking about it. Throw in some fresh oregano leaves instead of dried — they maintain their flavor better and add little pops of freshness. Add a few thin slices of lemon to the oil — they become candied and tender, adding bright citrus notes that make this taste like you're dining in a taverna. Serve with warm pita triangles instead of baguette for the full Greek experience.
The California Sunshine
Add some golden raisins along with the sun-dried tomatoes — they plump up beautifully and add unexpected sweetness that plays gorgeously against all those salty elements. Use a mix of green olives and Castelvetrano for color and variety. Add some toasted pine nuts in the last 5 minutes of baking for crunch and richness that takes this over the top. Finish with fresh basil instead of parsley for that California-fresh vibe that makes everything taste like sunshine and good decisions.
The Holiday Party Showstopper
Add some fresh cranberries around the feta for a festive touch that bursts with tart flavor and makes this look like Christmas on a plate. The cranberries soften and sweeten slightly while maintaining their shape, creating beautiful garnet gems throughout the dish. Use rosemary as your primary herb for that piney aroma that screams winter holidays. Add some chopped toasted pecans in the last few minutes for crunch and richness that makes this feel special enough for your most important celebrations.
Storing and Bringing It Back to Life
Fridge Storage
The sad reality is that baked feta is best served immediately, but if you find yourself with leftovers (a rare but beautiful problem), you've got options. Transfer any remaining cheese and oil to an airtight container and refrigerate for up to 3 days. The feta will firm back up and the oil will solidify — this is normal and actually protects everything from drying out. When you're ready to enjoy it again, let it come to room temperature for 30 minutes, then warm it gently in a 300°F oven for about 10 minutes. It won't have that same molten magic, but it'll still taste incredible and make a fantastic addition to salads or pasta.
Freezer Friendly
Here's something that'll blow your mind: you can freeze the assembled but unbaked dish for up to 2 months. Wrap it tightly in plastic wrap, then foil, and freeze. When you're ready to serve, let it thaw in the refrigerator overnight, then bake as directed, adding an extra 5-10 minutes to account for the cold dish. The texture won't be quite as perfect as fresh, but it's still miles better than most appetizers and makes you look like someone who has their life together. I keep one of these in my freezer for emergency entertaining — it's saved me more times than I can count when unexpected guests show up.
Best Reheating Method
If you've got leftover baked feta that's been refrigerated, resist the urge to microwave it — you'll end up with rubbery, separated cheese that tastes like disappointment. Instead, break the cold feta into chunks and toss it with hot pasta, where the residual heat will melt it into a creamy sauce. Add some of the solidified oil, a splash of pasta water, and maybe some fresh herbs for a meal that tastes like you planned it all along. You can also crumble the cold feta over salads, where its concentrated flavor adds incredible depth, or mash it into cream cheese for the world's most sophisticated bagel spread.