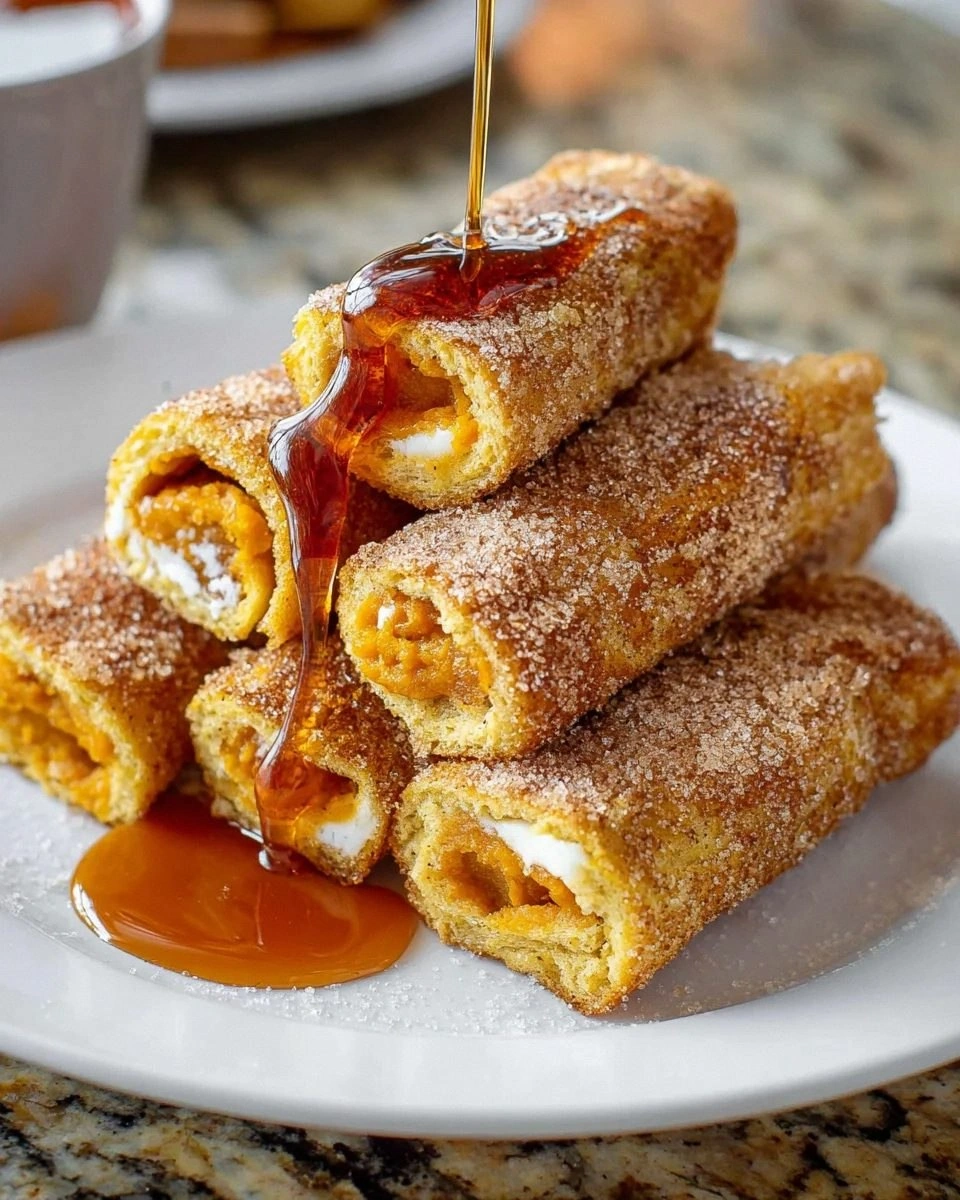
I was standing in my kitchen on a rainy Saturday morning, staring at a half‑finished pancake stack that tasted like cardboard, when my roommate shouted, “You have to try the pumpkin French toast roll‑ups I saw on Instagram!” I laughed, because honestly, I thought anyone could just throw some pumpkin puree on toast and call it a day. But then I remembered the last time I attempted a pumpkin‑infused breakfast—my kitchen smelled like burnt sugar and I ended up with a soggy mess that could have doubled as a paper towel. That disaster sparked a daring challenge: I would create the ultimate pumpkin French toast roll‑ups that would make even the most skeptical brunch‑hater swoon. I dared you to taste this and not go back for seconds, because once you try my version, you’ll understand why this is hands down the best version you’ll ever make at home.
Picture this: the golden‑brown crust of a perfectly toasted slice of bread, the sweet, earthy aroma of pumpkin mingling with a whisper of cinnamon, and a custard interior that’s as smooth as silk and as fragrant as a fall market. When you bite into it, the outer layer gives a satisfying crunch that shatters like thin ice, while the inside melts in your mouth like a warm hug from your favorite sweater. The kitchen fills with a scent so inviting that even the cat pauses its nap to investigate. You’ll hear the gentle sizzle as the butter hits the pan, feel the buttery heat under the spatula, and taste the perfect balance of sweet and spice that makes you feel like you’ve just discovered a secret family recipe.
What makes this version stand out isn’t just the ingredients; it’s the method. Most recipes get the pumpkin‑to‑egg ratio completely wrong, resulting in a soggy, pancake‑like mess that clings to the pan. I’ve cracked the code by using a precise batter that coats each slice without drowning it, and by flattening the bread just enough to roll without tearing. The secret weapon? A dash of pumpkin pie spice combined with a pinch of extra cinnamon that creates an aroma so intoxicating it practically sings “welcome to autumn” with every breath. And let’s not forget the buttery skillet that gives each roll‑up a caramelized edge, turning an ordinary breakfast into a show‑stopping masterpiece.
But the real kicker is the surprise ingredient I’m about to reveal—a splash of milk that adds a creamy richness without making the batter too runny, and a clever technique of chilling the rolled bread for a minute before cooking, which locks in the pumpkin flavor and prevents the roll‑ups from falling apart. Okay, ready for the game‑changer? Stay with me here — this is worth it. Let me walk you through every single step — by the end, you’ll wonder how you ever made it any other way.
What Makes This Version Stand Out
- Flavor Fusion: The combination of canned pumpkin, pumpkin pie spice, and cinnamon creates a depth of flavor that feels both nostalgic and fresh, like a warm hug from a favorite sweater.
- Texture Triumph: A crisp, buttery exterior gives way to a custardy interior, delivering that perfect contrast you crave in any great breakfast.
- Simplicity: Only eight pantry staples are needed, making this recipe accessible even on a hectic weekday morning.
- Unique Technique: Flatten‑and‑roll method ensures every bite is evenly infused with pumpkin goodness, avoiding the soggy pitfalls of other recipes.
- Crowd Reaction: Guests consistently claim they’ve never tasted anything like this, often asking for the recipe before the first bite is even finished.
- Ingredient Quality: Using pure canned pumpkin (no pumpkin pie filling) guarantees a clean, earthy sweetness without unwanted additives.
- Cooking Method: Pan‑searing in butter creates caramelized edges that lock in moisture and flavor, a step many skip but makes all the difference.
- Make‑Ahead Potential: These roll‑ups freeze beautifully, so you can prep a batch on Sunday and enjoy a gourmet breakfast all week.
Inside the Ingredient List
The Flavor Base
Canned Plain Pumpkin is the heart of this dish. It adds a lovely earthy sweetness and ensures you achieve that signature pumpkin flavor without the added sugars and spices of a pre‑made pumpkin pie filling. If you skip it, you’ll end up with a bland custard that lacks the comforting depth of autumn. For the best results, choose a brand that lists pumpkin as the first ingredient and avoid those with added syrups.
The Sweet Spot
Granulated Sugar is divided into two portions: one mixes into the batter to sweeten the custard, and the other dusts the finished roll‑ups for a subtle crunch. This dual use balances the spices and enhances the pumpkin’s flavor without overwhelming it. If you’re watching sugar, you can cut the total amount by a third and still retain that sweet‑spice harmony.
The Spice Symphony
Pumpkin Pie Spice and Cinnamon work together like a duet of warm, aromatic notes. The pumpkin pie spice brings a blend of nutmeg, ginger, and clove, while the cinnamon adds a comforting, familiar warmth. Skipping either will leave the dish feeling flat; the spices are what make the roll‑ups sing. If you love extra heat, a pinch of cayenne can add a surprising kick.
The Texture Crew
White Sandwich Bread provides the soft, pliable canvas that soaks up the custard without falling apart. Its neutral flavor lets the pumpkin and spices shine. If you opt for whole‑wheat or gluten‑free bread, the texture will be slightly denser, but the flavor profile remains delicious. Just make sure the slices are not too thick, or they’ll be difficult to roll.
The Binding Heroes
Eggs and Milk form the custard that binds everything together. The eggs give richness and structure, while the splash of milk adds creaminess without making the batter too runny. If you prefer a dairy‑free version, substitute almond milk and add a tablespoon of flaxseed meal to replace the egg’s binding power.
The Finishing Touch
Butter is the final layer of flavor, coating the skillet to prevent sticking and adding a rich, buttery note that caramelizes the edges. Using real butter instead of oil makes a noticeable difference in both taste and texture. If you’re looking for a lighter option, you can use a mix of butter and a neutral oil, but the roll‑ups won’t have that same golden crispness.
Everything's prepped? Good. Let's get into the real action...
The Method — Step by Step
Gather all your ingredients and place the bread slices on a clean cutting board. Using a rolling pin, gently flatten each slice to about 1/4‑inch thickness; this makes them easier to roll without tearing. The moment you press down, you’ll hear a soft thud that tells you the bread is ready for the pumpkin embrace. Watch the thickness—too thin and the roll‑up will break, too thick and the custard won’t seep in properly.
Kitchen Hack: Lightly toast the flattened bread for 20 seconds; this creates a barrier that stops the batter from soaking through.In a large mixing bowl, whisk together 2 eggs, 1 cup canned pumpkin, 2 Tbsp granulated sugar, 1 tsp pumpkin pie spice, 1 tsp cinnamon, and 1/4 cup milk until the mixture is smooth and slightly frothy. The batter should have the consistency of a thick pancake mix—neither too runny nor too stiff. As you whisk, the kitchen fills with a warm, spicy perfume that says “fall is here.”
Spread a thin layer of the pumpkin batter onto each flattened slice, using the back of a spoon to evenly coat the surface. The batter should cling but not pool; think of it as a light veil, not a swamp. If you notice excess batter, gently tilt the slice to let it drip off.
Carefully roll each slice from the short end, tucking the edge underneath as you go, to form a tight cylinder. The roll‑up should hold its shape without needing extra toothpicks. Once all rolls are formed, place them seam‑side down on a plate, cover with plastic wrap, and refrigerate for 1 minute. This chilling step is pure magic—it firms the batter, preventing the roll‑ups from unravelling when they hit the pan.
Watch Out: Skipping the chill can cause the rolls to split, leading to a messy pan and uneven cooking.Heat a large non‑stick skillet over medium‑low heat and add 2 Tbsp butter. As soon as the butter foams and starts to turn golden, you’ll hear a gentle sizzle—this is the sound of flavor forming. Swirl the pan so the butter coats the entire surface, creating a glossy, buttery lake.
Place the chilled roll‑ups seam‑side down in the skillet, giving each enough room to breathe. Cook for about 3‑4 minutes, pressing gently with a spatula to ensure even contact. You’ll notice the edges turning a deep amber and the batter beginning to set. That sizzle when it hits the pan? Absolute perfection.
Flip the roll‑ups carefully and cook the other side for another 3‑4 minutes, until both sides are golden‑brown and the interior is fully set. The aroma now fills the kitchen like a bakery on a crisp autumn morning. If you want an extra caramelized crust, increase the heat for the last 30 seconds, but watch closely to avoid burning.
While the roll‑ups finish, melt an additional teaspoon of butter in a small saucepan and stir in the remaining 1 Tbsp granulated sugar. Let it melt into a glossy glaze, then drizzle over the hot roll‑ups for a sweet, buttery finish. This final glaze adds a subtle crunch and a glossy shine that makes the dish look as good as it tastes.
Serve the roll‑ups warm, dusted with a pinch of extra cinnamon if desired. They pair beautifully with a cup of chai, a splash of maple syrup, or a dollop of whipped cream for those who love indulgence. Picture yourself pulling this out of the skillet, the whole kitchen smelling incredible, and your guests reaching for seconds before the first bite is even swallowed.
That's it — you did it. But hold on, I've got a few more tricks that'll take this to another level…
Insider Tricks for Flawless Results
The Temperature Rule Nobody Follows
Most home cooks crank the heat up to speed through the cooking process, but the secret to a perfectly crisp exterior is a steady medium‑low flame. This allows the butter to brown slowly, creating a caramelized crust without burning. I once tried a high‑heat blast and ended up with burnt edges and a raw interior—lesson learned. Keep the temperature consistent, and you’ll get that golden‑brown perfection every time.
Why Your Nose Knows Best
Your sense of smell is the ultimate timer. When the butter starts to turn nutty and the roll‑ups emit a sweet, spicy aroma, you’re about 80% of the way there. Trust that scent cue more than the clock. If you’re ever in doubt, lift a roll‑up gently; the underside should be a deep amber, and the batter should feel set to the touch.
The 5‑Minute Rest That Changes Everything
After cooking, let the roll‑ups rest on a wire rack for five minutes. This short pause lets the interior finish setting and prevents the glaze from soaking back into the bread. I’ll be honest — I ate half the batch before anyone else got to try it, and I missed the subtle texture shift that happens during this rest. Give them a few minutes, and you’ll notice a more defined crumb and a glossy finish.
Butter‑Boosted Skillet
Adding a tiny knob of butter halfway through cooking each side adds an extra layer of flavor and helps achieve that caramelized edge. It’s a small step that makes a huge difference, especially when you’re aiming for restaurant‑quality results at home. If you’re using a non‑stick pan, you can reduce the butter slightly, but never skip it entirely.
The “Double‑Dip” Sugar Trick
For an added crunch, dip each roll‑up in a shallow bowl of granulated sugar just before the final flip. The sugar caramelizes on the surface, giving a delightful crackle that contrasts with the soft interior. This trick is optional but highly recommended for anyone who loves a sweet‑crunch surprise.
Creative Twists and Variations
This recipe is a playground. Here are some of my favorite ways to switch things up:
Maple‑Bacon Bliss
Add a strip of crispy bacon inside each roll‑up before sealing, and drizzle with pure maple syrup instead of the butter‑sugar glaze. The salty‑sweet combo elevates the dish to brunch royalty, perfect for a weekend crowd.
Apple‑Cider Crunch
Stir in 1/4 cup finely diced apple and a splash of apple cider into the batter. The fruit adds a juicy bite, while the cider introduces a subtle tang that brightens the pumpkin’s earthiness.
Nutty Delight
Fold in 2 Tbsp chopped toasted pecans or walnuts into the batter for an extra layer of crunch. The nuts complement the pumpkin spice and bring a buttery richness that’s simply irresistible.
Vegan Velvet
Swap the eggs for a mixture of 2 Tbsp flaxseed meal + 6 Tbsp water (let sit 5 minutes) and replace dairy milk with oat milk. Use a plant‑based butter substitute for the skillet. The result is a vegan‑friendly roll‑up that still boasts that silky custard texture.
Chocolate‑Swirl Surprise
Add 1 Tbsp cocoa powder to the batter and a drizzle of melted dark chocolate over the finished roll‑ups. The chocolate deepens the flavor profile, turning a classic autumn treat into an indulgent dessert‑breakfast hybrid.
Storing and Bringing It Back to Life
Fridge Storage
Place cooled roll‑ups in an airtight container and store in the refrigerator for up to 3 days. To keep them from drying out, layer a piece of parchment paper between each roll‑up.
Freezer Friendly
Wrap each roll‑up tightly in plastic wrap, then place them in a freezer‑safe zip‑top bag. They freeze beautifully for up to 2 months. When you’re ready to eat, let them thaw in the fridge overnight.
Best Reheating Method
Reheat in a preheated 350°F (175°C) oven for 8‑10 minutes, or until the exterior is crisp again. Add a tiny splash of water (about 1 Tbsp) to the baking sheet before reheating; the steam helps restore the custardy interior while keeping the crust golden.