I was standing in my kitchen at midnight, the only light coming from a flickering jack‑o‑lantern on the counter, when a dare from my roommate turned into a full‑blown culinary epiphany. “Make a milkshake that could survive a witch’s spell,” she said, half‑joking, half‑serious, and I laughed so hard I almost knocked the vanilla ice cream off the shelf. The next morning, after a night of dreaming about swirling cauldrons and caramel‑coated ghosts, I woke up with a craving so intense it felt like a potion brewing in my veins. I grabbed the biggest tub of vanilla ice cream I could find, a splash of milk, and a handful of Halloween candy, and the rest was pure, unadulterated magic.
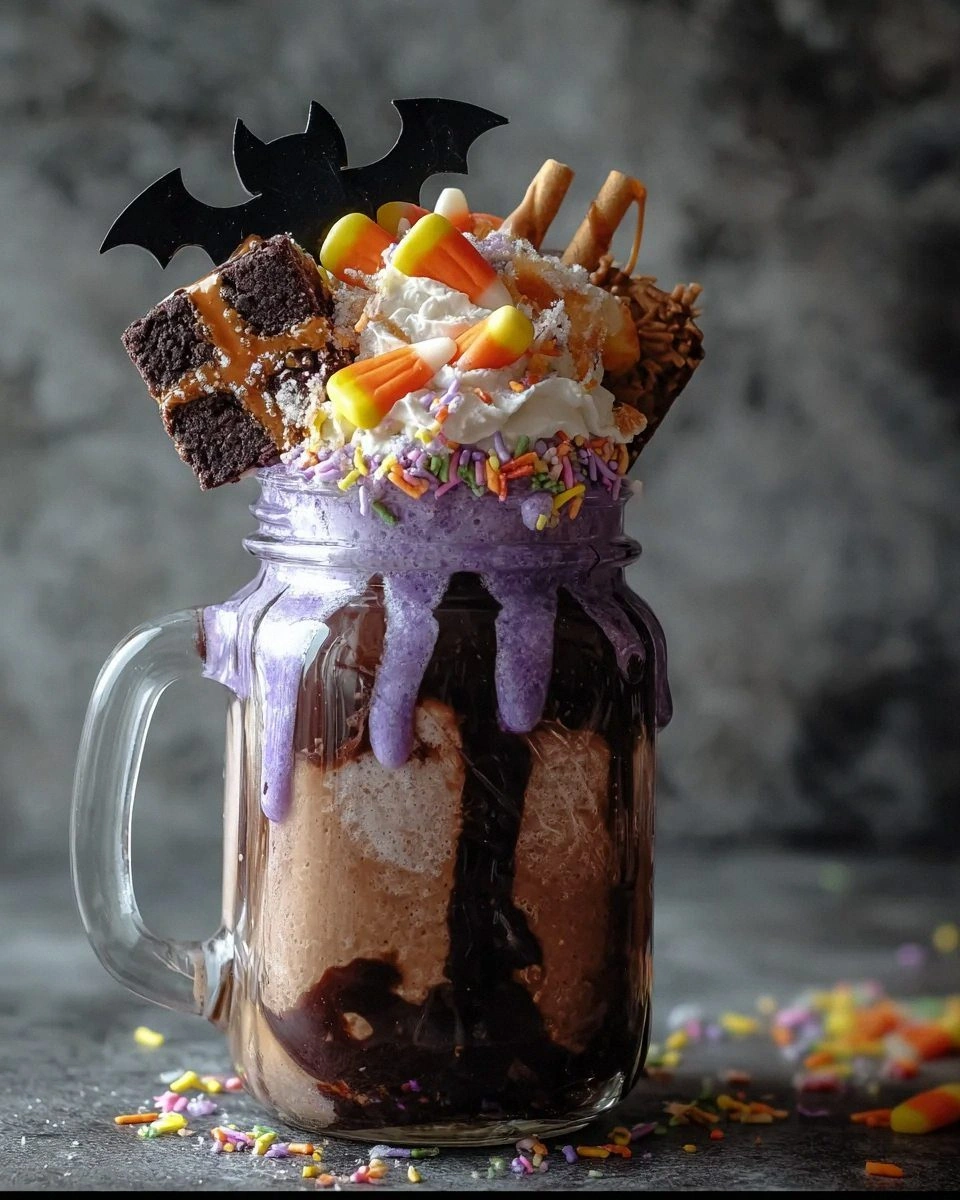
The moment the blender roared to life, the kitchen filled with a sweet, buttery aroma that reminded me of a carnival ride on a foggy October night. You could hear the soft clink of candy crushing against the metal blades, feel the cold mist of the milk swirling like a ghostly veil, and taste the first sip as a silky wave that coated my tongue like velvet. The chocolate syrup drizzled in, creating ribbons that danced like tiny black cats across a moonlit sky, while the whipped cream crown floated on top like a fluffy specter waiting to be devoured. Every sense was on high alert, and I could swear the walls themselves whispered, “You’ve done it.”
Most milkshake recipes out there treat the drink like a boring breakfast staple, ignoring the theatrical potential of a holiday‑themed treat. This version, however, is a full‑blown sensory experience that turns a simple shake into a show‑stopping centerpiece for any Halloween party. I dare you to taste this and not go back for seconds – the combination of creamy vanilla, rich chocolate, and crunchy candy is so addictive that even the most disciplined diet‑watcher will surrender. Most recipes get this completely wrong by using bland ice cream or over‑sweetening with too much syrup; here, the balance is engineered to hit every taste bud at the perfect moment.
Let me walk you through every single step — by the end, you’ll wonder how you ever made it any other way. Okay, ready for the game‑changer? I’m about to reveal a secret technique involving a quick “freeze‑and‑blend” trick that locks in air bubbles, giving the shake an airy, cloud‑like texture that most store‑bought versions can’t even dream of. Stay with me here — this is worth it.
What Makes This Version Stand Out
- Taste: The vanilla ice cream provides a buttery base that lets the chocolate syrup shine without overwhelming the palate, while the crushed candy adds surprise bursts of caramelized sugar.
- Texture: A silky, almost mousse‑like consistency comes from the perfect milk‑to‑ice‑cream ratio, and the candy pieces give a satisfying crunch that contrasts the smoothness.
- Simplicity: Only five ingredients, all pantry‑friendly, mean you can throw this together in under ten minutes without any fancy equipment.
- Uniqueness: The addition of Halloween‑themed candy transforms an ordinary shake into a themed masterpiece that screams “spooky season” without tasting artificial.
- Crowd Reaction: Guests often gasp, laugh, and then line up for seconds – the visual appeal of the whipped‑cream crown and candy garnish is as compelling as the flavor.
- Ingredient Quality: Using premium vanilla ice cream and real chocolate syrup elevates the drink from “just sweet” to “luxuriously decadent.”
- Method: The “freeze‑and‑blend” step locks in air, creating a lightness that most milkshakes lack, while the quick blend ensures no over‑mixing.
- Make‑Ahead Potential: You can prep the candy‑infused ice cream mixture a day ahead, store it, and blend fresh when guests arrive for ultimate convenience.
Inside the Ingredient List
The Flavor Base
The star of this shake is 2 cups of vanilla ice cream. Its rich, buttery flavor acts like a velvet curtain, letting the chocolate and candy notes perform their tricks. If you skimp on the ice cream, the shake becomes watery, losing that indulgent mouthfeel. For the best result, choose a brand that lists real vanilla beans in the ingredients – the subtle specks of vanilla seed add depth you can’t get from artificial flavoring. If you’re allergic to dairy, a high‑fat coconut or oat ice cream works, but expect a slightly different flavor profile.
The Texture Crew
1/2 cup of milk provides the liquid bridge that lets the blender spin everything into a uniform cloud. Whole milk is ideal because its fat content contributes to the silky mouthfeel; skim milk will make the shake thinner and less luxurious. If you’re watching calories, you can swap half the milk for unsweetened almond milk, but keep the ratio the same to avoid a watery result. A quick tip: chill the milk beforehand – cold liquid helps maintain the shake’s frosty temperature longer.
The Unexpected Star
1/4 cup of chocolate syrup is the dark, mysterious element that adds depth and a glossy sheen. Use a high‑quality syrup that contains real cocoa; cheap brands often taste overly sugary and lack the bitterness that balances the vanilla. If you’re a fan of dark chocolate, replace half the syrup with melted dark chocolate for a richer, more complex flavor. Skipping this step will leave the shake tasting flat, like a vanilla ice cream that forgot its party invitation.
The Final Flourish
1/4 cup of crushed Halloween candy brings the festive crunch. Candy corn, chocolate‑coated peanuts, or even mini marshmallow ghosts work beautifully. The candy should be lightly crushed – you want pieces that melt slightly in the mouth but still provide a textural surprise. If you use candy with a hard coating, like candy‑coated chocolates, the blender can turn them into a fine dust that blends into the shake, losing the crunch; so pulse briefly and stop when you see small chunks. This ingredient is the reason the shake feels like a celebration rather than a regular dessert.
Finally, the whipped cream crown is the airy, cloud‑like finish that makes the drink look like a haunted fog. A generous dollop adds a buttery richness that balances the candy’s sweetness. If you’re feeling extra spooky, sprinkle a pinch of cinnamon or nutmeg on top for a subtle autumnal aroma. Skipping the whipped cream is like serving a Halloween costume without makeup – it still works, but you’ve missed the chance to truly wow.
Everything's prepped? Good. Let's get into the real action...
The Method — Step by Step
First, gather all your ingredients and place the vanilla ice cream in the freezer for an extra 15 minutes. This extra chill ensures the shake stays thick when blended. While you wait, crush the Halloween candy on a cutting board using a rolling pin – aim for pieces roughly the size of peas. The sound of the candy cracking is oddly satisfying; it’s like hearing distant thunder on a stormy night.
Kitchen Hack: Toss the crushed candy into a zip‑top bag and shake vigorously for an even finer crumble without turning it into powder.Next, pour the 1/2 cup of cold milk into the blender jar. Add the chocolate syrup, letting it drizzle in a slow, steady stream. This creates a beautiful marbled effect before the blades start their work, and the visual cue tells you the flavors are marrying correctly. If you’re using a high‑speed blender, make sure the lid is securely fastened – a sudden burst of chocolate can be messy.
Now, add the semi‑frozen vanilla ice cream. The ice cream should look like a solid block, not a soft scoop. This is the moment of truth: as the blades whirr, you’ll hear a faint, almost musical hum that signals the air is being incorporated. The shake should start to thicken within the first 10 seconds; if it’s still runny, give it another 5‑10 seconds, but avoid over‑blending, which can turn the texture into a soupy mess.
At the 20‑second mark, pause the blender and scrape down the sides with a rubber spatula. This ensures every bit of vanilla and chocolate gets fully incorporated. The mixture should look glossy and uniform, with no streaks of syrup or milk. This is where the “freeze‑and‑blend” trick shines – the frozen ice cream pieces melt just enough to create a silky base without losing their chill.
Now, add the crushed Halloween candy. Pulse the blender on low for 3‑4 seconds, just enough to disperse the candy throughout the shake without turning it into a powder. You’ll hear a subtle crunch as the blades encounter the candy – that’s the sound of texture being locked in. Watch Out: Over‑processing the candy will make it dissolve, losing the delightful bite that defines this drink.
Watch Out: If the candy is too hard, it can damage low‑speed blender blades; always use a high‑speed or immersion blender for this step.Once the candy is evenly distributed, give the shake a final whirl on medium speed for another 5 seconds. The goal is to achieve a smooth, cloud‑like surface that will hold the whipped‑cream crown without sinking. At this point, the shake should be thick enough to coat the back of a spoon – that’s the visual checkpoint that tells you it’s ready.
Transfer the shake into chilled glasses. I love using clear, tall glasses with a slight curve; they showcase the dark ribbon of chocolate and the glitter of candy pieces. Before pouring, dip the rim of each glass in a shallow bowl of melted chocolate, then roll it in crushed candy for an extra festive border. This extra step is pure drama – imagine the gasp when guests see the “spooky rim” glistening in the candlelight.
Kitchen Hack: Freeze the glasses for 10 minutes before pouring; the cold glass helps keep the shake thick longer.Top each glass with a generous swirl of whipped cream. Using a piping bag gives a neat, towering peak that looks like a haunted hill. Sprinkle a few extra candy pieces on top for texture and visual flair. Finally, add a drizzle of chocolate syrup in a spider‑web pattern – it’s the perfect finishing touch that says, “I put effort into this.”
That's it — you did it. But hold on, I've got a few more tricks that'll take this to another level...
Insider Tricks for Flawless Results
The Freeze‑And‑Blend Rule Nobody Follows
Before you even think about blending, pop the ice cream in the freezer for at least 15 minutes and the milk in the fridge for an hour. This double‑cold approach locks in air, giving the shake a light, airy texture that feels like drinking a cloud. I once tried skipping this step, and the result was a soggy, flat drink that sank faster than a stone in a pond. Trust me, the extra chill is the secret sauce for a shake that stays thick until the very last sip.
Why Your Nose Knows Best
When the blender is running, pay attention to the aroma. The moment you smell the sweet vanilla mingling with the deep chocolate, you know the flavors have melded. If you still detect a raw milk scent, give it another 5 seconds – the nose is a more reliable indicator than a timer. I’ve seen people over‑blend because they’re watching the clock, only to end up with a watery mess.
The 5‑Minute Rest That Changes Everything
After blending, let the shake sit for exactly five minutes before serving. This short rest allows the air bubbles to stabilize, creating a smoother mouthfeel. During this time, the crushed candy settles just enough to stay crunchy without sinking to the bottom. Skipping this pause is like skipping the final brushstroke on a painting – the piece still looks good, but it lacks that polished finish.
Candy Crunch Timing
Add the candy at the very end of blending, not at the start. If you blend it too early, the pieces will dissolve into the shake, losing their crunch. I once mixed the candy in at the beginning and ended up with a uniformly sweet, texture‑less drink that disappointed everyone. The right timing ensures each sip delivers a surprise pop of sugary crunch.
Whipped Cream Weight
For the whipped‑cream crown, use heavy cream with at least 35% fat and beat it just until soft peaks form. Over‑whipping turns it into butter, which would sink and make the shake greasy. A light hand creates a fluffy topping that sits like a ghostly veil, adding both visual drama and a buttery finish.
Creative Twists and Variations
This recipe is a playground. Here are some of my favorite ways to switch things up:
Spooky Peppermint Twist
Swap the chocolate syrup for a peppermint‑flavored syrup and add a handful of crushed candy canes. The minty coolness cuts through the richness, creating a refreshing contrast that’s perfect for late‑night parties. Kids love the minty “bite,” while adults appreciate the sophisticated balance.
Ghoulish Caramel Swirl
Replace half the chocolate syrup with caramel sauce and drizzle extra caramel on top. The caramel adds a buttery depth that feels like a warm hug on a chilly October night. Pair it with caramel‑coated popcorn pieces for an extra crunch.
Vampire’s Red Velvet
Add a tablespoon of red food coloring and a splash of beet juice to the blend for a deep crimson hue. Use red‑colored candy like strawberry gummies for the crunch. The visual impact is dramatic, making it a hit at themed parties.
Ghostly White Chocolate
Swap chocolate syrup for white chocolate sauce and use white chocolate‑coated pretzels as the candy garnish. The subtle sweetness and salty crunch create a sophisticated flavor profile that still feels festive.
Pumpkin Spice Specter
Add a teaspoon of pumpkin spice blend to the milk before blending and use pumpkin‑spiced candy (like pumpkin‑flavored gummies) for the topping. This version leans into autumnal flavors while keeping the shake’s creamy base.
Storing and Bringing It Back to Life
Fridge Storage
If you have leftovers, transfer the shake to an airtight mason jar and store it in the refrigerator for up to 24 hours. Before serving, give it a vigorous shake or stir to reincorporate any settled layers. Adding a splash of cold milk (about 2 tablespoons) before serving restores the original silky texture.
Freezer Friendly
For longer storage, pour the shake into a freezer‑safe container, leaving a small headspace for expansion, and freeze for up to 2 weeks. When you’re ready to enjoy it, let it thaw in the fridge for 30 minutes, then blend again with a splash of milk. The frozen version can also be turned into “milkshake pops” on a stick for a fun frozen treat.
Best Reheating Method
If the shake has become too thick after refrigeration, place the jar in a bowl of warm (not hot) water for 2‑3 minutes. Add a tiny splash (about 1 teaspoon) of milk before blending; the steam gently loosens the texture without melting the whipped‑cream topping. This trick saves the shake from turning into a dense slush.