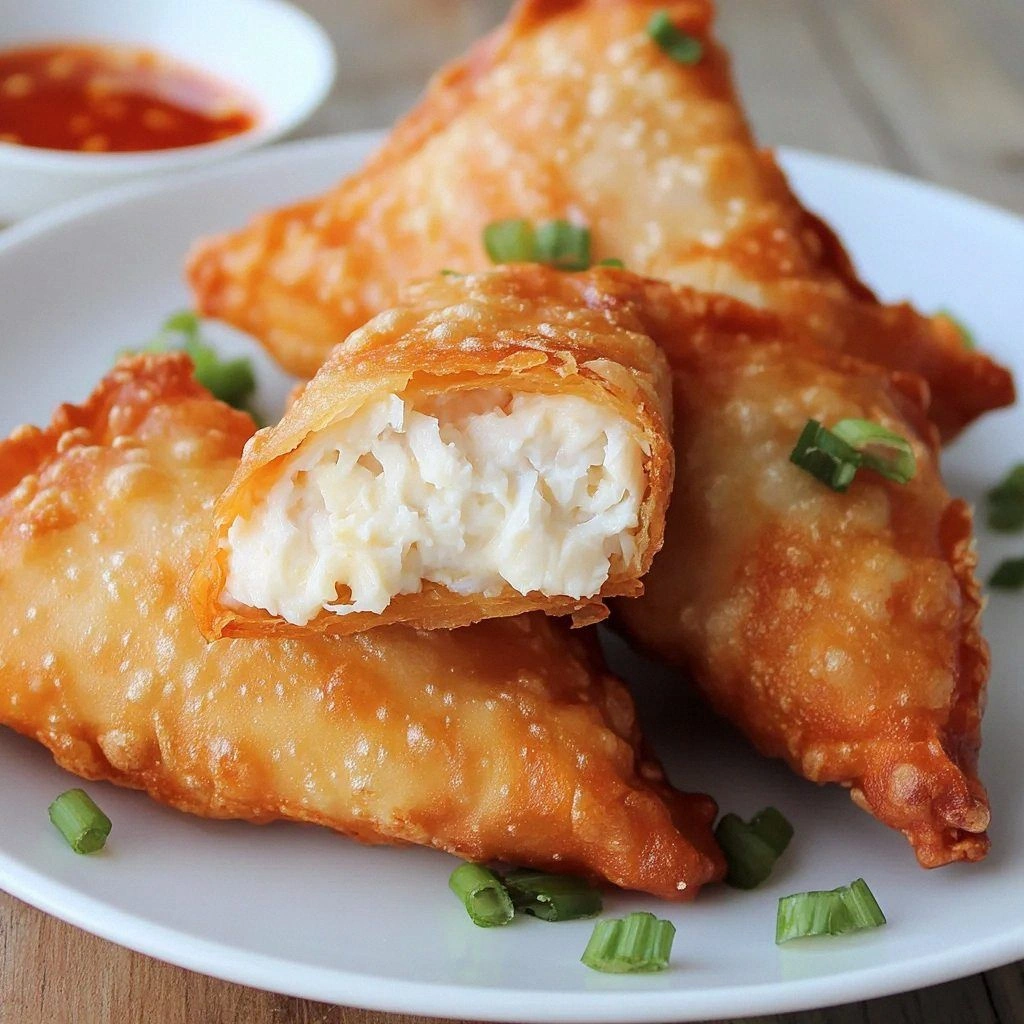
I still remember the first time I tried to make crab rangoon at home. It was a disaster of epic proportions. The filling leaked out like a crime scene, the wrappers tore apart, and I ended up with a plate of what looked like deep-fried regret. But here's the thing — that failure led me down a rabbit hole of experimentation that resulted in something even better: Crab Rangoon Egg Rolls that will make you question everything you thought you knew about appetizers. The crispy exterior shatters like thin ice, revealing a molten center that's basically a party in your mouth, and that first bite? Pure magic.
Picture this: It's 2 AM on a Tuesday, and I'm standing in my kitchen in my pajamas, determined to crack the code. The house smells like a Chinese restaurant had a baby with a sports bar, and I'm on my fifth attempt. But then it happens — the perfect roll, the ideal oil temperature, the moment when cream cheese meets crab in a beautiful marriage of flavors. I took one bite and immediately called my best friend, who still talks about that phone call three years later. That's the kind of life-changing moment we're talking about here.
Most recipes for this hybrid treat get it completely wrong. They either make the filling too sweet, or they don't season it enough, or they use that fake crab stuff that tastes like sadness. But I'm about to show you what actually works — a version that combines the best of both worlds: the crispy, golden exterior of an egg roll with that addictive cream cheese and crab filling that makes crab rangoon so irresistible. The secret lies in three specific techniques that nobody else seems to talk about, but trust me, they make all the difference between "meh" and "holy crap, I need the recipe."
What you're about to make isn't just another appetizer — it's the dish that'll have your friends texting you at midnight asking for the recipe, the one that disappears first at every party, the one that makes you look like a kitchen wizard even if you can barely boil water. I dare you to taste this and not go back for seconds. Actually, I double-dog dare you. By the time we're done here, you'll not only master the technique but you'll also understand why this particular combination of ingredients creates something that's greater than the sum of its parts. Let me walk you through every single step — by the end, you'll wonder how you ever made it any other way.
What Makes This Version Stand Out
Flavor Bomb: The filling hits that perfect balance between rich and bright, with cream cheese that's been whipped into submission, real lump crab meat that adds sweet ocean notes, and just enough seasoning to make everything sing without overwhelming the delicate crab flavor. Most recipes drown the crab in too much soy sauce or add unnecessary sugar, but this version lets the star ingredients shine while providing the perfect supporting cast.
Texture Paradise: We're talking about a wrapper that achieves the impossible — crispy and shatteringly thin on the outside, yet somehow managing to keep everything contained without getting soggy. The contrast between that golden-brown crunch and the silky, molten interior creates a textural experience that'll make your eyes roll back in your head. It's like your mouth can't decide which sensation to focus on first.
Foolproof Technique: Unlike traditional crab rangoon that requires the dexterity of a brain surgeon to fold properly, egg roll wrappers are forgiving and easy to work with. Even if you've never rolled anything in your life, you'll master this technique by the third one. The wrapper actually wants to cooperate, which is more than I can say for those stubborn wonton wrappers that seem to have a mind of their own.
Make-Ahead Magic: Here's where this recipe really shines — you can roll these beauties, freeze them on a baking sheet, then transfer to a freezer bag for up to three months. When the craving hits (and it will), you can pull out exactly how many you want and fry them straight from frozen. No thawing, no fuss, just pure convenience that makes late-night snacking dangerously easy.
Crowd Control: I'll be honest — I ate half the batch before anyone else got to try it. But when I finally shared, people lost their minds. These disappear faster than free samples at Costco, and I've watched grown adults hover protectively over the platter like they were guarding national treasure. The combination of familiar flavors in an unexpected package creates instant addiction.
Quality Control: This recipe uses real ingredients — no imitation crab, no cream cheese "product," no mystery seasonings. Just honest-to-goodness components that you can pronounce and find in any decent grocery store. The difference in flavor is astronomical, and once you taste the real deal, you'll never go back to the fake stuff.
Versatility Factor: While they're incredible on their own, these egg rolls play well with others. Serve them as an appetizer, slice them up for party snacks, or make them bigger and serve as a main dish with a simple salad. They're equally at home at a fancy dinner party or a game day gathering, adapting to whatever vibe you're going for.
Inside the Ingredient List
The Flavor Foundation
Cream cheese is the backbone of this operation, but not just any cream cheese — you want the full-fat brick variety, not the whipped stuff in a tub. The brick cream cheese has the structure to hold up to frying without turning into a puddle, while still achieving that dreamy, molten consistency when you bite in. Let it come to room temperature before mixing; cold cream cheese is stubborn and will fight you every step of the way, resulting in a lumpy filling that no amount of mixing will fix. And please, for the love of all that's holy, don't use the low-fat version — we're not making diet food here, and your taste buds will thank you for the real deal.
Lump crab meat is where we really separate the amateurs from the pros. Yes, it's more expensive than the shredded stuff, but the difference is night and day. Those sweet, tender chunks of crab create little pockets of luxury throughout the filling, making each bite feel special instead of just crab-flavored. If you absolutely must substitute, go for the refrigerated lump crab rather than the shelf-stable canned stuff, but trust me — spring for the good crab at least once so you understand what all the fuss is about. Your future self will remember this moment with gratitude.
The Aromatics Alliance
Green onions might seem like an afterthought, but they're actually crucial for cutting through the richness of the cream cheese. The sharp, fresh bite balances all that dairy fat and prevents the filling from becoming a one-note experience. Slice them super thin on the diagonal — not only does it look more professional, but it also distributes the onion flavor more evenly throughout the filling. And don't you dare use the dried stuff from a jar; fresh green onions cost about fifty cents and make all the difference in the world.
Garlic is another ingredient where fresh beats jarred every single time. One small clove, minced so fine it practically dissolves, adds depth without announcing itself. Too much garlic will bully the delicate crab flavor, but just enough creates this beautiful background note that makes people say "what's in these?" in the best possible way. If you're a garlic lover, resist the urge to add more — this is about balance, not domination.
The Seasoning Symphony
Worcestershire sauce is our secret weapon — just a few drops add incredible umami depth that makes the crab taste more like crab and the cream cheese taste more complex. It's like a flavor amplifier that works behind the scenes, enhancing everything without making itself obvious. If you don't have Worcestershire, a tiny splash of soy sauce will work, but go easy — soy sauce is saltier and more aggressive, so you need half as much.
Old Bay seasoning is non-negotiable in my book. This classic seafood seasoning brings celery salt, paprika, and a blend of warm spices that complement crab like they were made for each other. If you're not familiar with Old Bay, it's time to change that — this stuff is liquid gold for seafood dishes. Start with just a pinch; you can always add more, but you can't take it out once it's in there.
The Unexpected Star
Lemon zest might seem out of place, but hear me out — a whisper of fresh lemon brightens all the rich flavors and adds a subtle perfume that makes everything taste fresher and more alive. Use a microplane to zest just the yellow part of the lemon; the white pith underneath is bitter and will ruin everything. One lemon will zest for dozens of batches, so don't skip this step just because you don't want to buy a whole lemon for a teaspoon of zest.
The Final Flourish
Freshly ground black pepper makes a world of difference — the pre-ground stuff tastes like sawdust in comparison. Those little flecks of freshly cracked pepper add subtle heat and complexity that wake up your palate between bites. Don't go crazy here; we're talking about maybe five grinds total for the whole batch. Think of it as a gentle nudge rather than a punch in the face.
Salt is last because it depends on your other ingredients. Taste your cream cheese first — some brands are saltier than others. Then taste your crab — some canned varieties are packed in brine. Start conservative and adjust upward. Remember, you can always serve these with a salty dipping sauce, but you can't unsalt the filling once it's mixed. Err on the side of caution; your taste buds will adjust the seasoning when you fry them up.
The Method — Step by Step
- Make the filling by beating your room-temperature cream cheese until it's smooth and fluffy — this should take about two minutes with a hand mixer on medium speed. You're looking for that magical moment when the cream cheese transforms from a dense brick into something light and spreadable. Add your Worcestershire sauce, Old Bay, lemon zest, and a few grinds of black pepper, then beat for another thirty seconds until everything is incorporated. The mixture should smell incredible at this point, like a seaside vacation in dairy form.
- Gently fold in your lump crab meat using a rubber spatula, being careful not to break up those beautiful chunks. The key here is restraint — you want to distribute the crab evenly while maintaining those luxurious lumps that make each bite special. If you're using refrigerated crab, make sure to pick through it for any stray shell pieces; nothing ruins the experience like a surprise crunch. The filling should look like a party where everyone's invited but nobody's getting rowdy yet.
- Add your minced garlic and sliced green onions, folding just until combined. This is where the filling really comes alive — those fresh aromatics cutting through all that richness, creating layers of flavor that'll make your taste buds do a happy dance. Give it a taste and adjust the seasoning if needed, remembering that the flavors will meld together as it sits. Cover the bowl with plastic wrap and let it chill for at least thirty minutes; this step is crucial for firming up the filling so it doesn't leak out during rolling.
- Set up your rolling station with egg roll wrappers covered by a barely damp kitchen towel (they dry out faster than you think), your chilled filling, and that bowl of water. Lay one wrapper on your work surface with a corner pointing toward you, like a diamond shape. Place about two tablespoons of filling in the lower third of the wrapper, shaping it into a log that's about four inches long and half an inch thick. Don't overfill — I know it's tempting, but these babies will explode in the oil if you're too generous.
- Roll the bottom corner up and over the filling, tucking it in snugly like you're swaddling a baby. Fold in the left and right corners toward the center, creating an envelope shape. Now here's the crucial part — roll it away from you while keeping tension on the wrapper, pulling gently but firmly. When you reach the final corner, dip your finger in water and run it along the edge to seal the deal. The roll should feel tight and secure, like a little flavor cigar.
- Heat your oil in a heavy-bottomed pot or deep fryer to exactly 350°F — use a thermometer here, because guessing is for amateurs and under-fried egg rolls are a tragedy. The oil should be at least three inches deep for even cooking. When the oil reaches temperature, carefully lower in 3-4 egg rolls using a spider strainer or slotted spoon. Don't crowd the pot; they need room to swim and get crispy all over. The sizzle when they hit the oil? Absolute perfection.
- Fry for 3-4 minutes, turning occasionally with your spider strainer to ensure even browning. You're looking for that gorgeous golden-brown color that makes you want to bite through your screen. They should float when they're nearly done, and the bubbles will start to subside as the moisture cooks out. Don't walk away from the stove here — these go from perfect to burnt faster than you can say "takeout."
- Remove the egg rolls to a wire rack set over a baking sheet lined with paper towels. This setup lets air circulate underneath, keeping the bottoms crispy instead of creating a soggy mess. Let them drain for at least two minutes — I know it's torture, but that brief rest makes all the difference between greasy and glorious. If you're making a large batch, keep them warm in a 200°F oven on the wire rack; don't use paper towels or they'll steam and lose their crunch.
- While they're still hot but not molten, slice one open to check your work. The filling should be heated through and creamy, the wrapper should shatter under your knife, and the aroma should make you slightly weak in the knees. If you've done everything right, you'll need to physically restrain yourself from eating them all before anyone else gets a chance. Serve them immediately with sweet chili sauce, or just eat them standing at the counter like I do, making little happy noises with each bite.
That's it — you did it. But hold on, I've got a few more tricks that'll take this to another level...
Insider Tricks for Flawless Results
The Temperature Rule Nobody Follows
Here's the thing about temperature that most recipes gloss over: your filling needs to be cold when you roll, but your oil needs to be hot and stay hot. I learned this the hard way after a batch where half the egg rolls exploded because the filling got too warm and runny while I was rolling. Now I keep the bowl of filling nestled in a larger bowl of ice while I work, and it's a game-changer. The cold filling firms up the cream cheese, making it easier to handle and less likely to leak out during frying.
But here's the flip side — if your kitchen is warm (hello, summer cooking), work in smaller batches. Take out just enough filling for 4-5 egg rolls, keep the rest chilling, and work quickly. It's like a race against time and temperature, but once you get into a rhythm, it's almost meditative. A friend tried skipping this step once — let's just say it didn't end well, and she ended up with a pot full of cream cheese confetti.
Why Your Nose Knows Best
After you've made these a few times, you'll start to recognize the smell of perfectly fried egg rolls. It's not just about the golden color (though that's important too) — it's that nutty, toasty aroma that fills your kitchen when the wrappers hit that perfect level of doneness. Too pale and they smell like raw dough; too dark and you get that bitter, burnt smell that makes you want to open all the windows.
I can't tell you how many times I've pulled a batch at exactly the right moment based on smell alone, even when the color looked a touch lighter than I expected. Trust your nose — it knows things your eyes haven't learned yet. That moment when the aroma shifts from "fried" to "irresistible"? Pure magic. Write it down, remember it, because that's your new secret weapon.
The 5-Minute Rest That Changes Everything
Okay, ready for the game-changer? After you roll your egg rolls but before you fry them, let them rest on a parchment-lined baking sheet for five minutes. This does two things: it lets the seal set up properly so they don't unravel in the oil, and it brings them slightly closer to room temperature so they cook more evenly. I discovered this by accident when my phone rang mid-rolling session, and those five minutes of forced patience resulted in the most perfect batch I'd ever made.
During this rest, the moisture in the wrapper redistributes, and any condensation that formed while rolling evaporates. Your egg rolls will fry up crisper and more evenly, with fewer bubbles and blisters on the surface. It's like they need a moment to collect themselves before their hot oil baptism, and giving them that moment pays off in spades.
The Double-Fry Method for Extra Crunch
If you want to achieve restaurant-level crunch that lasts for hours (not that these will last that long), try the double-fry method. Fry your egg rolls for 2 minutes at 325°F, remove them to drain, then crank the oil up to 375°F and fry again for another minute. The first fry cooks them through and sets the structure, while the second fry creates that shatteringly crisp exterior that stays crunchy even after they cool.
This technique is especially useful if you're making a huge batch for a party and need to fry them ahead of time. The first fry can be done hours in advance, then you just give them that final blast of high-heat magic right before serving. It's like having a crispy insurance policy — they come out perfect every time, and you'll look like a total pro even if you're secretly sweating bullets in the kitchen.
Creative Twists and Variations
The Surf and Turf Edition
This recipe is a playground. Here are some of my favorite ways to switch things up: Add 2 ounces of thinly sliced prosciutto to the filling, chopped fine and mixed in with the crab. The salty, cured pork adds an incredible depth that plays beautifully with the sweet crab and rich cream cheese. It's like taking your taste buds on a luxury vacation where everyone gets along perfectly. The prosciutto melts into the filling, creating little pockets of umami that make people close their eyes and sigh with each bite.
The Spicy Korean-Inspired Version
Swap out the Old Bay for gochugaru (Korean chili flakes) and add a teaspoon of gochujang to the filling. The result is a funky, spicy version that'll clear your sinuses in the best possible way. Top with thinly sliced scallions and serve with a dipping sauce made from equal parts soy sauce, rice vinegar, and a touch of honey. It's like Korean-Maryland fusion that shouldn't work but absolutely does. If you've ever struggled with making fusion food work, you're not alone — and I've got the fix right here.
The Breakfast of Champions
Replace half the crab with smoked salmon, add some everything bagel seasoning, and serve with a side of cream cheese mixed with capers and dill. It's basically the best bagel you've ever had, but in egg roll form. Perfect for brunch parties where you want to impress without breaking a sweat. The smoky salmon pairs beautifully with the cream cheese, and the everything seasoning adds those onion-garlic notes that make breakfast feel special.
The Vegetarian Surprise
Substitute the crab with hearts of palm that you've shredded to mimic the texture, add some Old Bay and a touch of nori flakes for ocean flavor, and you've got a vegetarian version that'll fool even seafood lovers. The hearts of palm have that same tender-yet-firm texture as crab, and when seasoned properly, they take on a surprisingly convincing flavor profile. Even my die-hard carnivore friends devour these without complaint.
The Everything-but-the-Kitchen-Sink Version
Add water chestnuts for crunch, tiny shrimp for extra seafood punch, and a whisper of sesame oil for nuttiness. It's like the deluxe edition of the original, with textural variety that keeps every bite interesting. The water chestnuts stay crisp even after frying, providing little bursts of crunch that contrast beautifully with the creamy filling. Just don't go overboard — you want to enhance, not overwhelm.
The Dessert Plot Twist
I once made a dessert version with sweetened cream cheese, a touch of lemon, and fresh blueberries. It sounds weird, but the concept works — the crispy wrapper, the warm creamy filling, the burst of fruit. Serve with a dusting of powdered sugar and a side of honey for dipping. It's like a cheesecake and a churro had a baby, and that baby grew up to be delicious. Don't knock it till you've tried it — sometimes the strangest combinations create the most memorable results.
Storing and Bringing It Back to Life
Fridge Storage
If you somehow have leftovers (and that's a big if), store them in an airtight container lined with paper towels to absorb excess moisture. They'll keep for up to three days in the fridge, but let's be real — they're never as good as fresh. The refrigerator is the enemy of crispiness, so you're essentially storing up sadness for future you. But sometimes life happens, and you need to save some for later.
When you're ready to reheat, skip the microwave — it'll turn them into soggy sadness. Instead, pop them in a 400°F oven for 8-10 minutes, or until they're heated through and the wrapper crisps back up. Add a tiny splash of water to the baking sheet before reheating — it steams back to perfection and helps prevent the filling from drying out while the outside gets crispy again.
Freezer Friendly
These freeze beautifully, which is both a blessing and a curse. After frying, let them cool completely, then freeze in a single layer on a baking sheet. Once solid, transfer to a freezer bag with parchment between layers. They'll keep for up to three months, which means you can have emergency crab rangoon egg rolls at 2 AM when the craving hits. Just reheat from frozen in a 400°F oven for 12-15 minutes, flipping halfway through.
Even better, you can freeze them before frying. Roll them up, freeze on a baking sheet, then transfer to bags. When you want fresh egg rolls, fry them straight from frozen for 5-6 minutes at 350°F. They actually come out better this way — the slower thaw during frying helps prevent the filling from exploding out. It's like having a restaurant-quality appetizer on speed dial, ready whenever you need to impress unexpected guests or just treat yourself.
Best Reheating Method
The air fryer is your best friend for reheating these beauties. Set it to 375°F for 4-5 minutes, shaking halfway through. They come out almost as crispy as fresh, with none of the oil splatter or cleanup of deep-frying. Plus, you can reheat just one or two at a time without feeling wasteful. It's like having your own personal appetizer factory, ready to serve at a moment's notice.