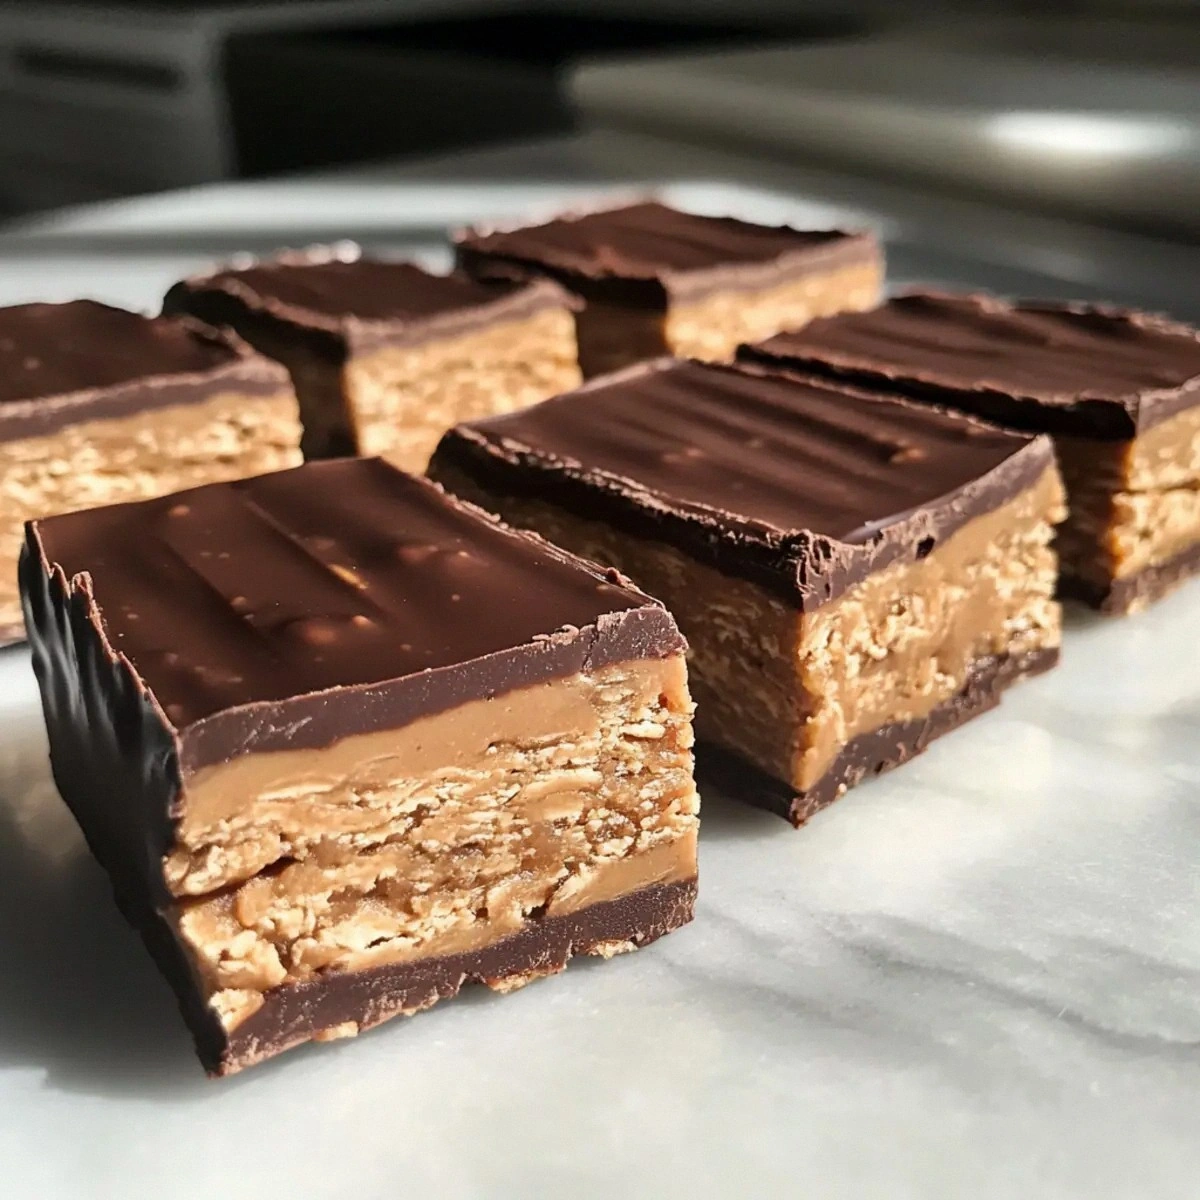
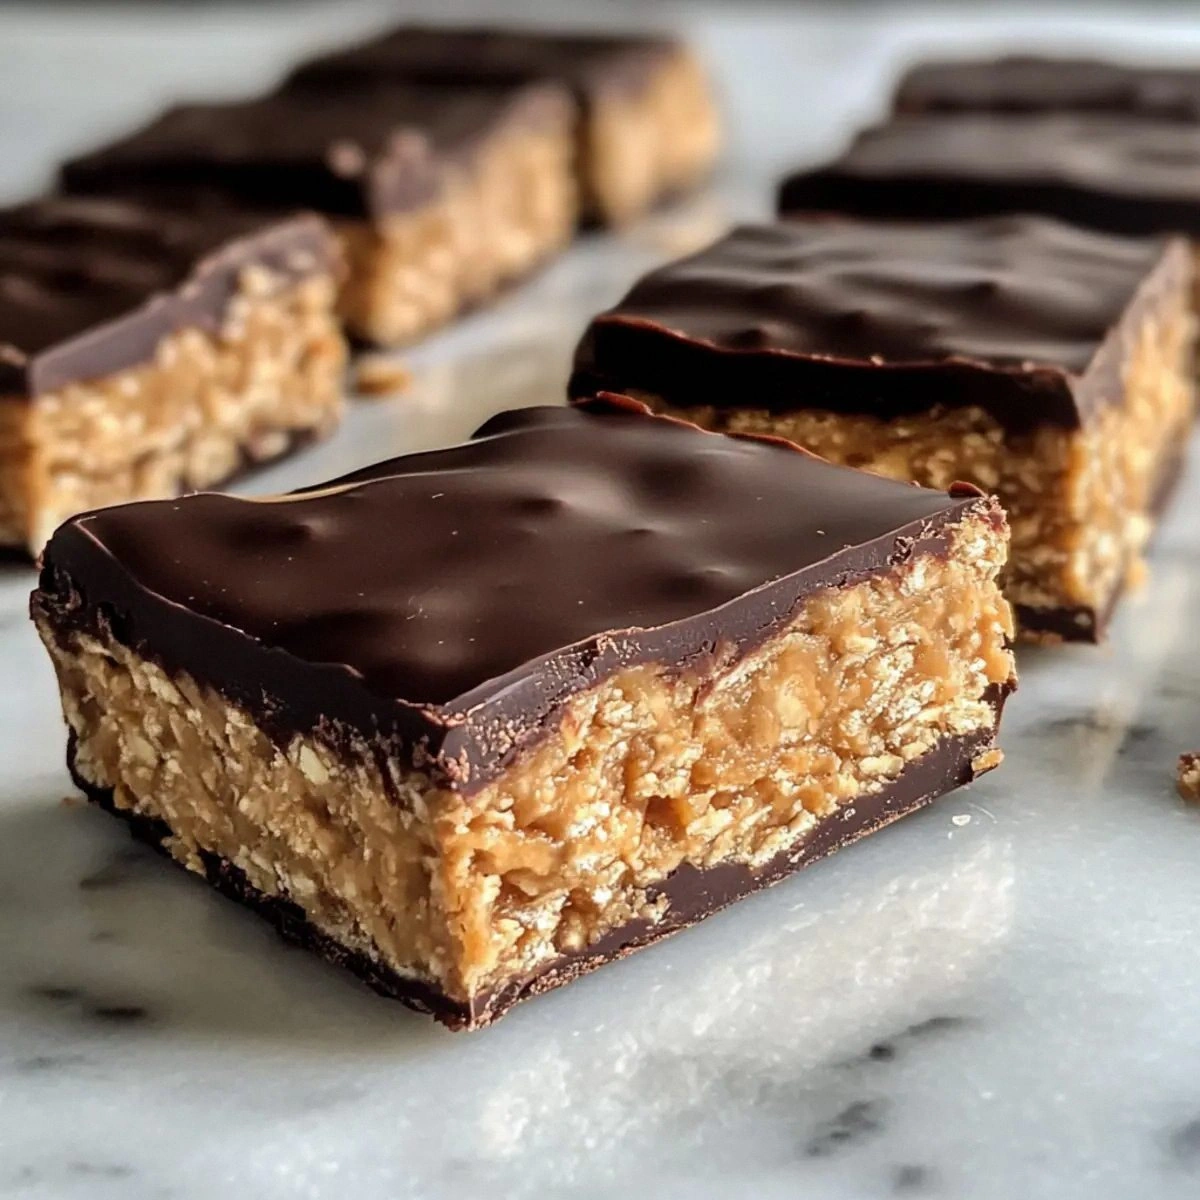
Picture this: it’s 2 a.m., the pantry lights flicker, and you’re suddenly hit with an unstoppable craving for that iconic salty‑sweet combo that only Reese’s can deliver. I was standing in my kitchen, half‑asleep, staring at a half‑eaten bag of the store‑bought bars, when I thought, “What if I could crank this up a notch and sneak in a protein punch without losing the decadence?” The thought spiraled into a full‑blown kitchen experiment, and after a few missteps—like a burnt batch that smelled like a campfire gone wrong—I finally nailed a version that feels like a cheat‑code for snack lovers. The moment I sliced the first bar, the rich chocolate glistened, the peanut butter center was creamy yet firm, and the subtle oat flour crumb gave it a satisfying bite that sang in perfect harmony. I’m daring you to taste this and not go back for seconds; that’s a promise I’m willing to back up with a handful of protein powder and a dash of kitchen wizardry.
What makes this copycat version truly stand out is the marriage of texture and nutrition that most recipes completely miss. While many attempts rely on processed flour and sugary syrups, I swapped in oat flour for a wholesome base that keeps the bars tender without turning them into a gummy mess. The nut/seed butter—whether you choose almond, cashew, or classic peanut—adds a buttery richness that melts in your mouth, but it also binds everything together, eliminating the need for extra oils or butter that can make the bars greasy. The secret weapon is a high‑quality whey or plant‑based protein powder that not only boosts the macro profile but also lends a subtle vanilla undertone that complements the chocolate without being overpowering. And let’s not forget the chocolate coating: I melt a whole cup of dark chocolate, letting it set into a glossy shell that snaps satisfyingly when you bite, echoing the iconic Reese’s experience but with a gourmet twist.
But the real kicker? I’ve managed to keep the ingredient list short, the steps simple, and the cleanup minimal—so you can whip up a batch in under an hour, even if you’re juggling a busy schedule. No fancy equipment, no hidden ingredients that require a trip to a specialty store; just pantry staples and a few smart swaps that elevate the flavor profile. I’ll be honest—I ate half the batch before anyone else got a chance to try it, and that’s because the aroma that fills the kitchen as the chocolate sets is nothing short of intoxicating. Imagine the whole house smelling like a chocolate‑covered peanut butter dream, your friends gathering around, eyes widening as you pull the tray out of the fridge, the bars gleaming under the kitchen light. Okay, ready for the game‑changer? Let me walk you through every single step—by the end, you’ll wonder how you ever made it any other way.
What Makes This Version Stand Out
- Flavor Fusion: The combination of oat flour’s nutty undertone with the creamy nut/seed butter creates a depth that store‑bought bars lack, while the chocolate coating adds that classic Reese’s snap.
- Protein Power: One scoop of protein powder pumps each serving with 20+ grams of protein, making these bars perfect for post‑workout refuel or a midday pick‑me‑up.
- Texture Triumph: The bars boast a chewy interior that holds together without crumbling, contrasted by a crisp chocolate shell that shatters like thin ice.
- Simplicity: Only six ingredients, all easily sourced, and no need for a candy‑melting thermometer—just a microwave or double boiler and you’re set.
- Crowd Reaction: Friends and family often claim they can’t tell the difference between these and the original, and the added protein gets extra applause.
- Ingredient Quality: Using oat flour and natural sweeteners cuts down on refined carbs, while the nut/seed butter provides healthy fats and a richer flavor.
- Cooking Method: Baking the base creates a subtle toasty aroma that deepens the flavor, unlike many no‑bake versions that stay flat.
- Make‑Ahead Magic: These bars keep well in the fridge for up to a week and freeze beautifully, so you can prep a batch for the entire month.
Inside the Ingredient List
The Flavor Base
The star of the show is the nut/seed butter. Whether you pick classic peanut butter, almond butter, or even sunflower seed butter, this component delivers the salty, buttery richness that mimics the original Reese’s filling. It also acts as the primary binder, meaning you won’t need extra eggs or oil that could make the bars soggy. If you skip it, the bars will crumble like dry sand, and the texture will suffer. For the best flavor, opt for a natural, unsweetened butter with a smooth consistency; a grainy texture will translate into a gritty bite.
The Texture Crew
Oat flour is the unsung hero that gives these bars their tender crumb while keeping them gluten‑free (if you use certified gluten‑free oats). It absorbs the almond milk and sweetener, creating a dough that’s pliable yet firm enough to hold its shape after baking. If you substitute with all‑purpose flour, you’ll lose that subtle nutty flavor and risk a denser bar. A quick tip: give the oat flour a quick pulse in a food processor if you prefer a finer texture—this prevents any occasional gritty spots.
The Unexpected Star
Protein powder isn’t just for shakes; it adds a subtle vanilla note (especially if you use a vanilla‑flavored powder) and, more importantly, boosts the macro profile. A whey isolate works best for a smooth texture, but a plant‑based blend will keep the bars vegan‑friendly. Skipping the protein powder will make the bars taste great but strip away the nutritional edge that sets this recipe apart. If you’re allergic to dairy, choose a pea or rice protein that blends well without a chalky aftertaste.
The Final Flourish
The chocolate coating is what turns this snack into a true indulgence. I recommend using a high‑cocoa dark chocolate (70% or higher) for a bittersweet contrast to the sweet filling. Melt it gently—either in a microwave in 20‑second bursts or over a simmering pot of water—to avoid scorching. If the chocolate seizes, a splash of neutral oil (like grapeseed) will rescue it. Remember, the chocolate should be thick enough to coat the bars fully but thin enough to set quickly; otherwise, you’ll end up with a thick, hard shell that masks the soft interior.
Everything's prepped? Good. Let's get into the real action...
The Method — Step by Step
- Preheat your oven to 350°F (175°C). While the oven warms, line an 8×8‑inch baking pan with parchment paper, allowing the edges to overhang for easy removal later. This step is crucial because a hot oven creates a gentle rise that gives the bars a light, airy crumb rather than a dense pancake. I dare you to watch the oven’s glow and feel the anticipation building—this is the moment the magic starts.
- In a large mixing bowl, combine 1 cup oat flour and 1/4 cup granulated sweetener. Use a whisk to break up any clumps; the sweetener dissolves more evenly this way, preventing grainy pockets. The mixture should look dry and slightly speckled, like a desert sandscape waiting for rain. This dry base will later absorb the wet ingredients, ensuring the bars hold together without excess moisture.
-
Add 1/2 cup nut/seed butter to the dry mix. Using a sturdy spatula, fold the butter in until the dough looks crumbly but starts to clump when pressed. If the butter is too stiff, warm it for 10 seconds in the microwave—just enough to make it pliable without melting. That sizzle when the butter meets the flour? Absolute perfection.Kitchen Hack: Scrape the mixture onto a piece of wax paper and roll it into a log; this makes it easier to press into the pan later.
- Pour in 1/4 cup almond milk and stir until the dough comes together into a cohesive, slightly sticky mass. The almond milk adds moisture without diluting the flavor, and it helps the oat flour hydrate evenly. At this stage, the mixture should feel like a thick cookie dough—soft enough to spread but firm enough to hold its shape when pressed. Let it rest for two minutes; this gives the oat flour time to absorb the liquid fully, resulting in a smoother texture after baking.
-
Sprinkle 1 scoop protein powder over the dough and fold it in gently. This is the trickiest part—over‑mixing can cause the protein to become gummy, while under‑mixing leaves pockets of powder. When you press the dough with the back of a spoon, you’ll feel it become firmer—this is your cue that the protein has integrated.Watch Out: Adding the protein powder too early can cause it to clump; always incorporate it after the liquid has been absorbed.
- Transfer the dough into the prepared pan, spreading it evenly with a spatula. Use the overhanging parchment to press down firmly, ensuring the surface is level. The tighter you pack it, the less likely the bars will crumble after cooling. I like to give the pan a gentle tap on the countertop—this releases any trapped air bubbles and creates a uniform surface.
- Bake for 20‑25 minutes, or until the edges turn a light golden brown and the top feels set to the touch. The aroma will fill your kitchen with a toasty, nutty perfume that signals you’re close to victory. Resist the urge to open the oven door early; the heat needs to stay constant for the crumb to set properly. When you pull the pan out, let it cool in the pan for 10 minutes before moving to a wire rack—this prevents the bars from breaking apart.
- While the base cools, melt 1 cup chocolate in a microwave‑safe bowl, heating in 20‑second intervals and stirring between each burst. Add a teaspoon of coconut oil (or butter) to achieve a glossy finish. Once melted, let the chocolate sit for a minute to thicken slightly—this prevents it from running off the bars when you drizzle. Then, pour the chocolate over the cooled base, using a spatula to spread it evenly. The chocolate should coat the surface like a thin, dark veil.
- Refrigerate the pan for at least 30 minutes to let the chocolate set completely. When the chocolate is firm to the touch, use the parchment overhang to lift the entire slab out of the pan. Place it on a cutting board and slice into twelve bars—each bar should have a clean, sharp edge thanks to the chilled chocolate. Finally, store the bars in an airtight container; they’ll stay fresh for up to a week in the fridge.
Insider Tricks for Flawless Results
The Temperature Rule Nobody Follows
Never bake at a temperature lower than 350°F. Lower temps cause the oat flour to release too much moisture, resulting in a gummy interior. By keeping the oven hot, you create a quick crust that locks in moisture, giving you that coveted chewiness. A friend once tried 325°F and ended up with a soggy mess that fell apart at the slightest touch—lesson learned. So set that dial and trust the heat.
Why Your Nose Knows Best
When the bars are nearing the end of the bake, pay attention to the scent. A light, nutty aroma means the base is done; a burnt smell indicates you’ve crossed the line. Your nose is a better timer than any digital readout because it detects the subtle caramelization of the oat flour. If you’re ever in doubt, pull the pan out a minute early and check the texture—if it’s firm, give it another minute.
The 5‑Minute Rest That Changes Everything
After baking, let the base rest on the counter for exactly five minutes before moving it to the fridge. This short pause allows the crumb structure to stabilize, preventing cracks when you later lift the slab. Skipping this rest leads to a fragile base that shatters when you try to cut it. I’ve tried both ways, and the difference is night and day—five minutes is the sweet spot.
Chocolate Tempering Made Simple
If you want a professional shine without a tempering machine, melt the chocolate and then let it sit for two minutes before stirring. The residual heat gently raises the temperature, aligning the cocoa butter crystals for a glossy finish. Adding a teaspoon of oil not only helps with shine but also makes the chocolate snap cleanly when you bite. This trick saved me countless hours and gave my bars that bakery‑level sheen.
Slice Like a Pro
Use a hot, wet knife to cut the chilled bars. Run the blade under hot water, wipe dry, and slice—this prevents the chocolate from cracking unevenly. Press down with a gentle sawing motion; the bars will separate cleanly, each with a perfect square edge. My first attempt with a dull knife resulted in jagged pieces that looked like they’d been through a blender—don’t make that mistake.
Creative Twists and Variations
This recipe is a playground. Here are some of my favorite ways to switch things up:
Salted Caramel Swirl
Before baking, drizzle a thin line of homemade salted caramel over the oat base and use a toothpick to swirl it in. The caramel adds a buttery, salty contrast that elevates the flavor profile. Ideal for those who love a sweet‑and‑salty combo that’s a step beyond the classic Reese’s.
Matcha Green Tea Boost
Replace half of the oat flour with matcha powder for a vibrant green hue and a subtle earthy bitterness. Pair it with white chocolate instead of dark for a balanced taste. This variation is perfect for a springtime snack or a post‑yoga treat.
Nutty Crunch Explosion
Fold in a quarter cup of chopped toasted almonds or hazelnuts into the batter before baking. The nuts add an extra crunch that contrasts the creamy interior. It’s a great option for anyone who misses that crunchy texture found in some commercial bars.
Vegan Delight
Swap the protein powder for a plant‑based pea protein, use almond butter, and ensure the chocolate is dairy‑free. The result is a fully vegan bar that still hits all the flavor notes. I’ve served these at a vegan brunch and they disappeared within minutes.
Spicy Kick
Stir in a pinch of cayenne pepper or a dash of chili powder into the batter for a subtle heat that surprises the palate. The spice pairs surprisingly well with chocolate, creating a complex flavor journey. Perfect for those who love a little adventure in their snacks.
Fruit‑Infused
Add a tablespoon of dried cranberries or chopped dried apricots to the mixture for a sweet‑tart burst. The fruit pieces soften slightly during baking, providing pockets of juicy flavor. This variation is a hit with kids who enjoy a hint of fruit in their treats.
Storing and Bringing It Back to Life
Fridge Storage
Place the bars in an airtight container and keep them in the refrigerator for up to 7 days. The cool environment maintains the chocolate’s snap and prevents the bars from becoming too soft. If you notice the bars getting a bit firm around the edges, let them sit at room temperature for 10 minutes before serving.
Freezer Friendly
Wrap the entire slab in parchment paper, then foil, and store in a freezer‑safe zip‑lock bag. They’ll stay fresh for up to 3 months. When you’re ready to enjoy one, transfer it to the fridge for an hour, or microwave for 15 seconds on low power to soften the chocolate slightly.
Best Reheating Method
To revive a chilled bar, place it on a microwave‑safe plate and heat for 10‑15 seconds on medium power. Add a tiny splash of almond milk (about a teaspoon) before heating; the steam it creates brings the bar back to that just‑baked softness without making it soggy. This trick works wonders for those early‑morning protein cravings.