I was standing in my kitchen, staring at a half‑cooked pot of chili that had decided to turn into a smoky, angry mess. My roommate walked in, sniffed the air, and shouted, “If you can’t tame that fire, at least make something that can handle the heat!” That was the moment I dared myself to create a deviled egg that could stand up to a chili‑garlic onslaught without losing its silky charm. I grabbed the last six eggs from the fridge, threw in a splash of lemon, and let my imagination run wild. The result? A bite‑size bomb that makes your taste buds do a salsa‑dance while the rest of the world wonders why they ever settled for boring old deviled eggs.
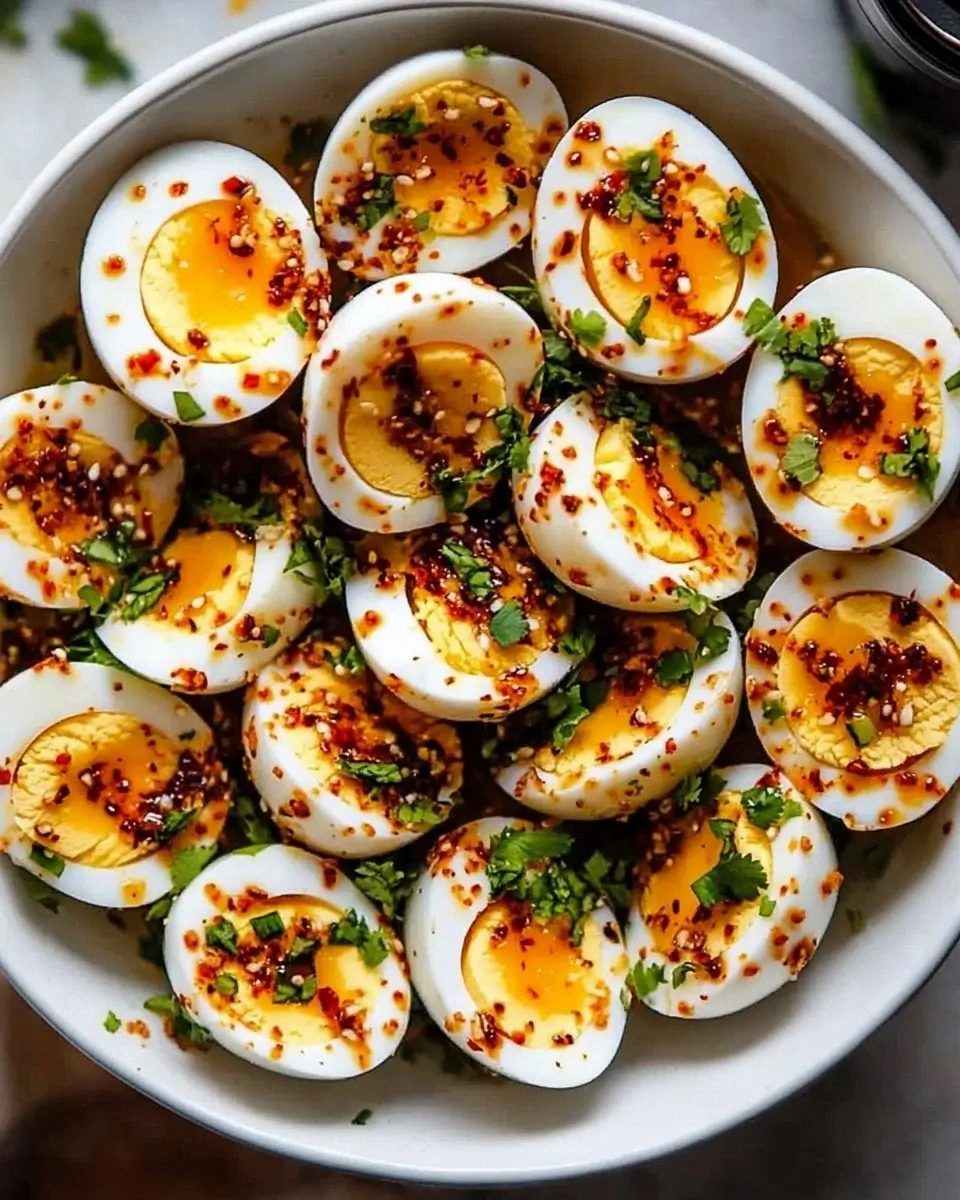
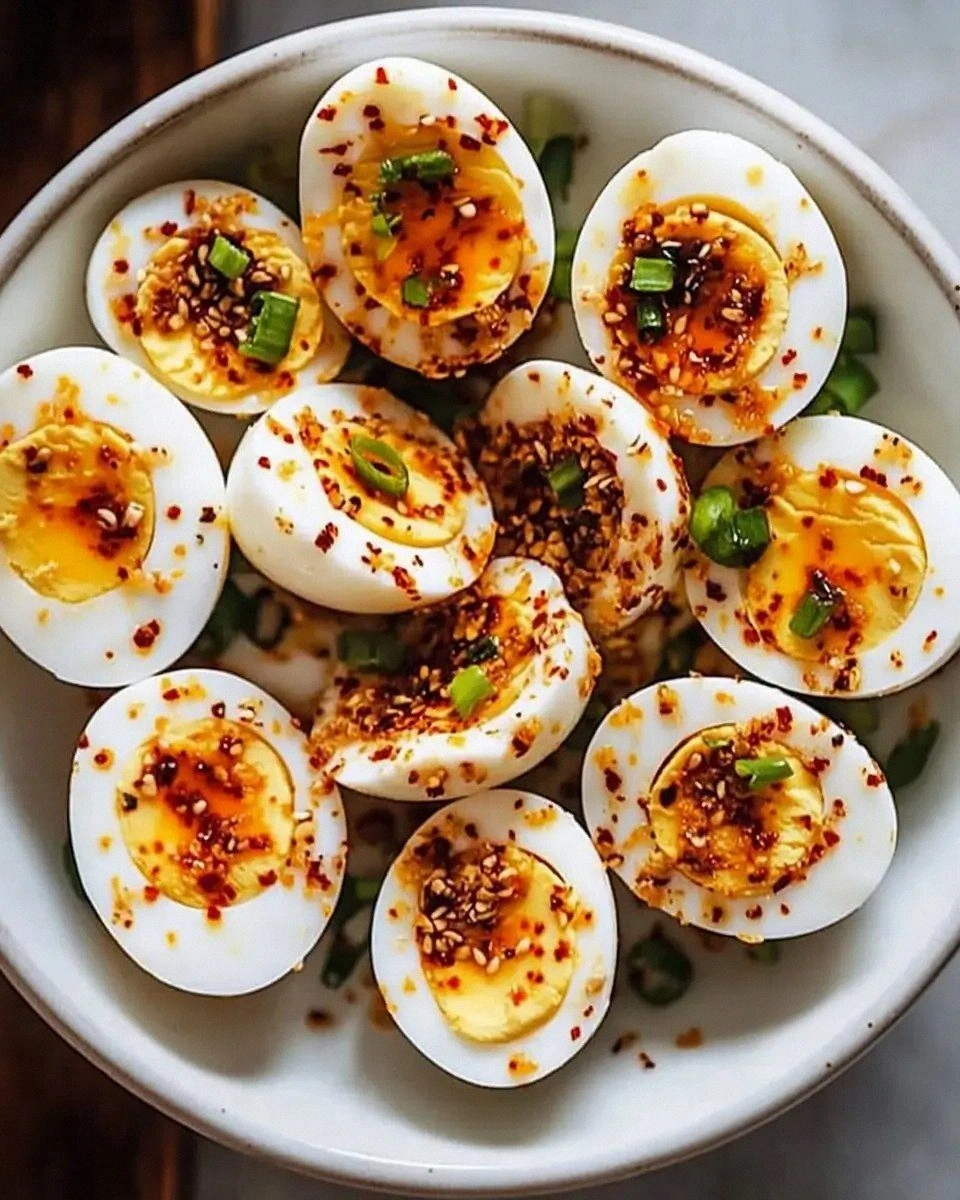
Picture this: a glossy white egg white, perfectly halved, its surface shimmering with a dusting of smoked paprika that looks like a tiny sunrise. When you bite into it, the creamy yolk filling erupts with a bold, peppery heat that tingles your palate, followed by a whisper of garlic that lingers like a secret you just can’t keep. The aroma hits you first – a subtle citrus zing, a hint of mustard, and then that unmistakable kick of chili garlic sauce that makes the kitchen feel like a street food stall in Bangkok. You can almost hear the sizzle of a wok in the background, even though you’re just standing at the counter with a fork.
Most deviled egg recipes either drown the yolk in mayo or hide the spice behind a veil of blandness. I’ve tried the “classic” version, the “low‑fat” version, even the “add‑some‑bacon” version, and each time something fell flat – either the texture was rubbery or the flavor was a whisper when it should have been a shout. This version, however, is a game‑changer. By balancing the heat of chili garlic sauce with the richness of mayonnaise and the brightness of lemon, every bite feels like a perfectly orchestrated symphony, and the smoked paprika adds a smoky backdrop that ties everything together.
I’m about to spill the beans – or rather, the yolks – on a technique that most home cooks overlook: a gentle, rolling boil for the eggs followed by an ice‑bath shock that creates the most tender, easy‑to‑peel shells you’ve ever seen. This step alone can make or break your deviled egg experience, and I’m going to walk you through it with the precision of a surgeon. Let me walk you through every single step — by the end, you'll wonder how you ever made it any other way.
What Makes This Version Stand Out
- Taste: The marriage of chili garlic sauce and Dijon mustard creates a layered heat that builds, peaks, and then fades into a buttery afterglow.
- Texture: Silky yolk filling meets firm, yet tender egg whites, delivering a contrast that’s as satisfying as a crunchy taco shell.
- Simplicity: Only eight ingredients, all pantry‑friendly, yet each one plays a starring role in the flavor profile.
- Uniqueness: The smoked paprika dusting adds an unexpected depth, turning a simple appetizer into a conversation starter.
- Crowd Reaction: Guests often claim they’ve never tasted deviled eggs this bold – it’s the “wow” factor that gets people reaching for seconds.
- Ingredient Quality: Fresh chives and high‑quality chili garlic sauce make the difference between “good” and “legendary.”
- Cooking Method: The ice‑bath shock technique ensures flawless peeling, saving you from the dreaded rubber‑egg disaster.
- Make‑Ahead Potential: These eggs keep beautifully in the fridge for up to two days, making them perfect for parties or meal prep.
Alright, let's break down exactly what goes into this masterpiece...
Inside the Ingredient List
The Flavor Base
Mayonnaise is the creamy glue that holds everything together, providing a luscious mouthfeel that softens the heat from the chili garlic sauce. If you swap it for Greek yogurt, you’ll get a tangier profile but lose some of that luxurious richness. The Dijon mustard adds a subtle sharpness that cuts through the fattiness, preventing the filling from feeling cloying. A splash of lemon juice brightens the entire mixture, acting like a high‑note in a song, lifting the flavors and balancing the spice. Skipping the lemon would leave the filling a little flat, like a movie without a climax.
The Texture Crew
Egg yolks are the heart of the dish – their natural buttery texture is amplified when mashed with the mayo and mustard. Fresh chives bring a delicate oniony crunch that adds a surprise pop in every bite. If you’re allergic to chives, finely chopped green onions or even a sprinkle of cilantro can work, but the flavor will shift toward herbaceous rather than subtly sharp. Smoked paprika isn’t just for color; it adds a smoky undertone that mimics a slow‑roasted flavor, giving depth without extra cooking time. Omit the paprika and you’ll lose that smoky whisper that makes the dish feel sophisticated.
The Unexpected Star
Chili garlic sauce is the hero that turns ordinary deviled eggs into a bold adventure. It brings a balanced heat with a garlicky umami that’s both familiar and exotic. If you can’t find Asian‑style chili garlic sauce, a mix of sriracha and minced garlic works, but the flavor will be a touch sweeter. For those who crave extra heat, a dash of cayenne pepper can be added, but be careful – you don’t want to overpower the subtle lemon and mustard notes. Skipping the sauce altogether would make this recipe just another basic deviled egg, and that’s not what we’re here for.
The Final Flourish
Salt and pepper to taste are the silent conductors that bring every other ingredient into harmony. A pinch of sea salt amplifies the sweetness of the yolk, while freshly cracked black pepper adds a gentle bite that lingers. If you prefer a more complex seasoning, a dash of smoked sea salt can echo the paprika’s smoky notes. Remember, seasoning is personal – taste the mixture before filling the eggs and adjust accordingly. Too much pepper and you’ll mask the delicate garlic; too little and the flavor will feel muted.
Everything's prepped? Good. Let's get into the real action...
The Method — Step by Step
Place the six large eggs in a single layer at the bottom of a saucepan and cover them with cold water, ensuring the water rises at least an inch above the eggs. Turn the heat to medium‑high and bring the water to a rolling boil – you’ll hear a gentle, eager bubble that tells you the water is ready. Once boiling, cover the pot, turn off the heat, and let the eggs sit for exactly 10 minutes; this is the “stealth” method that guarantees a perfectly set yolk without a green ring.
Kitchen Hack: After the 10‑minute sit, immediately transfer the eggs to an ice‑water bath for 5 minutes – this stops the cooking process and makes peeling a breeze.While the eggs are chilling, whisk together the mayonnaise, Dijon mustard, chili garlic sauce, and lemon juice in a medium bowl. The mixture should become a smooth, glossy emulsion that looks like a sunrise over a calm sea. Taste it now – you’ll notice the heat of the chili, the tang of the lemon, and the subtle mustard bite, all perfectly balanced. If the mixture feels too thick, add a teaspoon of warm water to loosen it without diluting the flavor.
Peel the eggs once they’re cool enough to handle. Gently tap each egg on the counter, roll it to loosen the shell, and start peeling from the wider end where the air pocket is located. The shell should slide off in large pieces, leaving the pristine white intact. If you encounter stubborn bits, run the egg under a thin stream of water – the water will seep under the shell and help it release.
Slice each egg lengthwise, creating a perfect pair of white “boats” and a golden yolk “cargo.” Carefully scoop out the yolks and place them in a separate bowl, being gentle so you don’t tear the whites. The yolks should crumble easily; if they’re a bit dry, add a splash of the mayo‑mustard mixture to re‑hydrate.
Mash the yolks with a fork until they’re crumbly, then pour in the prepared mayo‑mustard‑chili mixture. Stir vigorously until the filling is uniform, glossy, and thick enough to pipe without dripping. At this point, fold in the chopped fresh chives and smoked paprika, reserving a pinch of paprika for the final garnish. The aroma now should be intoxicating – a blend of garlic, citrus, and smoky spice that makes your kitchen feel like a gourmet bistro.
Season the filling with salt and freshly ground black pepper, tasting as you go. Remember the rule: a little seasoning now prevents you from over‑seasoning later. If you’re feeling adventurous, add a dash of hot sauce for an extra kick – but keep it subtle; the goal is to let the chili garlic sauce shine.
Transfer the filling to a piping bag fitted with a large star tip, or simply use a zip‑top bag with a corner snipped off. Pipe the mixture back into each egg white half, creating a generous mound that peaks slightly above the rim. This step is pure art – the smoother the pipe, the more elegant the final presentation.
Watch Out: If the filling is too runny, the pipe will ooze and ruin the clean lines; add a teaspoon of extra mayo to thicken.Garnish each deviled egg with a light dusting of smoked paprika and a few extra chive specks. The paprika not only adds visual contrast but also reinforces that smoky undertone we love. For an extra visual pop, you can add a tiny drizzle of chili garlic sauce in a zig‑zag pattern – but remember, a little goes a long way.
Refrigerate the assembled eggs for at least 15 minutes before serving. This chilling period allows the flavors to meld, and the filling firms up just enough for a clean bite. When you finally present them, the aroma will hit the room like a whisper of spice, and the first bite will deliver that promised explosion of flavor.
That's it — you did it. But hold on, I've got a few more tricks that'll take this to another level...
Insider Tricks for Flawless Results
The Temperature Rule Nobody Follows
Never fill the deviled egg mixture while the eggs are still warm; the residual heat can cause the mayo to separate, turning your silky filling into a curdled mess. Let the yolk mixture sit at room temperature for a few minutes, then chill it briefly before piping. I once tried to skip this step in a rush, and the texture turned grainy – a disaster that taught me respect for temperature control.
Why Your Nose Knows Best
Before you season with salt, give the filling a quick sniff. The aroma of garlic and lemon will tell you if it needs a brighter note or a deeper umami boost. Trust your nose more than the recipe – it’s the ultimate flavor detector. One time I added too much salt because I relied on the spoonful, and the dish was instantly over‑seasoned; a quick sniff would have saved me.
The 5‑Minute Rest That Changes Everything
After piping, let the eggs rest uncovered in the fridge for exactly five minutes. This short pause lets the paprika settle into the surface, creating a subtle crust that adds a textural surprise. Skipping this rest can make the garnish look flat and the flavor less integrated.
The Chive Shock
If you love the fresh bite of chives but worry about them wilting, give them a quick ice‑water rinse before chopping. The cold shock keeps the green vibrancy intact, and the flavor stays crisp. I tried using wilted chives once; the result was a soggy, lackluster garnish that ruined the visual appeal.
The Secret of the Ice‑Bath
Don’t underestimate the power of an ice‑bath after boiling. It not only stops the cooking process but also contracts the egg whites, creating a tighter seal that prevents the filling from leaking. I once skipped the ice‑bath and ended up with a few cracked whites that spilled their precious filling onto the plate – a mess no one wants.
Creative Twists and Variations
This recipe is a playground. Here are some of my favorite ways to switch things up:
Smoky Chipotle Twist
Replace the chili garlic sauce with chipotle in adobo and add a teaspoon of smoked paprika to the filling. The result is a deep, smoky heat that feels like a campfire in a bite, perfect for fall gatherings.
Herb‑Infused Garden
Swap the chives for a mixture of finely diced basil, parsley, and dill. This herbaceous version brightens the palate and pairs wonderfully with a glass of crisp white wine.
Asian Fusion
Add a dash of toasted sesame oil and a sprinkle of toasted sesame seeds on top. The nutty aroma complements the garlic heat and gives the dish an elegant Asian flair.
Cheesy Kick
Fold in a tablespoon of grated sharp cheddar or crumbled feta into the filling. The cheese adds a salty richness that balances the spice, making it a crowd‑pleaser for cheese lovers.
Vegan Version
Replace the eggs with firm tofu cubes, use vegan mayo, and swap the Dijon mustard for a mustard made from mustard seeds and water. The texture changes, but the bold flavor profile remains intact.
Citrus Burst
Add a teaspoon of orange zest to the filling and finish with a light drizzle of honey. The sweet‑citrus contrast elevates the heat, creating a sophisticated sweet‑spicy combo.
Storing and Bringing It Back to Life
Fridge Storage
Place the deviled eggs in an airtight container, cover with a damp paper towel to keep them from drying out, and store in the refrigerator for up to 48 hours. The flavors actually deepen after a few hours, so they taste even better the next day.
Freezer Friendly
If you need to prep far in advance, freeze the egg whites and yolk mixture separately. Wrap the whites tightly in cling film and store the filling in a freezer‑safe bag. Thaw in the fridge overnight, then re‑pipe. Use within one month for best quality.
Best Reheating Method
Deviled eggs are best served cold, but if you prefer a warm bite, place them on a baking sheet and warm in a 300°F oven for 5‑7 minutes. Add a tiny splash of water to the tray before heating – the steam revives the creamy texture without drying out the whites.