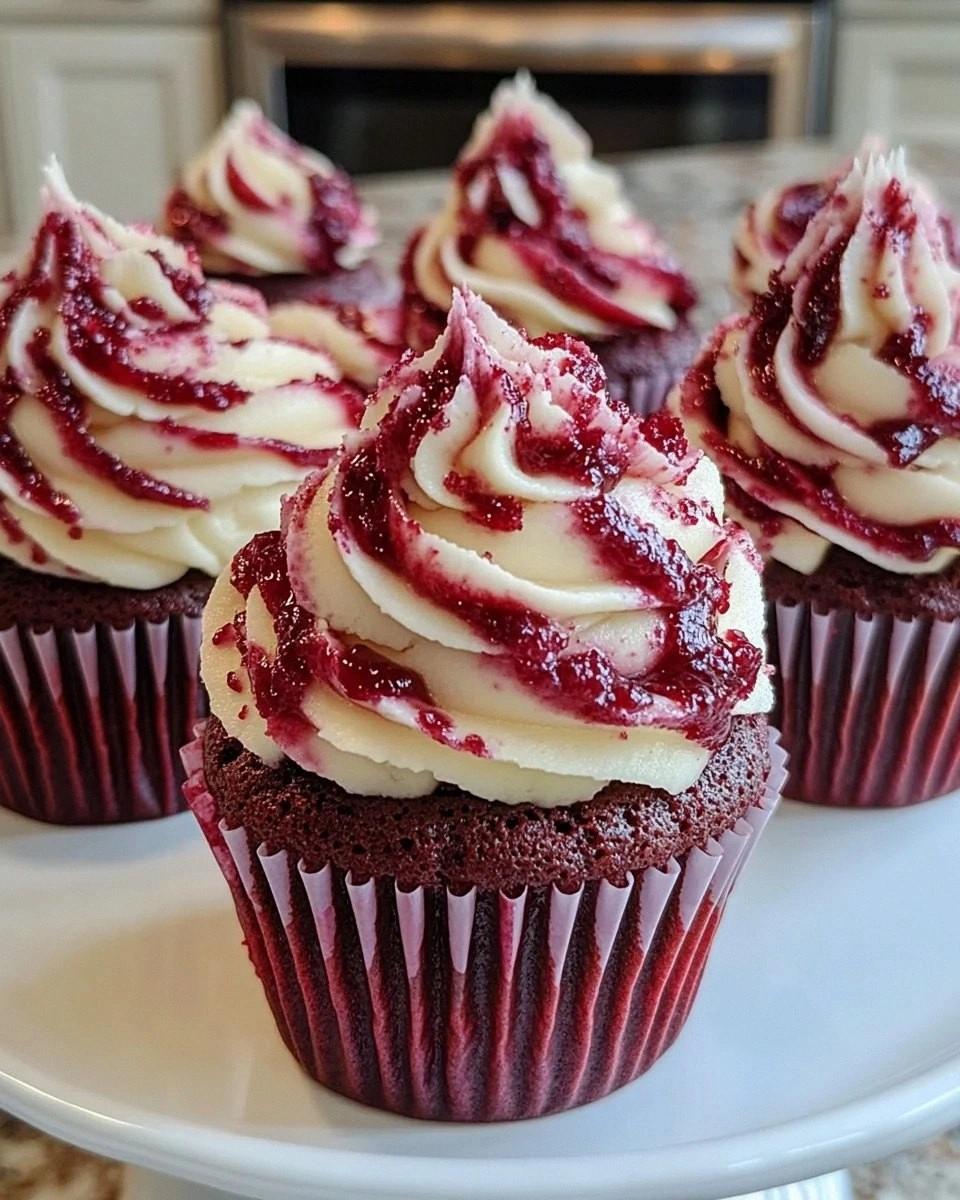
I’ll be honest — I ate half the batch before anyone else got a chance to try it. It all started on a rainy Thursday when my roommate dared me to bake something that could survive the apocalypse of bland desserts. I was armed with a half‑finished batch of plain cupcakes, a bottle of red food coloring that had been gathering dust, and a stubborn belief that I could turn a kitchen mishap into a masterpiece. The kitchen smelled like a mix of burnt sugar and hope, the timer ticked like a impatient drum, and my oven roared like a beast that demanded respect. I was terrified that the cupcakes would turn out as flat as a pancake, but the moment the batter hit the tin, a swirl of crimson and chocolate swirled together like a marble cake on a roller coaster.
Picture yourself pulling this out of the oven, the whole kitchen smelling incredible, the tops of the cupcakes puffed up like tiny clouds with a faint sheen of butter. The first bite is a revelation: the crumb is as soft as a sigh, the red velvet side carries that subtle cocoa‑kissed richness, and the marble pattern gives each bite a surprise of flavor contrast. The frosting? A tangy cream‑cheese cloud that cuts through the sweetness like a cool breeze on a hot day. This is hands down the best version you’ll ever make at home, and it doesn’t require a pastry chef’s degree—just a pinch of daring and a splash of confidence.
Most recipes get this completely wrong. They either over‑color the batter, turning it into a neon nightmare, or they forget the crucial acidity that makes the crumb tender and the color pop. Here’s what actually works: a perfect balance of cocoa and vanilla, a dash of vinegar that reacts with the baking soda for that signature fluff, and a secret ingredient that adds a silk‑smooth texture without making the cupcakes dense. I dare you to taste this and not go back for seconds, because once you’ve experienced the marble swirl, you’ll be haunted by the memory of ordinary cupcakes forever.
Okay, ready for the game‑changer? I’m about to walk you through every single step — by the end, you’ll wonder how you ever made it any other way. Stay with me here — this is worth it. Let’s dive into the magic that turns simple pantry staples into a show‑stopping dessert that will wow every guest who walks through your door.
What Makes This Version Stand Out
- Taste: The marriage of classic red‑velvet sweetness with a subtle cocoa bitterness creates a flavor duet that sings on the palate.
- Texture: A feather‑light crumb that melts in your mouth, thanks to the buttermilk‑vinegar reaction that lifts the batter.
- Simplicity: Only twelve ingredients, all pantry‑friendly, yet the result feels like it came from a five‑star bakery.
- Uniqueness: The marble swirl is achieved without any special tools—just a spoon and a little patience.
- Crowd Reaction: Guests often claim they’ve never seen cupcakes look so elegant, and they’ll ask for the recipe twice.
- Ingredient Quality: Using real cocoa powder and high‑quality cream cheese elevates the whole experience.
- Cooking Method: A moderate oven temperature ensures the tops stay moist while the edges develop a gentle crust.
- Make‑Ahead Potential: These cupcakes freeze beautifully, so you can bake them ahead of a party and simply thaw.
Inside the Ingredient List
The Flavor Base
All‑purpose flour is the canvas for our cupcake masterpiece. It provides structure while allowing the batter to expand during baking. If you swap it for cake flour, expect an even lighter crumb, but you’ll need to adjust the liquid slightly. Choose a flour that’s fresh—stale flour can give a metallic aftertaste.
Unsweetened cocoa powder is the dark side of this story. It adds depth without bitterness, creating that marble contrast you crave. Opt for Dutch‑process cocoa for a richer color and smoother flavor; natural cocoa will give a slightly more acidic bite.
Red food coloring is the visual hero. I recommend a gel version because it delivers intense color with less liquid, preserving the batter’s consistency. A pinch of beet powder can also be used for a natural hue, though the shade will be softer.
The Texture Crew
Buttermilk is the secret weapon that makes these cupcakes ultra‑tender. Its acidity reacts with baking soda to create tiny air pockets, giving the crumb that coveted “velvet” feel. If you don’t have buttermilk, you can make a quick substitute: one cup of milk plus one tablespoon of lemon juice, let it sit for five minutes.
Unsalted butter, softened, adds richness and helps the cupcakes rise evenly. Cream the butter with sugar until pale and fluffy; this incorporates air that contributes to the light texture. For a dairy‑free version, use a high‑quality plant‑based butter, but expect a slightly different mouthfeel.
Eggs act as emulsifiers, binding the fat and liquid together while also adding structure. Use room‑temperature eggs; cold eggs can cause the batter to seize, leading to a dense crumb.
The Unexpected Star
White vinegar may seem odd in a sweet treat, but its acidity is essential for the chemical reaction with baking soda. It also helps the red color stay vivid by adjusting the pH. A splash of apple cider vinegar works just as well if you prefer a milder flavor.
Vanilla extract provides that warm, aromatic backdrop that ties the flavors together. I love using Madagascar vanilla for its deep, creamy notes, but any pure vanilla will do.
The Final Flourish
Cream cheese frosting is the crowning glory. The tang of cream cheese balances the sweetness of the cupcakes, while the butter adds silkiness. Use full‑fat cream cheese for the best texture; low‑fat versions can become grainy.
Powdered sugar sweetens the frosting without adding grit, and a pinch of salt amplifies all the flavors. If you want a hint of citrus, add a teaspoon of orange zest to the frosting for an unexpected zing.
Everything's prepped? Good. Let's get into the real action…
The Method — Step by Step
Preheat your oven to 350°F (175°C) and line a 12‑cup muffin tin with parchment liners. While the oven heats, sift together the flour, cocoa powder, baking soda, and salt into a large bowl. This aerates the dry ingredients and ensures no lumps—trust me, a smooth batter is half the battle won.
Sifting also helps distribute the leavening agents evenly, which prevents those dreaded flat spots in the middle of the cupcakes.
In a separate bowl, cream the softened butter with the granulated sugar until the mixture turns pale and fluffy, about three minutes on medium speed. This is the moment where the batter starts to look like a cloud—if you stop here, you’ve already set yourself up for success.
Kitchen Hack: Add a pinch of cream of tartar to the butter‑sugar mix; it stabilizes the air bubbles and gives the cupcakes extra rise.Add the eggs one at a time, beating well after each addition. Then stir in the vanilla extract, red food coloring, and white vinegar. The batter should turn a deep, velvety crimson—if it looks pinkish, add a few more drops of gel coloring.
The vinegar will react with the baking soda later, creating that signature fluffy interior.
Alternate adding the dry mixture and the buttermilk to the butter‑egg blend, beginning and ending with the dry ingredients. Mix on low speed just until combined; over‑mixing will develop gluten and make the cupcakes tough.
At this point, the batter should be smooth and glossy, with a thick yet pourable consistency.
Divide the batter in half. To one half, fold in the cocoa powder until you achieve a dark chocolate hue. The other half stays the classic red‑velvet shade. This is where the marble magic begins.
Watch Out: If you over‑fold the chocolate batter, the swirl will disappear and you’ll end up with two separate layers.Spoon a tablespoon of the red batter into each liner, then add a tablespoon of the chocolate batter on top. Use a toothpick or a skewer to gently swirl the two colors together, creating a marble effect. I dare you to taste this and not go back for seconds; the visual is only half the fun.
Bake for 18‑22 minutes, or until a toothpick inserted into the center comes out clean with a few moist crumbs. The tops should be slightly domed and have a faint sheen. As they bake, the edges will start pulling away from the liner—this is your cue that they’re done.
Resist the urge to open the oven door too early; the sudden temperature drop can cause the cupcakes to collapse.
Allow the cupcakes to cool in the tin for five minutes, then transfer them to a wire rack to cool completely before frosting. While they cool, whip the cream cheese, butter, powdered sugar, vanilla, and a pinch of salt together until light and airy.
Kitchen Hack: Add a teaspoon of lemon zest to the frosting for a subtle brightness that cuts through the richness.Pipe or spread the frosting onto the cooled cupcakes. For an extra wow factor, drizzle a thin line of melted white chocolate over the top and use a toothpick to create a marbled swirl on the frosting itself.
That final visual cue is what makes guests pause, stare, and then dive in.
That's it — you did it. But hold on, I've got a few more tricks that'll take this to another level…
Insider Tricks for Flawless Results
The Temperature Rule Nobody Follows
Never bake cupcakes straight from a cold fridge. Let the batter sit at room temperature for five minutes before filling the liners. This tiny pause equalizes the batter temperature, ensuring an even rise and preventing a dense center. One friend tried skipping this step once — the cupcakes rose unevenly and looked like a lopsided hill.
Why Your Nose Knows Best
Instead of relying solely on a timer, trust your nose. When the cupcakes are done, they emit a sweet, buttery aroma that fills the kitchen. If you smell a faint caramel note, they’re likely ready. This sensory cue is more reliable than a minute or two on the clock.
The 5‑Minute Rest That Changes Everything
After removing the cupcakes from the oven, let them rest in the tin for exactly five minutes. This short rest lets the steam finish the cooking process gently, preventing a soggy bottom while keeping the crumb moist. Skipping this step often results in a cracked top.
Frosting Temperature Trick
For ultra‑smooth frosting, ensure both the cream cheese and butter are at the same temperature before mixing. If one is colder, the frosting will develop lumps. I keep them side‑by‑side on the counter for ten minutes to equalize.
The Final Chill
After frosting, refrigerate the cupcakes for fifteen minutes before serving. This firms up the frosting, making it easier to pipe clean swirls and preventing it from sliding off the sides. The chill also intensifies the flavor, allowing the tang of the cream cheese to shine.
Creative Twists and Variations
This recipe is a playground. Here are some of my favorite ways to switch things up:
Chocolate‑Espresso Marble
Add a tablespoon of instant espresso powder to the chocolate batter. The coffee deepens the cocoa flavor and adds a subtle bitterness that pairs beautifully with the sweet frosting.
Berry‑Infused Velvet
Fold in a quarter cup of fresh raspberry puree into the red batter. The fruit adds a bright note and a gorgeous pink hue that contrasts with the dark swirl.
Nutty Crunch
Stir in a half cup of finely chopped toasted pecans into the chocolate batter. The nuts give a pleasant crunch and a buttery undertone that elevates the marble effect.
White‑Chocolate Drizzle
Melt white chocolate and drizzle it over the frosted cupcakes just before serving. The glossy finish adds a sweet, creamy layer that makes the cupcakes look bakery‑ready.
Spiced Velvet
Add a pinch of ground cinnamon and a dash of nutmeg to the red batter. The warm spices give the cupcakes a cozy, holiday‑feel without overpowering the classic flavor.
Storing and Bringing It Back to Life
Fridge Storage
Place the frosted cupcakes in an airtight container and store them in the refrigerator for up to four days. The frosting stays firm, and the cupcakes retain moisture. Before serving, let them sit at room temperature for 20 minutes to soften the frosting.
Freezer Friendly
Unfrosted cupcakes freeze exceptionally well. Wrap each one tightly in plastic wrap, then place them in a zip‑top bag for up to three months. To serve, thaw overnight in the fridge, then frost fresh.
Best Reheating Method
For a warm, fresh‑out‑of‑the‑oven feel, microwave a single cupcake for 10‑12 seconds. Add a tiny splash of water to the plate before microwaving; the steam revives the crumb without drying it out.