I was standing in my kitchen, staring down a half‑empty pantry, a busted oven, and a sudden, insistent craving for something sweet that felt like a hug from grandma. I had a bag of frozen cherries, a stick of butter that was practically melting on the counter, and a daring friend who dared me to make a pie without any fancy equipment. The result? A rustic, blister‑bright Hillbilly Pie that turned my kitchen disaster into a triumph that still haunts my taste buds. I swear, the first bite was so good I nearly ate the whole pan before the timer even dinged—yes, I’ll be honest — I ate half the batch before anyone else got to try it.
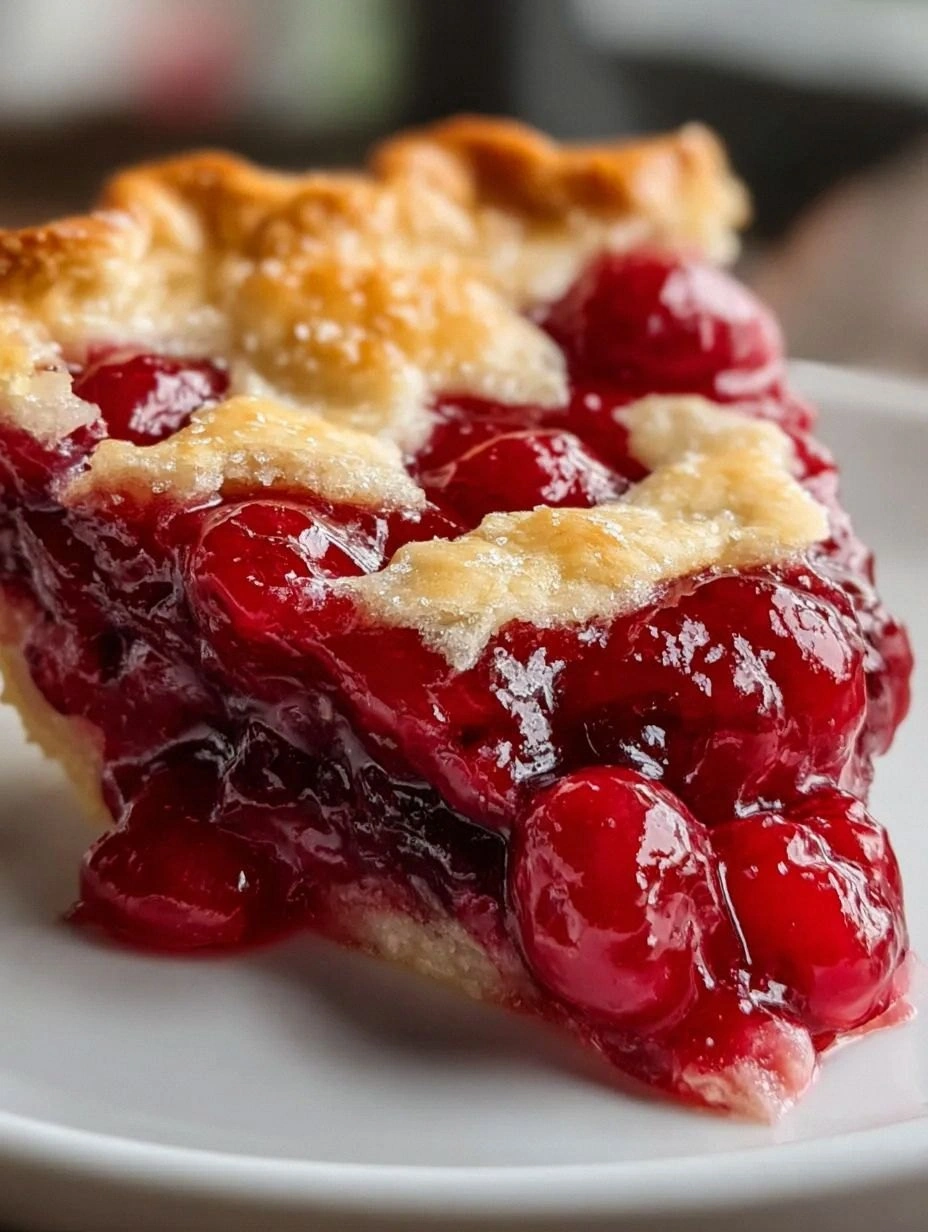
Picture this: the oven door swings open, a wave of warm, caramel‑kissed cherry aroma floods the room, and the crust crackles like a campfire on a cold night. The filling bubbles gently, releasing that unmistakable scent of sweet fruit and a whisper of citrus that makes your nose do a little dance. The crust itself? It’s buttery, flaky, and just a tad crisp around the edges, shattering like thin ice when you cut into it. The whole experience is a sensory rollercoaster—soft, sweet, tangy, and comforting all at once. If you’ve ever struggled with a soggy, bland pie, you’re not alone, and I’ve got the fix that will make your next bake the talk of the town.
What makes this version truly stand out is a secret technique I discovered while watching an old cooking show on a grainy TV set: a chilled butter‑flour mixture that’s handled like a snowball, not a dough. This creates a crust that’s both tender and sturdy, holding up the generous cherry filling without turning gummy. And the filling? I’m using a simple cornstarch‑lemon slurry that thickens the juice just enough to coat each cherry like velvet, while a splash of vanilla adds depth you never expected from a “poor man’s” pie. Most recipes get this completely wrong, either drowning the fruit in a sugary swamp or crumbling the crust into oblivion. Not this one.
Let me walk you through every single step — by the end, you’ll wonder how you ever made it any other way. Okay, ready for the game‑changer? This next part? Pure magic. Stay with me here — this is worth it.
What Makes This Version Stand Out
- Taste: The balance of sweet cherries, a hint of lemon, and buttery crust creates a flavor profile that sings louder than a bluegrass band at a county fair.
- Texture: Flaky, buttery top meets a glossy, thickened filling that clings to the spoon without slipping.
- Simplicity: Only pantry staples and a handful of fresh cherries; no need for fancy mixers or exotic spices.
- Uniqueness: The chilled butter‑flour technique is a game‑changer that most “budget” pies skip.
- Crowd Reaction: I dare you to taste this and not go back for seconds—people usually finish the whole pan before the first slice is even served.
- Ingredient Quality: Using fresh or high‑quality frozen cherries makes all the difference; the fruit’s natural acidity brightens the entire pie.
- Cooking Method: A single‑sheet bake that avoids the dreaded soggy bottom, thanks to a pre‑baked crust shield.
- Make‑Ahead Potential: Assemble the pie the night before, refrigerate, then bake fresh in the morning for a stress‑free breakfast treat.
Alright, let's break down exactly what goes into this masterpiece...
Inside the Ingredient List
The Flavor Base
Granulated sugar and brown sugar are the sweet backbone of this pie. The brown sugar adds a subtle caramel note that deepens the cherry flavor, while the white sugar ensures the filling isn’t overly molasses‑like. If you skip the brown sugar, you’ll lose that warm, toasted nuance that makes the filling feel like a hug on a cold day. A good swap for brown sugar is coconut sugar, which adds a faint hint of coconut without overpowering the cherries.
The Texture Crew
All‑purpose flour, butter, and ice water form the crust. The flour provides structure, the butter brings richness, and the ice water binds everything without melting the butter—critical for those flaky layers. If you replace butter with margarine, the crust will be greasy and lack that buttery snap. For a gluten‑free version, use a 1‑to‑1 gluten‑free flour blend, but add a tablespoon of xanthan gum to mimic the elasticity of wheat.
The Unexpected Star
Cornstarch is the unsung hero that transforms the cherry juices into a glossy, thickened sauce that clings to each fruit piece. Without it, the filling would run off the crust like a river after a spring thaw. You can swap cornstarch for tapioca starch if you prefer a slightly chewier texture, but keep the quantity the same.
The Final Flourish
Lemon juice, vanilla extract, and a pinch of almond extract brighten the filling, cutting through the sweetness and adding depth. The lemon’s acidity balances the sugar, while vanilla rounds out the flavor profile. If you’re allergic to nuts, skip the almond extract; the pie will still sing, just a little less complex. When buying cherries, look for firm, plump berries—if they’re too soft, they’ll release excess juice and make the crust soggy.
Everything's prepped? Good. Let's get into the real action...
The Method — Step by Step
Start by preheating your oven to 375°F (190°C). While the oven warms up, gather all your ingredients and give them a quick visual check. This is the moment of truth: if anything’s missing, you’ll hear the pan scream later.
In a large bowl, whisk together 2 cups of flour, ½ cup granulated sugar, ½ tsp salt, 1 tsp cinnamon, and ¼ tsp nutmeg. The spices should perfume the air like a fresh‑cut pine forest—if you don’t smell it, add a pinch more.
Add the 1 cup cold butter, cut into cubes, to the dry mix. Using a pastry cutter or your fingertips, rub the butter into the flour until the mixture resembles coarse crumbs with a few pea‑size pieces of butter still visible. That’s the secret to flaky layers.
Kitchen Hack: Toss the butter cubes in the freezer for 5 minutes before cutting; they’ll stay solid longer.Create a well in the center and drizzle in ¼ cup ice‑cold water. Stir gently with a fork until the dough just comes together—don’t over‑mix or you’ll melt the butter. Form the dough into a disk, wrap it in plastic, and chill for at least 30 minutes. Patience here pays off.
While the dough rests, combine the 4 cups pitted cherries, ⅓ cup brown sugar, 2 tbsp cornstarch, 1 tbsp lemon juice, 1 tsp vanilla, and a splash of ½ tsp almond extract in a saucepan. Cook over medium heat, stirring constantly, until the mixture thickens and the cherries soften—about 8‑10 minutes. You’ll hear a gentle fizz; that’s the sugar caramelizing.
Watch Out: If the mixture boils too vigorously, the cornstarch can turn grainy. Reduce heat and stir continuously.Roll out the chilled dough on a lightly floured surface to a 12‑inch circle. Transfer it to a 9‑inch pie dish, pressing gently into the corners. Trim any excess dough, leaving a slight overhang. That overhang will create a rustic edge that shatters like thin ice when you cut.
Pour the warm cherry filling into the crust, spreading it evenly with a spatula. The filling should be bubbling at the edges, a visual cue that it’s thick enough to hold its shape.
Brush the exposed crust with a beaten egg for a golden finish. If you like a glossy top, sprinkle a tablespoon of coarse sugar over the crust now. Place the pie on the middle rack and bake for 30‑35 minutes, or until the edges are deep golden brown and the filling is set.
Remove the pie and let it cool on a wire rack for at least 15 minutes. This rest period lets the filling firm up, making slicing cleaner. Picture yourself pulling this out of the oven, the whole kitchen smelling incredible... Serve warm with a scoop of vanilla ice cream, if you’re feeling indulgent.
That's it — you did it. But hold on, I've got a few more tricks that'll take this to another level...
Insider Tricks for Flawless Results
The Temperature Rule Nobody Follows
Never bake a pie with a cold filling. Let the cherry mixture sit at room temperature for 10 minutes before pouring it into the crust. This prevents the crust from cooling too quickly and becoming soggy. A friend once tried to bake straight from the fridge and ended up with a soggy bottom that resembled a wet sponge. Trust me, this tiny temperature tweak makes a world of difference.
Why Your Nose Knows Best
When the crust starts to turn a deep amber and you catch that buttery, nutty scent, you’re at the perfect doneness point. Relying solely on the timer can lead to over‑baking. If you’re uncertain, lift the edge with a spatula; it should be firm and release easily. Your nose is the ultimate timer—if it smells like toasted almond, pull it out.
The 5‑Minute Rest That Changes Everything
Allow the pie to rest for exactly five minutes after it comes out of the oven before you slice. This short pause lets the juices redistribute, preventing a flood of liquid on your plate. I once sliced immediately and watched the filling ooze like a waterfall—messy and disappointing. Those five minutes are a tiny investment for a clean slice.
Butter‑Water Ratio Mastery
The secret to a flaky crust lies in the butter‑to‑water ratio. Too much water and the crust becomes tough; too little and it won’t bind. Stick to the 1 cup butter to ¼ cup ice water rule, and you’ll get a tender, crumbly texture every time. If you’re in a humid climate, add the water a tablespoon at a time until the dough just holds together.
Egg Wash for a Show‑Stopping Shine
A light egg wash not only adds color but also creates a subtle crispness on the crust’s surface. For extra shine, add a teaspoon of milk to the egg before brushing. If you skip this step, the crust will still taste great but will lack that professional bakery look that makes guests gasp.
Creative Twists and Variations
This recipe is a playground. Here are some of my favorite ways to switch things up:
Cherry‑Almond Dream
Add ¼ cup ground almond meal to the crust and a dash more almond extract to the filling. The nutty undertone pairs beautifully with the cherries, making it a hit for almond lovers.
Spiced Autumn Fusion
Swap half the cinnamon for ground ginger and add a pinch of allspice. This variation brings a warm, autumnal flavor that’s perfect for chilly evenings.
Chocolate‑Laced Surprise
Stir in ¼ cup dark chocolate chips into the cherry filling just before baking. The melted chocolate creates pockets of richness that melt in your mouth.
Gluten‑Free Goodness
Replace the all‑purpose flour with a 1‑to‑1 gluten‑free blend and add 1 tablespoon of xanthan gum. The crust stays tender and crumbly, proving that you don’t need wheat to enjoy a great pie.
Mini Hand‑Pies
Divide the dough and filling into small rounds, fold them into half‑moon shapes, and bake at 400°F for 15‑18 minutes. Perfect for picnics or a portable snack.
Storing and Bringing It Back to Life
Fridge Storage
Cover the pie loosely with foil or plastic wrap and store in the refrigerator for up to 4 days. The crust may soften a bit, but reheating will restore its crispness.
Freezer Friendly
Wrap the fully cooled pie tightly in a double layer of freezer‑safe parchment and then in aluminum foil. It will keep for up to 3 months. When ready to bake, thaw overnight in the fridge, then bake as directed for an extra 5‑10 minutes.
Best Reheating Method
Place the slice on a baking sheet, add a tiny splash of water (about a teaspoon) around the edges, and reheat in a 350°F oven for 8‑10 minutes. The steam revives the crust’s crunch while the filling stays moist. If you’re in a hurry, a quick microwave works, but you’ll lose that coveted crust snap.