I was standing in my kitchen, mid‑midnight, surrounded by half‑crushed cookie jars and a stubbornly stubborn cheesecake that refused to set. The air was thick with the sweet, caramel‑like perfume of cookie butter, and I could hear the faint hum of the refrigerator like a lazy drumbeat. My roommate had dared me to create a dessert that could survive a binge‑watch marathon, and I was determined to prove that no‑bake could be just as dramatic as a flambé. After a disastrous attempt that left my first batch looking like a soggy sandcastle, I went back to the drawing board, tweaked the ratios, and discovered a secret that turned everything from “meh” to “mind‑blowing.”
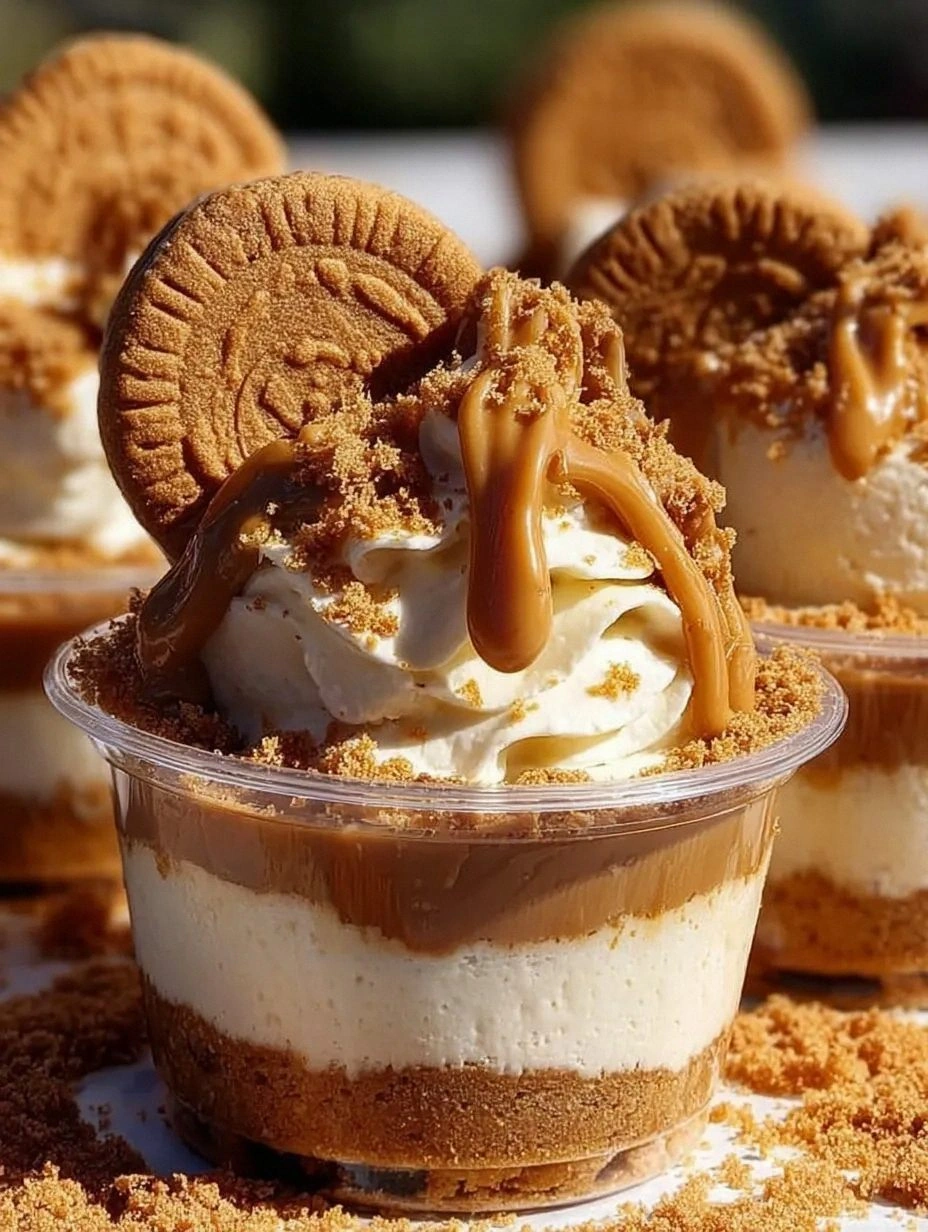
Picture this: a silky, buttery cheesecake that slides off the spoon like a velvet curtain, perched in a crisp cookie‑crusted cup that shatters with a gentle tap, releasing a fragrant wave of speculoos that makes your taste buds do a little jig. The texture is a perfect duet of creamy and crunchy, the flavor a harmonious blend of caramelized biscuits and tangy cream cheese, and the whole thing is so simple you could whip it up while your favorite show is still on. I dare you to taste this and not go back for seconds – the first bite is a revelation, the second is a confession that you’ll be dreaming about it for weeks. Most recipes get this completely wrong; they either over‑sweeten or end up with a soggy base. Here’s what actually works.
What sets this version apart is a tiny but mighty trick: I fold in a splash of heavy cream that stabilizes the filling without any gelatin, and I use a double‑layer crust that gives you that satisfying crunch without crumbling apart. The secret ingredient, a generous dollop of authentic Dutch cookie butter, brings a depth of flavor you’ll swear was forged in a secret bakery. And the best part? You don’t need an oven, a fancy mixer, or a culinary degree – just a few everyday tools and a willingness to trust the process. I’ll be honest — I ate half the batch before anyone else got to try it, and that’s the only crime I’m willing to admit.
Okay, ready for the game‑changer? I’m about to walk you through every single step — by the end, you’ll wonder how you ever made it any other way. Stay with me here — this is worth it. The technique I’m about to reveal will make your kitchen smell like a cozy bakery, and you’ll have a batch of dessert cups that could win any potluck. Let’s dive in and make this the ultimate no‑bake dessert you’ll crave forever.
What Makes This Version Stand Out
- Flavor Explosion: The combination of cookie butter and cream cheese creates a caramel‑rich, tangy profile that’s more complex than a simple cheesecake.
- Texture Symphony: A crunchy, buttery crust meets a silky, melt‑in‑your‑mouth filling, delivering contrast in every bite.
- Simplicity Redefined: No oven, no gelatin, no fancy equipment – just a bowl, a whisk, and a few minutes of your time.
- Unique Twist: The double‑layer crust (crumbs + butter, then a thin glaze of melted chocolate) adds a surprise snap that most no‑bake recipes lack.
- Crowd‑Pleaser Factor: Even the pickiest eaters can’t resist the familiar cookie butter flavor wrapped in a sophisticated dessert format.
- Ingredient Quality: Using authentic speculoos spread (the Dutch original) makes the difference between “good” and “legendary.”
- Make‑Ahead Magic: These cups set in the fridge, so you can prepare them a day ahead and still serve them fresh.
- Portion Control: Individual cups mean no slicing drama and perfect serving sizes for any gathering.
Inside the Ingredient List
The Flavor Base
Cookie butter is the star of the show – a spiced, caramel‑laden spread made from ground speculoos biscuits. Its deep, buttery notes give the cheesecake a richness that plain sugar can’t match, and the subtle hints of cinnamon and nutmeg add a warm, comforting backdrop. If you skip it, you’ll end up with a bland, one‑dimensional filling that feels like a plain yogurt dip. A good swap is a homemade speculoos spread (blend toasted gingerbread crumbs with butter and brown sugar), but the store‑bought version saves time and guarantees consistency.
Cream cheese brings the tang that cuts through the sweetness, balancing the dessert so it never feels cloying. Using full‑fat cream cheese ensures a velvety mouthfeel; low‑fat versions become grainy and lose that luxurious melt‑in‑the‑mouth quality. If you’re out of cream cheese, try a blend of ricotta and Greek yogurt – it works, but the texture will be slightly lighter.
The Texture Crew
Crushed speculoos cookies (or graham crackers) form the crunchy foundation. They provide a buttery, slightly sweet crunch that contrasts the creamy filling. When you toast them lightly before crushing, you’ll notice a deeper caramel aroma that elevates the entire cup. If you’re gluten‑free, substitute with almond flour mixed with a touch of coconut sugar for a similar crumbly texture.
Melted butter is the binding agent for the crust. It melts the crumbs together, creating a firm base that won’t crumble when you lift the cup. Too much butter makes the crust soggy; too little leaves gaps. A good tip is to melt the butter just until it’s shimmering, then let it cool for a minute before mixing with the crumbs.
The Unexpected Star
Heavy cream is the secret weapon that stabilizes the filling without any gelatin. When whipped to soft peaks and folded in, it lightens the mixture, giving it an airy lift while keeping it firm enough to hold its shape. Skipping the cream makes the cheesecake dense and heavy, like a brick. If you’re dairy‑free, try coconut cream – it adds a subtle tropical note that pairs surprisingly well with the spiced cookie butter.
The Final Flourish
A drizzle of dark chocolate or caramel on top adds visual appeal and an extra flavor layer that makes the dessert feel indulgent. The chocolate’s bitterness cuts through the sweetness, while caramel adds a gooey, buttery finish. If you’re watching sugar, you can skip the drizzle or use a sugar‑free chocolate coating.
Everything's prepped? Good. Let’s get into the real action…
The Method — Step by Step
Start by crushing the speculoos cookies into fine crumbs. You can use a food processor or place them in a zip‑top bag and smash with a rolling pin. The crumbs should be fine enough to cling together when mixed with butter, but still retain a tiny grain for texture. Once crushed, set them aside in a large mixing bowl.
Melt the butter in a small saucepan over low heat until it’s just shimmering. Immediately pour the melted butter over the cookie crumbs and stir with a spatula until every particle is glossy and evenly coated. This is the moment of truth – the mixture should clump together when pressed with your fingers.
Kitchen Hack: For a perfectly smooth crust, press the crumb‑butter mixture into the cups using the back of a chilled metal spoon; the cold metal helps the butter set faster.Divide the crust evenly among your serving cups – I use four 4‑oz ramekins for a single‑serve portion. Press the crust down firmly, creating a shallow well that will hold the filling. Make sure the edges are slightly higher than the center; this prevents the cheesecake from spilling over later.
Now, for the filling: In a large bowl, beat the softened cream cheese with an electric mixer on medium speed until it’s smooth and free of lumps. Add the cookie butter and continue beating until the mixture is glossy and fully incorporated. The aroma at this stage is intoxicating – you’ll hear the faint “whoosh” as the butter emulsifies with the cheese.
Watch Out: Over‑mixing can incorporate too much air, causing the cheesecake to crack when chilled. Stop as soon as the mixture looks silky and uniform.In a separate bowl, whip the heavy cream with powdered sugar and vanilla until soft peaks form. This takes about 2‑3 minutes on high speed; you’ll see the cream thicken and hold its shape when the whisk is lifted. Gently fold the whipped cream into the cheese‑butter mixture, using a rubber spatula and a gentle folding motion to keep the airy texture intact.
Kitchen Hack: If the mixture looks too loose, chill the bowl for 5 minutes before folding – the cold surface helps the filling firm up faster.Spoon the filling over the crusts, smoothing the tops with the back of a spoon or a small offset spatula. Each cup should be filled to within a half‑inch of the rim, leaving room for the optional drizzle. At this point, the filling should be thick enough to hold its shape without wobbling.
Cover each cup with plastic wrap and refrigerate for at least 2 hours, or up to overnight. The chill allows the butter in the crust to solidify and the cheesecake to set, creating that perfect slice‑through texture. When you’re ready to serve, the cups should feel firm to the touch but still melt on the tongue.
Just before serving, melt the dark chocolate (or caramel) in a microwave in 20‑second bursts, stirring between each burst until smooth. Drizzle a thin line over each cup in a decorative zig‑zag or spiral. The glossy finish not only looks stunning but adds a final flavor punch that ties the whole dessert together.
Serve the cups chilled, optionally garnished with a pinch of sea salt or a few crushed cookie crumbs for extra crunch. That first bite should be a perfect harmony of buttery crust, creamy filling, and a whisper of chocolate that lingers. And now the fun part – watch your guests go back for seconds, then thirds, then maybe the whole batch.
That's it — you did it. But hold on, I've got a few more tricks that'll take this to another level…
Insider Tricks for Flawless Results
The Temperature Rule Nobody Follows
Never use cold butter straight from the fridge when making the crust. Warm, melted butter coats the crumbs uniformly, preventing dry pockets. If you accidentally use cold butter, give it a quick 10‑second microwave blast – just enough to melt without browning. This simple temperature tweak ensures a crust that’s both crisp and cohesive.
Why Your Nose Knows Best
When the butter‑crumb mixture is warm, you’ll notice a faint toasty scent; that’s your cue that the crust is ready to set. If the scent is faint or non‑existent, the butter may be under‑melted, leading to a crumbly base. Trust your nose more than the clock – a quick sniff can save you from a disastrous texture.
The 5‑Minute Rest That Changes Everything
After folding the whipped cream into the cheese mixture, let the bowl sit for five minutes before spooning into the cups. This short rest lets the air bubbles rise to the surface, resulting in a smoother, denser filling that won’t weep during refrigeration. I once skipped this step and ended up with a watery top layer – lesson learned.
Chocolate Drizzle Precision
Use a small pastry bag or a squeeze bottle for the chocolate drizzle. A thin, controlled line prevents the chocolate from pooling, which would otherwise drown the delicate flavor of the cookie butter. If you don’t have a bag, a zip‑top bag with a tiny corner cut off works just as well.
The Freeze‑Thaw Flip
If you need to make these ahead for a party, freeze the cups for up to a week, then thaw them in the fridge for 4‑6 hours before serving. The thawed cups retain their texture better than a simple fridge‑only storage, because the slow freeze forms tiny ice crystals that melt evenly, preserving the creamy consistency.
Creative Twists and Variations
This recipe is a playground. Here are some of my favorite ways to switch things up:
Espresso Infusion
Add a tablespoon of finely ground espresso to the cookie butter before mixing with the cream cheese. The coffee’s bitter notes contrast the sweet butter, creating a sophisticated mocha‑like flavor that’s perfect for brunch.
Nutty Crunch
Stir in a quarter cup of toasted chopped hazelnuts or almonds into the crust for an added crunch. The nuts echo the speculoos spice profile and give each bite a satisfying snap.
Berry Burst
Top each cup with a spoonful of raspberry or strawberry coulis just before serving. The bright acidity cuts through the richness, making the dessert feel lighter and more balanced.
Vegan Delight
Swap the cream cheese for a vegan cream cheese alternative, use coconut cream instead of heavy cream, and choose a plant‑based cookie butter. The result is a dairy‑free version that still delivers that iconic flavor.
Caramel Swirl
Drizzle a thick caramel sauce into the filling before it sets, then use a skewer to create a marble effect. The caramel ribbons add a buttery sweetness that pairs beautifully with the spice‑laden base.
Storing and Bringing It Back to Life
Fridge Storage
Cover the cups tightly with plastic wrap and store them in the refrigerator for up to 4 days. The cool environment keeps the crust crisp and the filling firm. If you notice condensation, gently pat the tops with a paper towel before serving to avoid a soggy surface.
Freezer Friendly
Place the cups in a single layer on a baking sheet, flash‑freeze for 30 minutes, then transfer to an airtight freezer bag. They’ll keep for up to 2 months. When you’re ready to enjoy them, move the cups to the fridge to thaw slowly for 4‑6 hours – this prevents the filling from separating.
Best Reheating Method
If you prefer a slightly warm dessert, pop the cup in a preheated oven at 150°C (300°F) for 5‑7 minutes, just until the edges soften. Add a tiny splash of water to the ramekin before warming; the steam will revive the creamy texture without melting the crust.