I still remember the day I ruined my grandmother's antique mixing bowl with a batch of brownies so dry they could double as hockey pucks. The shame of watching my friends politely nibble around the edges while pretending to enjoy them still haunts me. That culinary catastrophe sent me on a three-year quest to create the perfect brownie — one that would make grown adults weep with joy and beg for the recipe. After countless failed experiments, one too many espresso shots, and a moment of pure desperation at 2 AM, I finally cracked the code.
Picture this: your kitchen fills with the intoxicating aroma of dark chocolate melting into butter, while a whisper of espresso dances through the air like a secret promise. The batter comes together in a glossy swirl that looks almost too beautiful to bake. These aren't your average cakey brownies that crumble disappointingly in your mouth. No, these are the kind of fudgy espresso brownie bites that make you close your eyes involuntarily when you taste them, the kind that creates that perfect crackly top that shatters like thin ice under your fork, revealing a molten chocolate center that's so intensely rich, so devastatingly chocolatey, that you'll swear off box mixes forever.
Here's the kicker — most brownie recipes get the espresso part completely wrong. They either add too much and end up tasting like a coffee shop floor, or too little and you wonder why they bothered at all. The secret lies in treating espresso like salt: it's there to amplify the chocolate, not announce itself with trumpets. When done right, it creates this mysterious depth that makes people ask, "What's that incredible flavor I can't quite place?"
Let me walk you through every single step — by the end, you'll wonder how you ever made it any other way.
What Makes This Version Stand Out
Ultra-Fudgy Texture: We're using a higher fat-to-flour ratio than 99% of recipes out there, plus we're underbaking them just enough to achieve that coveted gooey center. The edges set while the middle stays lusciously soft, creating that perfect textural contrast that'll make you weak in the knees.
Espresso Without the Jitters: Just enough espresso powder to make the chocolate sing, but not so much that you'll be buzzing until sunrise. It's like adding a whisper of coffee to your chocolate's ear, telling it to be the best version of itself.
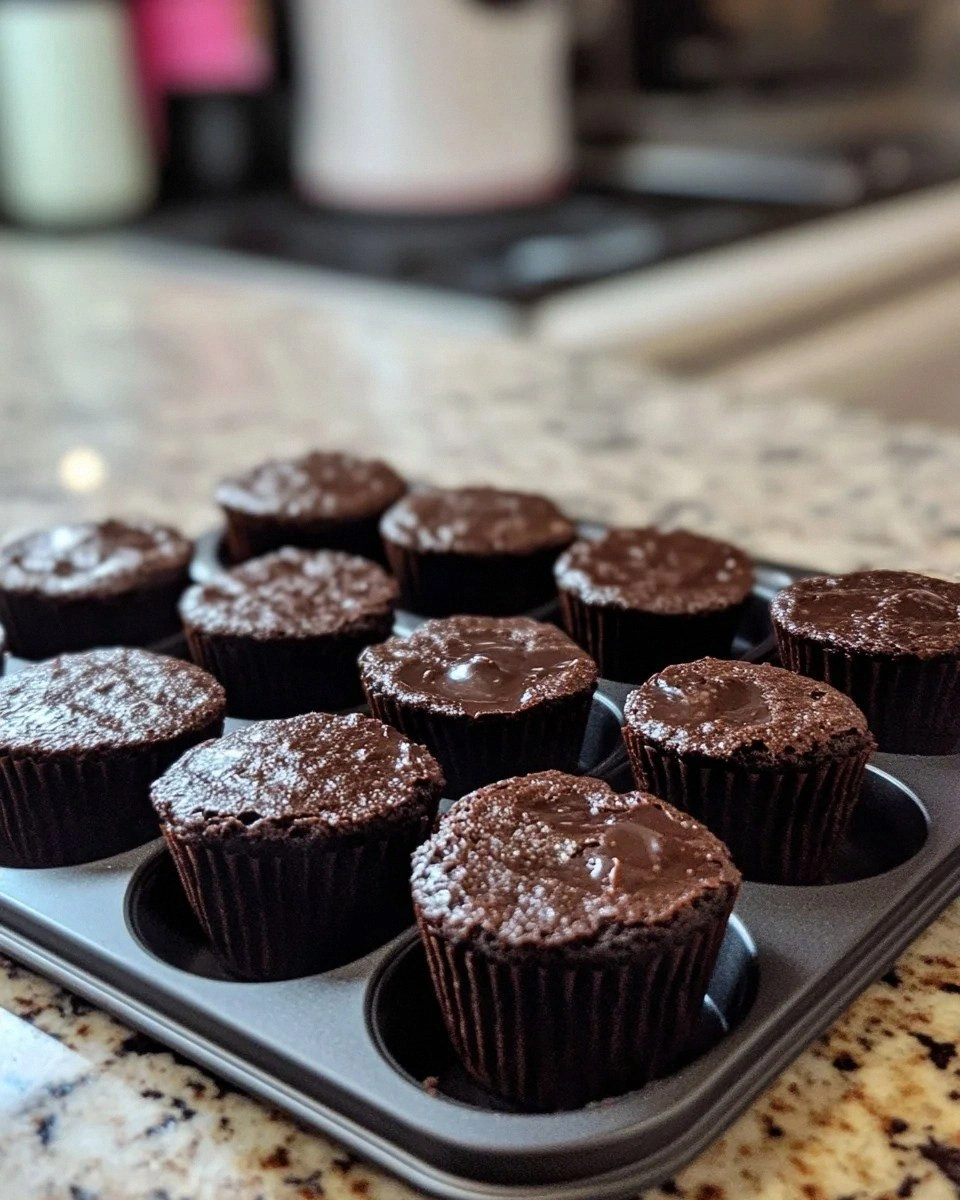
Bite-Sized Perfection: By making them in mini muffin tins, every piece gets those coveted crispy edges while maintaining a fudgy center. Plus, portion control becomes dangerously easy — or not, because you'll definitely eat six without blinking.
One-Bowl Wonder: Everything comes together in a single bowl, which means fewer dishes and more time for the important things in life, like eating warm brownie bites straight from the pan while nobody's watching.
Crowd Psychology: There's something about miniature desserts that makes people lose their minds. Serve these at a party and watch grown adults transform into competitive children fighting over the last bite. I've seen it happen, and it's glorious.
Make-Ahead Magic: These actually taste better the next day, once the flavors have had time to meld and mature. If you can resist eating them all immediately, you're rewarded with an even more complex flavor profile.
Quality Ingredients Rule: We're using real butter, good chocolate, and pure vanilla extract. No shortcuts, no margarine, no imitation vanilla. Your taste buds will throw a parade in your honor.
Alright, let's break down exactly what goes into this masterpiece...
Inside the Ingredient List
The Flavor Base
The chocolate you choose here is make-or-break territory. I'm talking about the kind that makes you weak in the knees when you smell it — we're using 70% dark chocolate as our foundation because it strikes that perfect balance between sweet and sophisticated. The higher cocoa content gives us that deep, complex flavor that cheap chocolate could never achieve, while the remaining 30% sugar ensures our brownies won't taste like bitter disappointment.
Unsalted butter isn't just a suggestion — it's the law in my kitchen. Salted butter varies wildly in sodium content between brands, and that unpredictability can turn your perfect brownies into a salty mess. Plus, using unsalted butter lets us control the salt levels with precision. The fat in butter coats the flour proteins, limiting gluten development and ensuring our brownies stay tender instead of turning into chocolate-flavored bricks.
Instant espresso powder is our secret weapon here, and I'm not talking about that instant coffee that's been sitting in your pantry since 2015. Good espresso powder dissolves completely into the batter, amplifying the chocolate's natural complexity without adding a distinct coffee flavor. It's like hiring a really good publicist for your chocolate — suddenly everyone notices how amazing it is, but nobody can figure out why.
The Texture Crew
Eggs do triple duty in these brownies — they provide structure, richness, and that gorgeous shiny top crust. We're using cold eggs straight from the fridge because they create a thicker batter that rises higher and sets with that perfect crinkly surface. The proteins in eggs coagulate during baking, giving our brownies just enough structure to hold together while staying fudgy instead of cakey.
Granulated sugar isn't just about sweetness — it's about moisture retention and that perfect crackly top. The sugar dissolves into the butter and chocolate mixture, creating a syrup that keeps our brownies moist for days. During baking, some of that sugar rises to the surface and crystallizes, forming that coveted paper-thin crust that shatters delightfully under your teeth.
All-purpose flour provides just enough structure to prevent our brownies from turning into chocolate soup. We're using less than you'd expect because we're going for fudgy, not cakey. The proteins in flour form a network when hydrated, but we're keeping it minimal so our brownies stay dense and rich instead of light and fluffy.
The Unexpected Star
Dark brown sugar is my secret ingredient that takes these brownies from excellent to legendary. The molasses in brown sugar adds a subtle caramel note and extra moisture that makes these brownies incredibly tender. It also reacts with the baking soda to create tiny air pockets, giving us that perfect texture that's neither too dense nor too light.
Cornstarch might seem like an odd addition, but it's our insurance policy against tough brownies. Just a tablespoon interferes with gluten formation, ensuring our brownies stay tender and almost custardy in the center. It's like adding a bodyguard for your texture — nobody's getting tough on its watch.
The Final Flourish
Pure vanilla extract rounds out all the flavors and adds that warm, aromatic note that makes everything taste more expensive. Skip the imitation stuff — it has a chemical aftertaste that'll ruin all your hard work. Good vanilla should smell like a warm hug from someone you love, not like a scented candle from the dollar store.
Sea salt is the final touch that makes all the other flavors pop. Salt enhances sweetness and brings out the complexity in chocolate, but we're adding just enough to do the job without making our brownies taste salty. Think of it as the conductor in an orchestra — you don't notice it when it's there, but everything falls apart without it.
Everything's prepped? Good. Let's get into the real action...
The Method — Step by Step
- Preheat your oven to 350°F (175°C) and position the rack in the center. This isn't the time to get creative with oven placement — center rack ensures even heat distribution so your brownies bake evenly instead of ending up with burnt edges and raw centers. Line your mini muffin tin with paper liners, or if you're feeling rebellious, grease them well with butter and dust with cocoa powder for that professional bakery look.
- Create a double boiler by setting a heatproof bowl over a pan of simmering water, making sure the bowl doesn't touch the water. Add your butter and dark chocolate, stirring occasionally until melted and smooth. This gentle melting method prevents the chocolate from seizing up and becoming grainy. The mixture should look glossy and irresistible, like liquid velvet. Remove from heat and let it cool slightly — we're not looking to scramble our eggs here.
- Whisk in both sugars until completely combined. The mixture will thicken and become almost fudge-like — this is exactly what we want. The sugars need time to dissolve partially, creating that perfect shiny crust later. Don't rush this step; good things come to those who whisk. You'll know it's ready when you can no longer feel sugar granules between your fingers.
- Add your eggs one at a time, whisking vigorously after each addition. This is where the magic happens — the eggs emulsify with the chocolate mixture, creating a thick, glossy batter that coats the back of a spoon. Cold eggs help create that perfect crackly top, so don't be tempted to use room temperature ones here. The batter should look like the most luxurious chocolate pudding you've ever seen.
- Sift in the flour, cornstarch, espresso powder, and salt all at once. Switch to a spatula and fold gently until just combined. Overmixing develops gluten and gives you tough brownies — we're going for tender and fudgy, not bread-like. The batter should be thick and almost mousse-like, with no dry pockets of flour lurking around. Stop as soon as you don't see any flour streaks.
- Fold in any mix-ins if you're feeling fancy — chocolate chips, chopped nuts, or even a swirl of caramel. But honestly, these brownies are so perfect on their own that additions might be gilding the lily. If you do add extras, keep it minimal — we want the chocolate to be the star of this show, not a supporting actor.
- Divide the batter among your mini muffin cups, filling each about three-quarters full. This gives them room to rise without overflowing and creating a mess that'll have you cursing my name later. The batter should mound slightly above the rim — they'll settle as they bake. If you have leftover batter, grab a spoon and consider it the baker's prerogative.
- Bake for 12-15 minutes, until the edges look set but the centers still jiggle slightly when you shake the pan. This is crucial — overbaking is the enemy of fudgy brownies. They'll continue cooking from residual heat after you pull them out, so err on the side of underdone. The tops should be glossy and slightly cracked, like a beautiful mosaic of chocolate.
That's it — you did it. But hold on, I've got a few more tricks that'll take this to another level...
Insider Tricks for Flawless Results
The Temperature Rule Nobody Follows
Here's the thing about brownie baking — temperature matters more than your oven dial suggests. Most ovens run hot or cold by up to 25 degrees, which can be the difference between fudgy perfection and chocolate-flavored cardboard. Invest in an oven thermometer and calibrate your oven properly. Your brownies will thank you, and so will everyone who gets to eat them. Also, let your brownies cool completely in the pan before attempting to remove them. I know it's torture, but warm brownies are fragile and will fall apart on you.
Why Your Nose Knows Best
Your sense of smell is your secret weapon in the kitchen. When these brownies are perfectly baked, your kitchen will fill with an intense chocolate aroma that's almost intoxicating. If you can smell them from the living room, they're probably done. If the smell is still faint, give them another minute or two. This might sound like kitchen voodoo, but trust me — your nose knows more than you think it does.
The 5-Minute Rest That Changes Everything
Here's a pro move that separates good brownies from legendary ones: after pulling them from the oven, let them rest for exactly 5 minutes, then run a thin knife around the edges. This prevents them from sticking as they cool and contract slightly. But here's the kicker — place the entire pan on a wire rack and let them cool for at least 30 minutes before eating. The centers will continue to set while staying fudgy, and the flavors will develop more complexity. I know waiting is cruel, but your patience will be rewarded with brownie nirvana.
The Storage Secret
Here's where most people mess up — they throw their brownies in any old container and wonder why they go stale overnight. Store these beauties in an airtight container with a slice of bread. The bread will dry out first, keeping your brownies perfectly moist for up to 5 days. Replace the bread slice every couple of days. It's like having a personal brownie bodyguard working 24/7 to keep them fresh.
Creative Twists and Variations
This recipe is a playground. Here are some of my favorite ways to switch things up:
Salted Caramel Swirl
Drizzle homemade caramel over the batter before baking, then sprinkle with flaky sea salt. The sweet-salty combination creates an addiction that's almost dangerous. Swirl gently with a toothpick for that marbled effect that looks like it came from a fancy bakery. The caramel sinks slightly as it bakes, creating little pockets of gooey sweetness throughout.
Mint Chocolate Madness
Add 1/2 teaspoon of peppermint extract to the batter and fold in some chopped Andes mints. The cool mint flavor pairs beautifully with the rich chocolate and subtle espresso notes. Top with a dusting of powdered sugar for that winter wonderland vibe. These disappear faster than snowflakes in July at holiday parties.
Peanut Butter Explosion
Drop small dollops of peanut butter on top of each brownie bite before baking, then swirl with a toothpick. The peanut butter creates these beautiful ribbons and adds a nutty richness that complements the chocolate perfectly. Use natural peanut butter for the best flavor and texture.
Orange Zest Zing
Add the zest of one orange to the batter along with a tablespoon of orange liqueur. The citrus brightens up the dense chocolate and adds a sophisticated note that makes people ask for your secret ingredient. It's like chocolate and orange were destined to be together in these little bites of heaven.
Coconut Dream
Fold in 1/2 cup of toasted coconut flakes and add a teaspoon of coconut extract. The tropical notes create an unexpected but delightful contrast to the rich chocolate. Top with a coconut flake for garnish so people know what flavor adventure they're about to embark on.
Double Chocolate Decadence
Add a mix of white, milk, and dark chocolate chunks to create a triple-threat chocolate experience. The different chocolates melt at slightly different rates, giving you pockets of varying sweetness and texture throughout each bite. It's like a chocolate party where everyone's invited.
Storing and Bringing It Back to Life
Fridge Storage
These brownies will keep in an airtight container in the refrigerator for up to a week, though I doubt they'll last that long. The cold actually intensifies their fudgy texture, making them even more decadent. Bring them back to room temperature for 30 minutes before serving, or enjoy them cold for a different experience — they're like chocolate truffles when chilled.
Freezer Friendly
These brownies freeze beautifully for up to 3 months. Wrap each brownie bite individually in plastic wrap, then place in a freezer bag with as much air removed as possible. When the craving hits, unwrap and microwave for 15-20 seconds. They'll taste like you just pulled them from the oven, with that perfect fudgy center and crackly top restored to their former glory.
Best Reheating Method
If you must reheat these (though they're perfect at room temperature), wrap them in a damp paper towel and microwave for 10-15 seconds. The steam from the towel prevents them from drying out. For an extra-special treat, warm them slightly and serve with a scoop of vanilla ice cream. The contrast between warm brownie and cold ice cream creates a dessert experience that'll make you question why you ever ate anything else.