Picture this: it’s a rainy Saturday afternoon, you’ve just rescued the last half‑cup of fresh raspberries from wilting, and a friend dares you to bake something that will make the whole house smell like a spring garden meets a Parisian patisserie. I’m not one to back down from a challenge, especially when the stakes involve delicate rose water and a cheesecake filling that could make a seasoned pastry chef weep with envy. The first attempt? A lopsided bun that tasted more like a bland biscuit than the fluffy, buttery dream I was aiming for. I was ready to toss the whole idea out the window, but then I remembered the secret weapon that turned my disaster into a triumph: the perfect balance of a light brioche‑style dough and a silky raspberry‑rose cheesecake core.
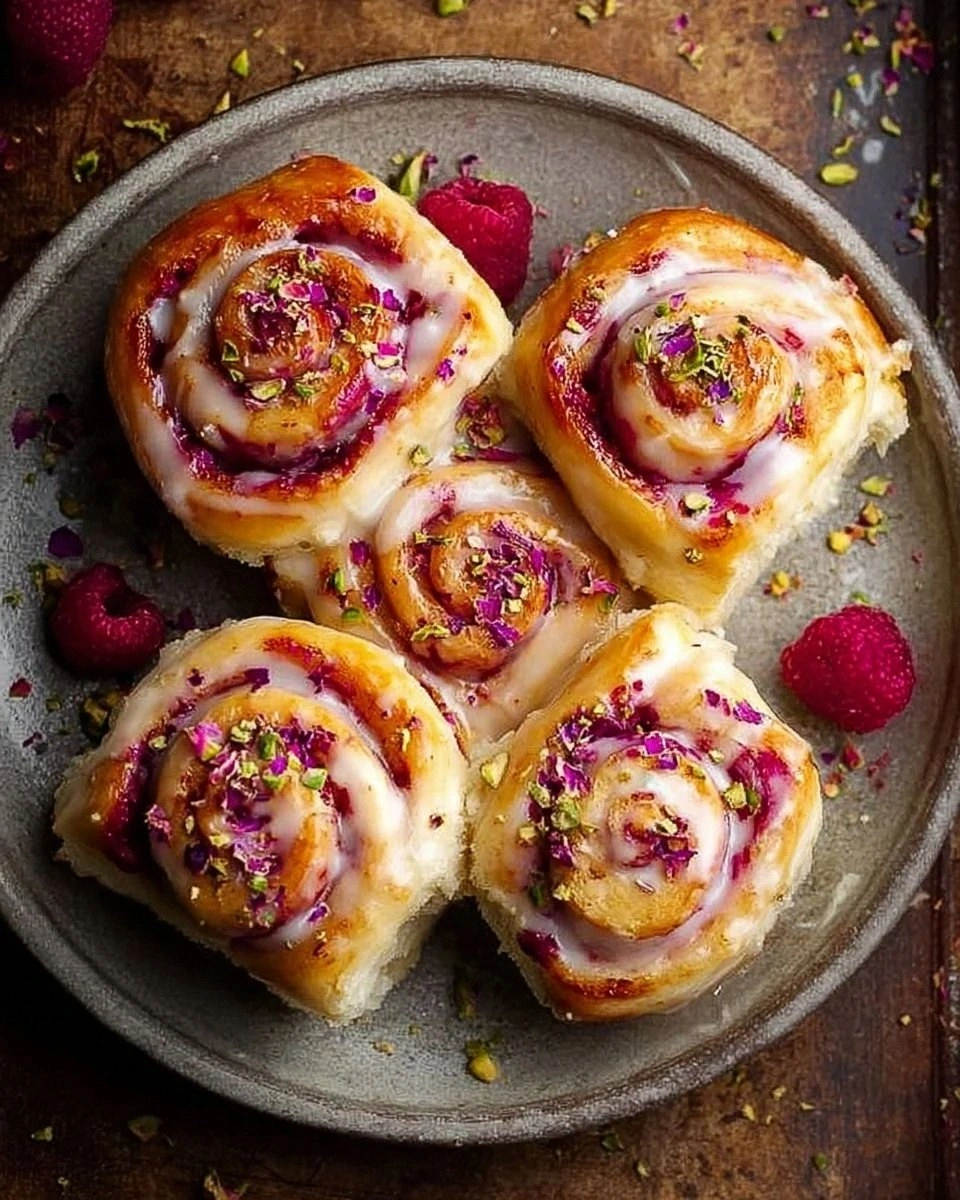
The moment I lifted the first bun from the oven, a caramelized aroma swirled with the floral whisper of rose, and a burst of raspberry hit my palate like fireworks on the Fourth of July. The crust crackled softly, giving way to a pillowy interior that felt like a cloud hugging a velvety cheesecake. The raspberries were bright, the rose water was subtle—just enough to make you pause and think, “Did I just bite into a summer garden?” And the dusting of powdered sugar on top? It glistened like fresh snow on a rose‑petal lawn, inviting you to dive right in.
What makes this version truly stand out is the marriage of simplicity and elegance. Most recipes either overcomplicate the dough, turning it into a dense bread, or they skimp on the filling, leaving you with a bland bite. I’ve cracked the code: a straightforward dough that rises beautifully, a cheesecake filling that’s light enough to melt in your mouth, and a hint of rose that elevates the whole experience without overpowering the raspberries. The secret? A quick “cream‑butter” technique that creates a tender crumb, and a gentle fold‑in of the raspberry‑rose swirl that keeps the batter airy.
But wait—there’s a twist you won’t see in any other recipe. I’m going to introduce a tiny splash of rose water at the very end of the dough’s resting period, which locks in the fragrance and prevents it from evaporating during baking. I dare you to taste this and not go back for seconds. Let me walk you through every single step — by the end, you’ll wonder how you ever made it any other way.
What Makes This Version Stand Out
- Flavor Harmony: The subtle rose water dances with the tart raspberry, creating a balanced sweet‑tart profile that feels both familiar and exotic.
- Texture Perfection: A crisp, buttery crust gives way to a cloud‑like interior, while the cheesecake filling stays silky without becoming soggy.
- Simplicity: Fewer than a dozen ingredients, all pantry‑friendly, yet the result feels like a bakery masterpiece.
- Unique Twist: The optional rose water adds a fragrant note most home bakers overlook, turning a simple bun into a conversation starter.
- Crowd‑Pleaser: Even the pickiest eaters love the bright raspberry burst, and the elegant appearance earns instant Instagram fame.
- Ingredient Quality: Using real cream cheese and fresh raspberries makes the filling rich without artificial additives.
- Method Mastery: A short, hands‑off rise and a quick bake keep the kitchen stress low while delivering high‑impact results.
- Make‑Ahead Potential: These buns keep beautifully for up to three days, and they reheat like fresh‑baked wonders.
Inside the Ingredient List
The Flavor Base
Granulated Sugar (¼ cup): This tiny amount sweetens the dough just enough to feed the yeast without making the bun overly sweet. Skipping it? Your dough may rise sluggishly, and you’ll miss that subtle caramel note. If you’re cutting sugar, replace with a tablespoon of honey for a hint of floral depth.
Instant Yeast (1 tsp): The fast‑acting hero that gives the buns their lift. It’s reliable, but if you’re using active dry yeast, double the quantity and give it a 5‑minute proof in warm water. Pro tip: always check the expiration date—old yeast is the silent killer of fluffy pastries.
The Texture Crew
All‑Purpose Flour (2 cups): The backbone of the dough, providing structure. For a softer crumb, you can substitute ¼ cup with cake flour, but keep the total weight the same. When measuring, spoon the flour into the cup and level it off; packing it will make the buns dense.
Soft Butter (2 tbsp): Adds richness and helps create those flaky, buttery layers. If you’re dairy‑free, try a plant‑based butter with a high fat content; it behaves similarly in the dough.
Warm Water (½ cup): Not too hot! Aim for 105‑110°F (40‑43°C). Water that’s too hot will kill the yeast, while cold water will stall the rise. A quick tip: dip your finger; it should feel comfortably warm, not scalding.
The Unexpected Star
Cream Cheese (1 cup, softened): This is where the magic happens. It creates a silky, tangy filling that contrasts the sweet dough. If you use low‑fat cream cheese, the texture will be grainy; full‑fat is non‑negotiable for that melt‑in‑your‑mouth feel.
Powdered Sugar (½ cup): Sweetens the cheesecake without adding grit. It also helps achieve that smooth, glossy finish when folded into the cream cheese.
Vanilla Extract (1 tsp): Enhances the overall flavor profile, making the raspberry‑rose combo feel more rounded. Real vanilla beans are even better—scrape the seeds for an extra punch.
The Final Flourish
Fresh Raspberries (½ cup, mashed): The bright, tart heart of the bun. If raspberries are out of season, frozen works fine—just thaw and drain excess water. Skipping the mash? You’ll end up with pockets of whole fruit that burst unpredictably.
Rose Water (1 tsp, optional): A whisper of floral perfume that elevates the bun from ordinary to unforgettable. Too much? It can become soapy; stick to the suggested amount. If you can’t find rose water, a drop of orange blossom water works as a substitute.
Powdered Sugar for Dusting & Extra Raspberries for Garnish: These finishing touches add visual appeal and a final burst of flavor. Use a fine mesh sieve for an even dusting; clumps ruin the delicate look.
Everything's prepped? Good. Let's get into the real action…
The Method — Step by Step
In a large mixing bowl, whisk together the flour, granulated sugar, instant yeast, and salt. This dry blend is the canvas for our masterpiece. I like to give it a quick flick of the wrist—like shaking a Polaroid picture—so everything is evenly distributed. Power transition: Okay, ready for the game‑changer?
Make a well in the center and pour in the warm water and softened butter. Using a wooden spoon, stir until a shaggy dough forms. At this stage, the dough should look a bit rough, but don’t worry—that’s the sign of good gluten formation.
Kitchen Hack: Add the butter in tiny cubes; it melts gradually, creating tiny pockets of richness.Turn the dough onto a lightly floured surface and knead for about 5 minutes, or until it becomes smooth and elastic. The dough should bounce back when you press it—think of a rubber ball that’s just been squeezed. If it feels sticky, sprinkle a touch more flour; if it’s too dry, drizzle a teaspoon of water.
Watch Out: Over‑kneading can make the buns tough; stop when the dough is smooth and slightly tacky.Place the dough in a lightly oiled bowl, cover with a damp towel, and let it rise in a warm spot for 45‑60 minutes, or until doubled in size. The kitchen should feel like a cozy sauna—if it’s too cold, pop the bowl near a turned‑on oven (just off). While you wait, the aroma of yeast will start to fill the room, a subtle reminder that greatness is in the making.
While the dough rests, prepare the cheesecake filling. In a medium bowl, beat the softened cream cheese until smooth, then gradually add powdered sugar, vanilla extract, and rose water (if using). Fold in the mashed raspberries gently; you want streaks of pink, not a uniform puree. This creates those gorgeous marble swirls when you bake.
Once the dough has risen, punch it down gently—think of it as giving a tired dog a light pat. Divide the dough into four equal portions (or eight for mini buns). Roll each piece into a ball, then flatten slightly with your palm, creating a small well in the center.
Spoon a generous tablespoon of the raspberry‑rose cheesecake mixture into each well. Then, fold the edges over the filling, pinching to seal, and shape each bun into a smooth round. The goal is a seamless sphere that hides the filling inside—like a secret treasure chest.
Place the formed buns on a parchment‑lined baking sheet, leaving a couple of inches between them. Cover loosely with a clean kitchen towel and let them proof for another 20‑30 minutes. They should puff up slightly; you’ll know they’re ready when the tops feel puffy to the touch.
Preheat your oven to 375°F (190°C). Just before sliding the buns in, lightly brush the tops with melted butter for a glossy finish, then dust generously with powdered sugar. The butter helps the sugar adhere and adds a buttery crunch.
Bake for 18‑22 minutes, or until the tops are golden‑brown and the buns sound hollow when tapped. The edges should pull away from the pan slightly, a sign that the crust has set perfectly. Remove from the oven and let them cool on a wire rack for 10 minutes before adding the final garnish of fresh raspberries.
That's it — you did it. But hold on, I've got a few more tricks that'll take this to another level...
Insider Tricks for Flawless Results
The Temperature Rule Nobody Follows
Never underestimate the power of a consistent room temperature. If your kitchen is chilly, the dough will take forever to rise, and you’ll end up with dense buns. I keep a small bowl of hot water on the counter (covered) to create a warm micro‑climate. This trick saved me countless hours of waiting and gave the buns a perfect, airy crumb.
Why Your Nose Knows Best
When the dough is proofing, trust your sense of smell. A faint yeasty scent means the yeast is alive and kicking. If the dough smells sour, you’ve over‑proofed it, and the texture will be gummy. In that case, gently reshape the dough, let it rest a few minutes, and bake immediately to salvage the structure.
The 5‑Minute Rest That Changes Everything
After shaping the buns but before the final proof, let them sit for five minutes uncovered. This short rest relaxes the gluten, making the final proof smoother and preventing the buns from springing back when you try to shape them. I once skipped this step and ended up with buns that “popped” back into oval shapes—no good for a round bun aesthetic.
Butter Brush Brilliance
Brushing melted butter on the buns before baking does more than add flavor; it creates a barrier that keeps the interior moist while the exterior crisps up. Use a silicone brush for an even coat, and don’t be shy—double‑brush for that buttery sheen that makes the buns look bakery‑ready.
Cooling Is Not Optional
Allow the buns to cool on a wire rack for at least ten minutes before dusting with powdered sugar. If you dust them while still hot, the sugar will melt into a sticky glaze. Patience here yields a pristine, snow‑kissed finish that’s Instagram‑gold.
Creative Twists and Variations
This recipe is a playground. Here are some of my favorite ways to switch things up:
Lemon‑Lavender Dream
Swap the rose water for 1 tsp lavender essence and add a teaspoon of lemon zest to the filling. The floral‑citrus combo brightens the bun, perfect for a spring brunch.
Chocolate‑Cherry Indulgence
Fold in ¼ cup of finely chopped dark chocolate and replace half the raspberries with dark‑cherry preserves. The rich chocolate pairs decadently with the tart cherry, creating a dessert‑like treat.
Matcha‑Mango Fusion
Mix 1 tsp matcha powder into the dough for a subtle earthy note, and stir mango puree into the cheesecake filling instead of raspberries. The green‑gold contrast is as pleasing to the eye as it is to the palate.
Nutty Caramel Crunch
Stir in ¼ cup toasted chopped almonds into the dough and drizzle a caramel glaze over the finished buns. The crunch adds texture, while the caramel amplifies the buttery richness.
Savory Herb Surprise
Omit the sugar and rose water, and instead add 1 tsp dried thyme and ¼ cup grated Parmesan to the dough. Fill with a herbed goat cheese spread for a savory bite that works as an appetizer.
Storing and Bringing It Back to Life
Fridge Storage
Place the cooled buns in an airtight container or a zip‑top bag. They’ll stay fresh for up to three days. If you notice the tops drying out, sprinkle a tiny bit of water on a paper towel, lay it over the buns, and seal the container—this creates a mini‑steam environment.
Freezer Friendly
Wrap each bun individually in plastic wrap, then place them in a freezer‑safe bag. They’ll keep for up to two months. When you’re ready to enjoy, let them thaw at room temperature for 30 minutes, then pop them in a 350°F oven for five minutes to revive the crust.
Best Reheating Method
Preheat your oven to 300°F (150°C). Lightly mist the buns with a spray bottle of water—just enough to create a thin veil of moisture. Warm for 8‑10 minutes. The water splash steams the interior back to fluffy perfection while the outer crust regains its golden crunch.