I was standing in my kitchen, the clock ticking past midnight on Christmas Eve, when a sudden craving for something that screamed “holiday party” hit me like a snowball to the face. I had a box of cake mix, a tub of frosting, and a bag of candy melts that had been sitting untouched for weeks, and I thought, “Why not turn this into the most unforgettable bite‑size treat ever?” The idea was simple, but the execution? That was the wild ride I’m about to share. I’ll be honest — I ate half the batch before anyone else got to try it, and the look on my sister’s face when she saw the glittering pops was pure, unfiltered joy.
Picture this: the oven door swings open, a wave of warm vanilla and butter rolls over the room, and the scent of toasted sugar twirls with the faint whisper of pine from the nearby tree. The batter, once a bland, boxed promise, now smells like a winter wonderland, and the frosting, when whipped, becomes a glossy, pink‑golden cloud that clings to the crumb like a lover’s embrace. The candy melts melt into a glossy river of chocolate that, when dipped, creates a crackle that sounds like tiny fireworks on a cold night. And when you bite into that first pop, the soft cake center gives way to a crunchy, sweet coating that makes your taste buds do a little jig.
Most recipes for cake pops either overcomplicate the process with fancy molds or underwhelm with bland flavors that disappear faster than a New Year’s resolution. This version stands out because it takes the absolute simplest base—a boxed cake mix—and transforms it with a handful of pantry heroes into a show‑stopping, crowd‑pleasing masterpiece. I dared you to taste this and not go back for seconds, because once you’ve experienced the perfect balance of moist crumb, buttery frosting, and a snap‑crackle coating, you’ll understand why this is hands down the best version you’ll ever make at home.
Now, here’s the kicker: the secret weapon is a splash of peppermint extract that I add to the frosting, giving the pops a subtle, festive zing that cuts through the sweetness without being overpowering. It’s a tiny detail that most recipes completely miss, but it makes the difference between “just another cake pop” and “the highlight of the dessert table.” Okay, ready for the game‑changer? Let me walk you through every single step — by the end, you’ll wonder how you ever made it any other way.
What Makes This Version Stand Out
- Flavor Explosion: The peppermint‑infused frosting adds a cool, minty whisper that dances with the sweet chocolate coating, creating a festive duet that sings on the palate.
- Texture Harmony: The crumb is moist yet firm enough to hold its shape, while the outer shell provides a satisfying crunch that shatters like thin ice under a gentle tap.
- Simplicity Redefined: You only need five pantry staples—no fancy equipment, no exotic ingredients, just pure holiday magic.
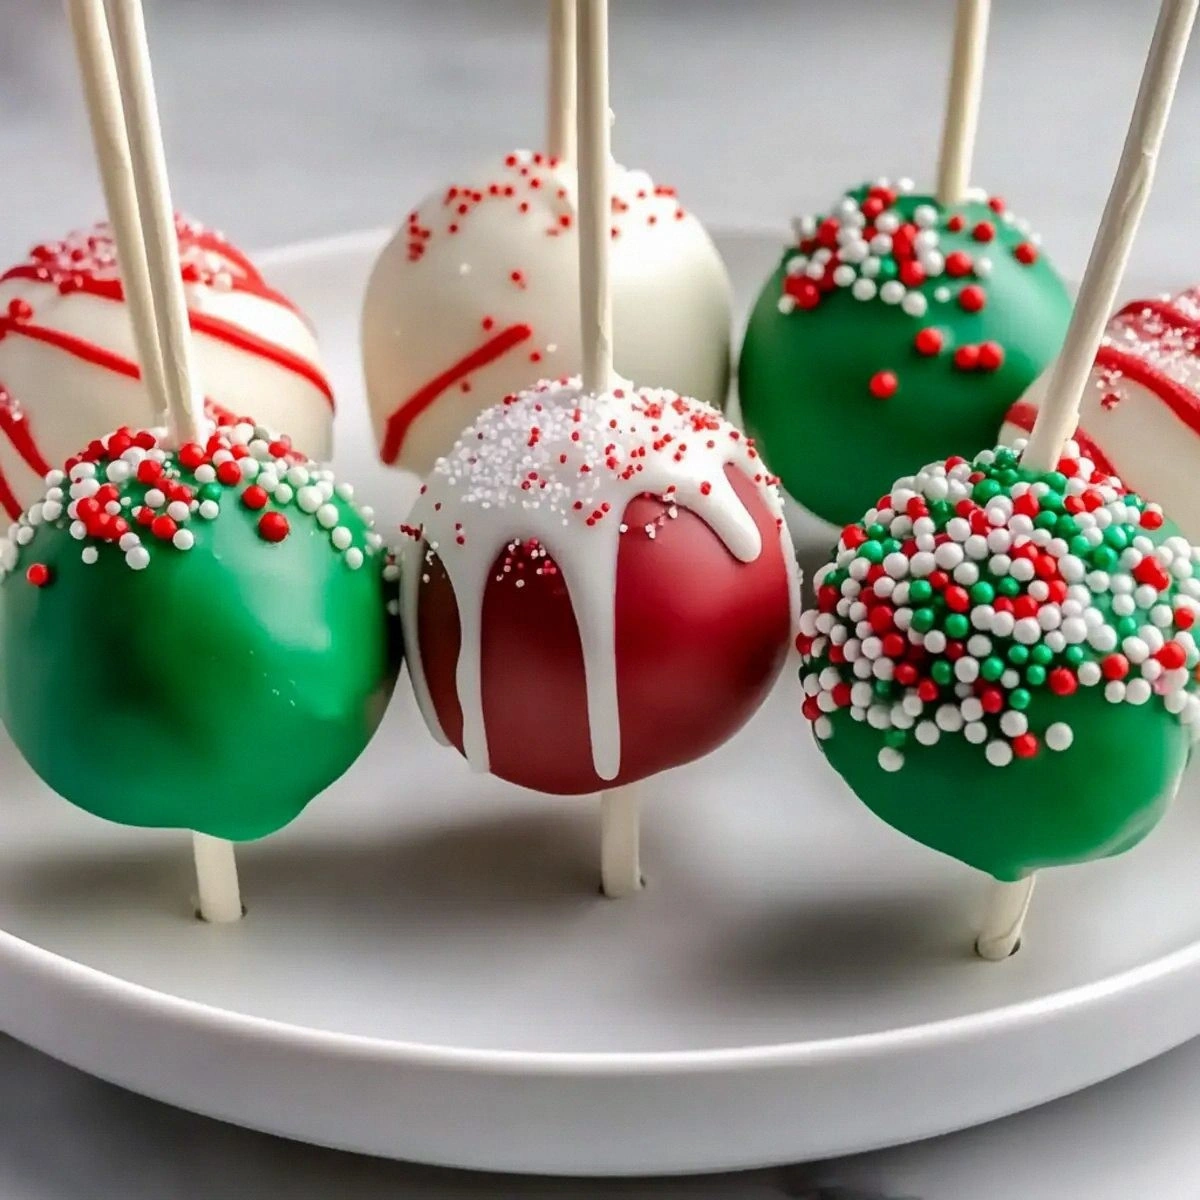
- Visual Wow Factor: The vibrant sprinkles and glossy candy melt coating turn each pop into a miniature Christmas ornament you actually want to eat.
- Crowd Reaction: Guests will line up, eyes wide, whispering “What’s that? Can I have another?” because the look and taste are irresistibly share‑worthy.
- Ingredient Quality: Using a high‑quality boxed cake mix ensures consistent flavor and texture, while premium candy melts give a professional sheen.
- One‑Pan Efficiency: All steps happen in just two bowls and a microwave, meaning cleanup is a breeze—perfect for busy holiday hosts.
- Make‑Ahead Magic: These pops keep beautifully in the fridge for up to a week, and they freeze like a charm for future celebrations.
Inside the Ingredient List
The Flavor Base
The boxed cake mix is the unsung hero of this recipe. It provides a reliable, fluffy crumb that forms the backbone of every pop. Skipping it or substituting with a homemade sponge can lead to inconsistency—either too dry or too crumbly. If you’re feeling adventurous, try a gingerbread or red velvet mix for a seasonal twist, but remember that the frosting will need a flavor adjustment to keep the balance right.
The Texture Crew
Frosting is the glue that holds the cake crumbs together, turning a loose crumble into a pliable dough you can roll into perfect spheres. I use a classic vanilla buttercream, but a cream cheese frosting adds a tangy depth that pairs beautifully with peppermint. If you run low on frosting, a quick mix of powdered sugar, butter, and a splash of milk will do the trick—just keep the consistency thick enough to bind.
The Unexpected Star
Candy melts are the glossy, crunchy armor that makes these pops look like edible ornaments. They melt at a lower temperature than chocolate, which means you won’t scorch them, and they set with a snap that’s incredibly satisfying. For a dairy‑free version, use vegan candy melts; the texture remains the same, but the flavor profile shifts slightly toward the cocoa notes.
The Final Flourish
Sprinkles are the festive confetti that turn each pop into a celebration on a stick. Choose non‑pareve, festive shapes—snowflakes, candy canes, or classic jimmies—to match your holiday theme. If you’re watching sugar, opt for a light dusting of edible glitter instead; it adds sparkle without the extra sweetness.
And of course, the lollipop sticks are the sturdy handles that let you dip, display, and devour without getting frosting on your fingers. Look for sticks with a thick base; they’re easier to grip and less likely to snap under the weight of the coating. Everything’s prepped? Good. Let’s get into the real action...
The Method — Step by Step
Preheat your oven to 350°F (175°C). While the oven warms up, grease a 9×13‑inch baking pan with butter or non‑stick spray. This is the moment of truth: the batter should spread evenly, creating a uniform cake that will later crumble into perfect crumbs. If you hear a faint sizzle as the batter hits the pan, you’re on the right track.
Empty the boxed cake mix into a large mixing bowl, add the water, oil, and eggs as instructed on the package, and whisk until just combined. Over‑mixing creates gluten that makes the cake tough, so stop when the batter looks smooth with a few tiny lumps. Pour the batter into the prepared pan, smoothing the top with a spatula.
Bake for 20‑25 minutes, or until a toothpick inserted in the center emerges clean with just a few crumbs attached. The edges should start pulling away from the pan, a visual cue that the cake is perfectly baked. Let the cake cool completely on a wire rack; rushing this step leads to a soggy crumb that won’t hold together.
Once cooled, crumble the cake into a large bowl, aiming for fine, sand‑like pieces. This is where the magic begins—if the crumbs are too large, your pops will be uneven. Power transition: Okay, ready for the game‑changer? Add the entire cup of frosting to the crumbs and mix with a sturdy spoon until the mixture sticks together when pressed.
Roll the mixture into 1‑inch balls using your hands, then place each ball onto a parchment‑lined baking sheet. As you roll, the frosting‑infused crumbs should feel pliable, not sticky. If they cling to your fingers, sprinkle a tiny pinch of powdered sugar on your hands—this prevents excess stickiness without altering flavor.
While the balls chill, melt the candy melts in a microwave‑safe bowl in 30‑second bursts, stirring in between, until smooth and glossy. Add a drop of peppermint extract here for that subtle festive zing. Watch Out: Overheating can cause the chocolate to seize, turning it grainy and unworkable—stop heating as soon as it’s fully melted.
Insert a lollipop stick into each chilled cake ball, pushing about halfway through. The stick should be centered so the pop sits upright when dipped. This step can be fiddly, so take your time—if a stick wobbles, gently rotate the ball to find a stable spot.
Dip each pop into the melted candy melts, turning it slowly to achieve an even coat. Let excess melt drip back into the bowl; a gentle tap against the side of the bowl helps remove drips without breaking the coating. While the coating is still wet, sprinkle the tops with festive sprinkles, ensuring a generous coverage that adds both crunch and color.
Allow the pops to set at room temperature for 20‑30 minutes, or speed up the process by placing them in the refrigerator for 10 minutes. The coating should harden to a firm, crackle‑ready shell that shatters delightfully when bitten.
That’s it — you did it. But hold on, I’ve got a few more tricks that'll take this to another level. Stay with me here — this is worth it.
Insider Tricks for Flawless Results
The Temperature Rule Nobody Follows
Never dip a pop when the chocolate is colder than room temperature. The coating will set too quickly, leading to cracks and an uneven surface. Keep the melted candy melts in a warm spot—like a turned‑off oven with the light on—so it stays fluid yet not too hot. A friend once tried to dip straight from the fridge and ended up with a patchy, dull finish that looked like a melted candle.
Why Your Nose Knows Best
Trust the aroma of the baked cake. When the cake gives off a sweet, buttery fragrance and the edges start pulling away from the pan, it’s done. Relying on a timer alone can lead to over‑baking, which dries out the crumb and makes the pops crumbly. If you’re ever unsure, a quick touch with a clean finger—cool but not cold—will tell you if the interior feels springy, the perfect sign of doneness.
The 5‑Minute Rest That Changes Everything
After mixing the crumb and frosting, let the mixture rest for five minutes. This pause allows the crumbs to fully absorb the moisture, creating a dough that’s easy to roll and holds its shape. Skipping this step often results in a sticky mess that sticks to your hands and the parchment. I’ve seen beginners rush this and end up with a bowl of mush instead of neat balls.
Stick Insertion Strategy
Insert the lollipop stick at a slight angle, then rotate the pop until the stick is upright. This technique prevents the ball from cracking and ensures the stick is firmly anchored. If you push the stick straight down, you risk creating a weak point that can break when the pop is lifted from the dip.
The Quick Chill Method
If you’re short on time, place the rolled balls on a metal tray and blast them in the freezer for just 5 minutes. The metal conducts cold faster, firming the balls without freezing the frosting. This hack is a lifesaver when you’re juggling multiple holiday dishes and need those pops ready for the party.
Creative Twists and Variations
This recipe is a playground. Here are some of my favorite ways to switch things up:
Cocoa‑Cranberry Delight
Swap the peppermint extract for a teaspoon of cocoa powder mixed into the frosting, and fold dried cranberries into the crumb mixture. The result is a deep chocolate flavor punctuated by tart cranberries—a perfect match for winter brunches.
White Chocolate & Raspberry
Use white candy melts instead of dark, and swirl a spoonful of raspberry jam into the frosting before mixing. The pink‑white contrast looks festive, and the tart jam cuts through the sweetness beautifully.
Spiced Gingerbread Pop
Choose a gingerbread cake mix, add a pinch of ground cloves and nutmeg to the frosting, and dip in caramel‑colored candy melts. Sprinkle with crushed gingerbread cookies for a crunchy, spicy finish that screams holiday comfort.
Nutty Caramel Crunch
Drizzle caramel sauce over the set pops and roll them in toasted chopped pecans. The caramel adds a buttery richness while the nuts bring a satisfying crunch that elevates the texture profile.
Vegan Holiday Bliss
Replace the boxed cake mix with a vegan vanilla mix, use a coconut‑oil‑based frosting, and dip in vegan candy melts. Finish with organic sprinkles. The result is just as indulgent, and it’s friendly to guests with dietary restrictions.
Storing and Bringing It Back to Life
Fridge Storage
Place the pops in an airtight container, separating layers with parchment paper. They stay fresh for up to 5 days, and the coating remains glossy. If the coating looks a bit dull, a quick dip in fresh melted candy melts revives the shine.
Freezer Friendly
Arrange the pops on a baking sheet, freeze until solid (about 1 hour), then transfer to a zip‑top freezer bag. They’ll keep for up to 3 months. When you’re ready to serve, let them thaw at room temperature for 15 minutes, then pop them in the microwave for 10 seconds to warm the interior.
Best Reheating Method
Add a tiny splash (about a teaspoon) of water to a microwave‑safe dish, place a pop on a paper towel, and cover loosely with a damp paper towel. Heat for 10‑15 seconds; the steam revives the cake’s softness while the coating stays intact. This trick prevents the pop from becoming rubbery, preserving that perfect bite‑size contrast.