Picture this: it's December 23rd, my kitchen looks like a snowstorm hit a cocoa factory, and I'm frantically trying to bake something that'll make my judgmental cousin forget last year's dry fruitcake disaster. The pressure is real, folks. I'm elbow-deep in flour, chocolate streaks across my face like war paint, when I realize I've been making the same mistake every single Christmas — trying to impress with complicated desserts that taste like cardboard and regret.
But here's where the magic happens. Instead of crying into my mixing bowl (been there), I start throwing together everything that makes Christmas taste like childhood memories and midnight secrets. Semi-sweet chocolate chips cascading like edible jewels, butter melting into liquid gold, those ridiculous holiday M&Ms that somehow taste better just because they're shaped like tiny Christmas ornaments. The smell alone should be illegal in seventeen states — it's like someone bottled up every happy Christmas moment and let it loose in your kitchen.
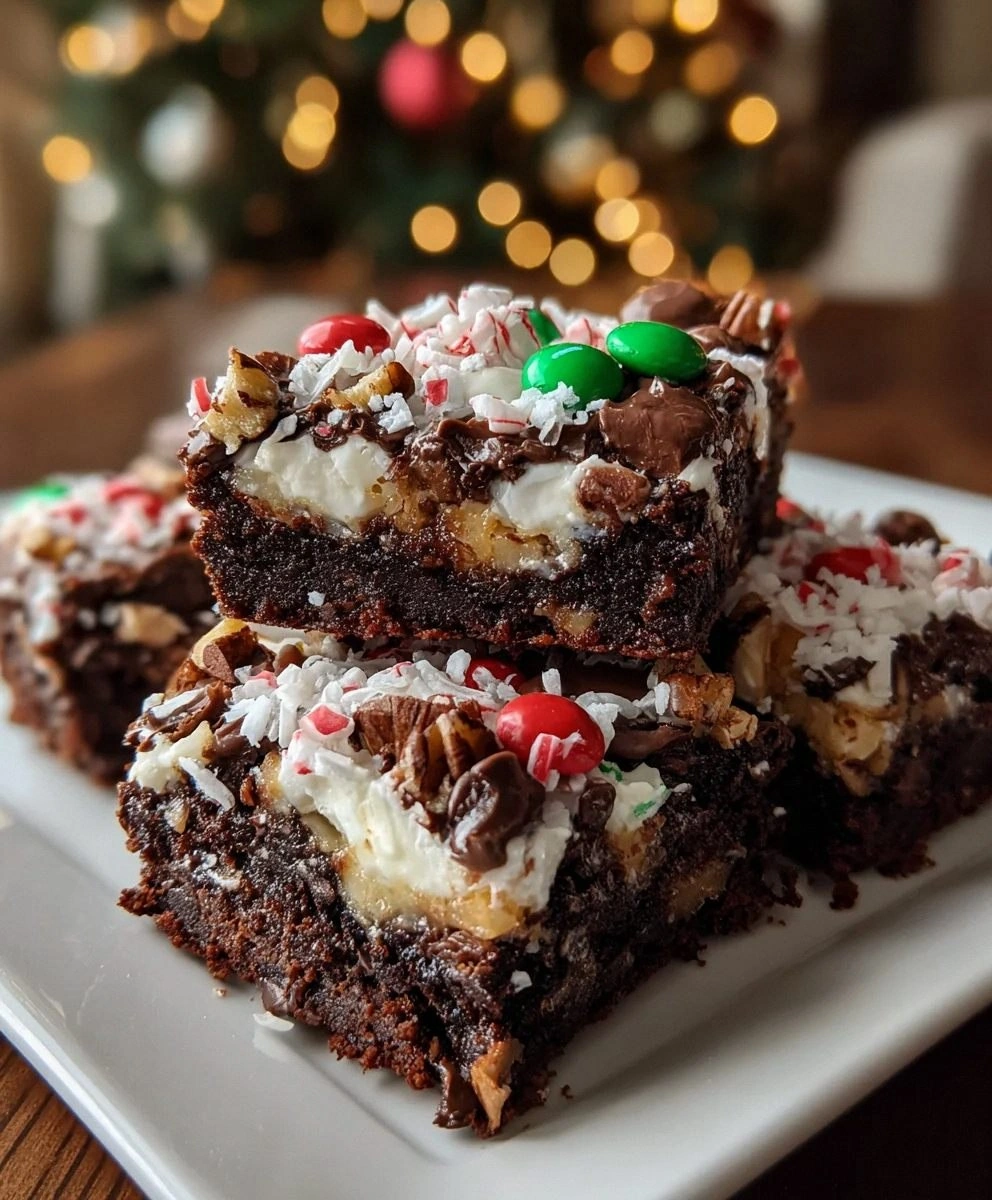
What emerged from that chaotic experiment were these Christmas Magic Layer Brownie Bars that made my cousin literally speechless (a Christmas miracle in itself). These aren't your grandma's dry, crumbly bars that you have to choke down with a gallon of eggnog. No, these are fudgy brownie layers stacked with coconut clouds, M&M rainbows, and a sweetened condensed milk river that ties everything together like the world's most delicious holiday present. The edges get this incredible caramelized crunch while the center stays gooey enough to make you question everything you thought you knew about dessert textures.
Let me walk you through every single step — by the end, you'll wonder how you ever made it any other way. We're talking about creating something so ridiculously good that you'll find yourself hiding them from family members and claiming the dog ate them. Trust me, I've been there, and it's worth every single decadent bite.
What Makes This Version Stand Out
Flavor Explosion: These bars don't just taste like chocolate — they taste like Christmas morning exploded in your mouth. The combination of semi-sweet chocolate with those holiday M&Ms creates this candy-like crunch that makes every bite feel like you're unwrapping a surprise. The coconut adds this tropical whisper that makes absolutely zero sense but somehow works like magic, turning a regular brownie into something that tastes like Santa went on vacation and came back with stories to tell.
Textural Paradise: Most brownie bars are either too cakey or too fudgy — these hit that perfect middle ground with layers that create a textural symphony. You get the chewy bite from the brownie base, the soft give from the coconut, the snap from the M&Ms, and this incredible caramelized top that crackles like thin ice under your fork. It's like someone took everything good about Christmas textures and stacked them in the most delicious way possible.
Foolproof Method: Here's the thing — I'm the person who once set fire to microwave popcorn, and even I nail these every single time. The method is so forgiving that you could probably make these half-asleep on Christmas Eve after too much mulled wine (not that I'm speaking from experience or anything). The sweetened condensed milk acts like edible glue, holding everything together even if your layers aren't perfectly even.
Visual Drama: These bars look like Christmas threw up in the most spectacular way possible. The layers create this gorgeous cross-section that'll make your Instagram explode faster than you can say "holiday baking." The red and green M&Ms peek through like tiny edible Christmas lights, while the coconut toasts to golden perfection that makes everyone think you're some kind of pastry wizard.
Crowd Control: I dare you to bring these to a party and watch what happens. People who claim they "don't really like sweets" will suddenly develop a deep emotional connection to these bars. I've seen grown adults hide extras in their coat pockets and teenagers voluntarily spend time with their families just to get seconds. These bars have magical powers of togetherness, which is really what Christmas is all about, right?
Make-Ahead Magic: Unlike those finicky cookies that go stale if you look at them wrong, these actually get better after a day in the fridge. The flavors meld together like they're having their own little Christmas party, and the texture firms up to the perfect sliceable consistency. Make them on December 20th and you'll still be the Christmas hero on December 25th.
Alright, let's break down exactly what goes into this masterpiece...
Inside the Ingredient List
The Flavor Base
The semi-sweet chocolate chips aren't just there for show — they're the foundation of everything good and holy about these bars. When they melt into the butter, they create this glossy river of chocolate that smells so good it should come with a warning label. Don't cheap out here, because this is where all your flavor complexity comes from. I've tried with bargain-bin chips and ended up with something that tasted like chocolate's disappointed cousin.
Salted butter is your best friend here because it adds this subtle complexity that unsalted butter just can't match. The salt enhances all the sweet flavors and keeps everything from tasting like a sugar bomb exploded in your mouth. If you only have unsalted butter, toss in a quarter teaspoon of good sea salt — not that iodized stuff that tastes like chemistry class.
Vanilla extract is like the bass player in a band — you don't always notice it, but you'd definitely miss it if it wasn't there. Use the real stuff, not that artificial vanilla that smells like a candle store had an identity crisis. The vanilla adds these warm, almost boozy notes that make everything taste more expensive than it actually is.
The Texture Crew
All-purpose flour is what gives these bars their structure, but here's the key — don't overmix it. Stir just until you can't see dry flour anymore, then step away from the bowl like it's radioactive. Overmixing develops gluten and turns your beautiful bars into rubbery Frisbees that could double as hockey pucks. Nobody wants to lose a tooth on Christmas.
Large eggs are crucial because they bind everything together like edible cement. Room temperature eggs mix in more evenly, so pull them out of the fridge about 30 minutes before you start. Cold eggs can make your butter seize up into little grainy bits, and then you'll be standing there cursing the culinary gods while everything looks like chocolate cottage cheese.
Sweetened condensed milk is basically liquid gold that someone figured out how to can. It seeps into all the layers and creates this gooey, almost caramel-like texture that makes grown adults make embarrassing noises when they eat it. Don't substitute evaporated milk here — they're not the same thing, and you'll end up with a sad, soggy mess that tastes like disappointment.
The Unexpected Star
Sweetened flaked coconut is where people start getting nervous, but trust me on this one. Toasted coconut adds this nutty, almost buttery flavor that makes everything taste like a tropical Christmas vacation. The flakes create these little pockets of texture that keep every bite interesting instead of just a homogeneous chocolate blob. Even coconut haters usually end up converted after trying these bars.
The Final Flourish
Holiday M&Ms aren't just pretty — they add this candy shell crunch that breaks up all the soft, chewy textures. The mini ones melt slightly and create these pockets of chocolate while the regular ones stay intact like little treasure surprises. Mix and match colors for maximum visual impact, because we eat with our eyes first, and these bars are all about the drama.
Holiday sprinkles are your chance to go completely overboard in the best possible way. Look for the ones that are just colors without those weird artificial flavors that taste like a craft store smells. The sprinkles add this festive crunch and make everything look like Christmas exploded in the most joyful way possible.
Everything's prepped? Good. Let's get into the real action...
The Method — Step by Step
- Preheat your oven to 350°F (175°C) and line a 9x13-inch baking pan with parchment paper, leaving overhang on the sides like little handles. This isn't just for easy removal — it's your insurance policy against the bars becoming permanently welded to your pan. I've seen too many beautiful desserts sacrificed to the pan gods because someone got lazy with the parchment. While the oven heats up, take a moment to appreciate the fact that you're about to create something magical — or just use this time to sneak a handful of M&Ms, I won't judge.
- Melt the butter in a large saucepan over medium heat, swirling occasionally until it's completely liquid and starting to foam slightly. The foaming is good — it means the water is evaporating and you're concentrating all that buttery goodness. Don't let it brown unless you want a nutty flavor that'll compete with your chocolate. Once melted, remove from heat and immediately add the chocolate chips, stirring until they're about 80% melted. The residual heat will finish the job and prevent your chocolate from seizing up like it just heard bad news.
- Whisk in the granulated sugar until the mixture looks like glossy chocolate lava — this should take about a minute of vigorous whisking. The sugar will start to dissolve into the warm chocolate, creating this beautiful glossy mixture that smells like childhood memories. Add the eggs one at a time, whisking well after each addition. The mixture should go from grainy to smooth to slightly thick as the eggs emulsify everything together. If it looks like it's separating, keep whisking — it'll come back together like nothing happened.
- Stir in the vanilla extract, then sprinkle the flour over the wet ingredients. Here's the crucial part: use a spatula to fold the flour in just until you can't see dry streaks anymore. The batter will be thick and fudgy, like chocolate pudding that's been hitting the gym. Add the chopped nuts if you're using them, folding gently to distribute without overmixing. The batter should look like it has ribbons of chocolate running through it — that's exactly what you want.
- Pour about two-thirds of the brownie batter into your prepared pan, spreading it into an even layer that reaches all the corners. This is your foundation layer, so take your time getting it smooth — the back of a spoon or offset spatula works perfectly. The batter will be thick and luxurious, like you're spreading chocolate frosting on the world's largest cupcake. Don't worry if it doesn't look perfect — the layers on top will hide any sins, and the taste will make everyone forget about aesthetics anyway.
- Time for the magic layer: sprinkle the coconut evenly over the brownie base, making sure to get it all the way to the edges. The coconut will toast as it bakes, turning golden brown and creating these amazing crispy edges that people will fight over. Don't pack it down — you want it loose so the condensed milk can seep through and create pockets of coconutty goodness. This is where the recipe starts looking like a hot mess, but trust the process.
- Drizzle the sweetened condensed milk over the coconut layer in a zigzag pattern, trying to get fairly even coverage without drowning any spots. The milk will seep down and create this incredible gooey layer that holds everything together like edible glue. Use about three-quarters of the can — we're saving some for later layers. The coconut will start to look wet and glossy, like it's been caught in a delicious rainstorm.
- Sprinkle the mini M&Ms over the condensed milk layer, pressing them in slightly so they don't all roll to the edges when you add the next layer. The colors will start bleeding slightly into the milk, creating these beautiful tie-dye effects that look like Christmas lights reflected in a puddle. Try to resist eating them directly off the surface — I know it's tempting, but we're building something special here.
- Dollop the remaining brownie batter over the top in small spoonfuls, then use a knife to swirl it gently with the M&Ms below. You're not trying to mix them together — just create these beautiful marbled patterns that look like Christmas abstract art. The batter will spread and puff up as it bakes, creating this gorgeous cracked top that hides all the treasure below. If some M&Ms peek through, that's perfect — they'll get slightly caramelized and taste like candy jewels.
- Bake for 25-30 minutes, rotating the pan halfway through for even baking. The top should look set and slightly cracked, with the edges pulling away from the sides of the pan. A toothpick inserted near the center should come out with just a few moist crumbs — not wet batter, but not completely clean either. The coconut on top should be golden brown and fragrant, like someone's toasting coconut macaroons in your kitchen. Let them cool completely in the pan before lifting out with the parchment handles and cutting into squares.
That's it — you did it. But hold on, I've got a few more tricks that'll take this to another level...
Insider Tricks for Flawless Results
The Temperature Rule Nobody Follows
Here's the thing that separates the brownie masters from the brownie disasters: temperature matters more than you think. Your eggs and butter need to be at room temperature, or you'll end up with a batter that looks like it's having an identity crisis. Cold eggs can make your beautifully melted chocolate seize up faster than you can say "Christmas catastrophe," leaving you with grainy, separated batter that no amount of whisking will fix. Pull everything out of the fridge at least 30 minutes before you start, or if you're impatient like me, pop the eggs in warm water for 5 minutes and cut the butter into small pieces so it warms up faster.
Why Your Nose Knows Best
Forget timers — your nose is the best kitchen tool you have for these bars. When the coconut starts to smell like you're on a tropical beach during the holidays, that's when you know things are getting serious. The aroma should hit you in waves: first chocolate, then toasting coconut, then this incredible caramelized sugar smell that makes your neighbors knock on your door asking what you're making. If your kitchen doesn't smell like Christmas and happiness after 20 minutes, something's gone wrong and you should probably check your oven temperature.
The 5-Minute Rest That Changes Everything
This is where most people mess up — they want to dig in while the bars are still molten hot and end up with a chocolate lava mess that burns their tongue and ruins the experience. Give these beauties at least 5 minutes after they come out of the oven before you even think about touching them. The residual heat continues cooking the center gently, and the condensed milk layer needs time to set up properly. Plus, letting them cool slightly intensifies all the flavors — it's like the difference between hearing a song on the radio versus listening to it on good headphones. Patience, my friend, patience.
The Cutting Technique That'll Make You Look Like a Pro
Here's how to get those perfect, bakery-worthy squares: use a plastic knife or a bench scraper, and dip it in hot water between cuts. The heat melts through the chocolate cleanly instead of dragging and cracking the top. Wipe the knife clean between cuts for the most Instagram-worthy edges. And don't even think about cutting them while they're warm — you'll end up with a gooey mess that looks like abstract art rather than intentional squares. I learned this the hard way when I tried to impress guests with warm bars that ended up looking like modern art.
The Storage Secret That Keeps Them Amazing
These bars actually get better with age — if you can keep them around that long. Store them in an airtight container with a piece of wax paper between layers, and they'll stay amazing for up to a week. The flavors meld together like they're having their own little Christmas party, and the texture becomes even more fudgy and incredible. Just don't refrigerate them unless you live somewhere tropical — the cold makes the chocolate seize up and lose that gorgeous glossy texture. Room temperature is where the magic happens.
Creative Twists and Variations
This recipe is a playground. Here are some of my favorite ways to switch things up:
Tropical Christmas Bars
Swap out the holiday M&Ms for white chocolate chips and dried pineapple pieces, add some macadamia nuts if you're feeling fancy, and use coconut extract instead of vanilla. Suddenly you've got a Christmas dessert that tastes like Santa took a vacation to Hawaii and brought back stories and souvenirs. The white chocolate gets all caramelized and toasty, creating these incredible flavor bombs that'll make you forget it's supposed to be cold outside.
Salted Caramel Dream
Drizzle some store-bought caramel sauce over the coconut layer before adding the condensed milk, then sprinkle everything with flaky sea salt. The sweet-salty combo is absolutely addictive — like someone figured out how to make caramel corn into a brownie bar. Use dark chocolate chips instead of semi-sweet to balance all that sweetness, and prepare yourself for people asking you to make these for every holiday from now until eternity.
Mint Chocolate Madness
Replace half the vanilla with peppermint extract, use green and red M&Ms, and add some crushed candy canes to the top layer. The result tastes like Christmas morning in edible form — all those minty fresh flavors cutting through the richness like a winter breeze. Just don't go overboard on the peppermint — a little goes a long way, and too much will make your bars taste like toothpaste.
Peanut Butter Paradise
Swirl some peanut butter into the top brownie layer before baking — just drop spoonfuls and use a knife to marble it through. The peanut butter gets slightly caramelized and creates these incredible pockets of nutty flavor that pair perfectly with the chocolate. Use peanut butter M&Ms instead of regular ones, and you've basically created a Reese's Christmas explosion that'll have people proposing marriage.
White Chocolate Raspberry
Use white chocolate chips instead of semi-sweet, add some freeze-dried raspberries to the coconut layer, and use raspberry extract instead of vanilla. The tart raspberries cut through all the sweetness and create this beautiful pink swirl effect that looks like Christmas morning sunrise. The white chocolate gets all caramelized and toasty, creating flavor combinations that taste way more sophisticated than they have any right to be.
Spicy Mexican Hot Chocolate
Add a teaspoon of cinnamon and a pinch of cayenne to the brownie batter, use dark chocolate chips, and add some cinnamon sugar to the coconut layer. The result has this incredible warmth that builds slowly — first you taste chocolate, then cinnamon, then this gentle heat that makes everything taste more complex. It's like Christmas in Mexico City, and it's absolutely spectacular.
Storing and Bringing It Back to Life
Fridge Storage
Here's the thing — these bars don't actually need refrigeration unless you live somewhere tropical or want to keep them longer than a week. The high sugar content acts as a natural preservative, and refrigeration can make the chocolate bloom and get that weird white film. If you must refrigerate, wrap them tightly in plastic wrap then foil, and let them come to room temperature before serving. Cold chocolate is a crime against dessert, and nobody wants to bite into a rock-hard bar that tastes like sadness.
Freezer Friendly
These bars freeze beautifully — cut them into squares first, then wrap each one individually in plastic wrap and store in a freezer bag. They'll keep for up to three months, which means you can make a double batch in December and still be the Christmas hero in March. Thaw them overnight in the refrigerator, then let them come to room temperature before serving. Pro tip: slightly underbake them if you plan to freeze, because freezing can make them a bit drier.
Best Reheating Method
If they've been refrigerated or frozen, don't microwave them — the chocolate can seize up and get grainy. Instead, let them come to room temperature naturally, or if you're impatient (like me), pop them in a 200°F oven for about 5 minutes. This gentle warming brings back all the gooey texture without ruining the chocolate. Add a tiny splash of water to the container before reheating — it creates steam that brings everything back to life like dessert resurrection.