Picture this: a cold December morning, the house still half‑asleep, and the only thing keeping you from hitting snooze is the faint, intoxicating whisper of ginger and cinnamon drifting from the kitchen. I was half‑awake, half‑grumpy, when my roommate dared me to bake something that could actually survive the holiday party dunk‑fest. I laughed, I rolled my eyes, and I said, “Challenge accepted.” Fast forward two hours, and I’m standing over a tray of golden, aromatic biscotti that practically glow with holiday spirit. I dare you to taste this and not go back for seconds.
The moment you open the oven, the scent hits you like a warm hug from a grandma who’s just finished her secret spice blend. The air fills with a sweet‑spicy perfume that makes the whole house feel like a winter wonderland, even if the snow outside is just a rumor. You’ll hear the faint crackle of the butter melting, the gentle thump of the molasses as it meets the sugar, and the soft whisper of the whisk as eggs fold into the batter. Your hands will feel the buttery dough, soft yet firm enough to shape, and your eyes will be drawn to the deep, mahogany specks of molasses that promise a caramel‑kissed crunch.
Why does this version stand out from every other gingerbread biscotti you’ve ever seen on a Pinterest board? First, the balance of spices is calibrated like a symphony—cinnamon, ginger, allspice, cloves, and a daring pinch of black pepper that adds a subtle heat you won’t see coming. Second, the double‑bake method I’m using creates a crisp exterior that shatters like thin ice, while the interior stays tender enough to soak up any holiday beverage you pair it with. Most recipes get the texture completely wrong—either they’re too hard, or they crumble like dry leaves. Not this one. This is hands down the best version you’ll ever make at home.
But the real secret? A splash of molasses that gives the biscotti a deep, caramel‑rich color and a whisper of umami that makes the sweetness feel sophisticated. And a final dusting of powdered sugar that melts into a glossy glaze as the biscuits cool, turning each bite into a snow‑kissed treat. Okay, ready for the game‑changer? Let me walk you through every single step — by the end, you’ll wonder how you ever made it any other way.
What Makes This Version Stand Out
- Flavor Explosion: The blend of five warm spices creates a layered taste that evolves with each bite, delivering a festive punch that lingers on the palate.
- Texture Triumph: A crisp, caramelized crust meets a tender, slightly chewy center, achieving that perfect biscotti bite you crave.
- Simplicity: Only fourteen pantry staples are needed, and the method uses everyday kitchen tools—no fancy equipment required.
- Unique Ingredient: Unsulfured molasses adds depth and a subtle earthiness that most gingerbread recipes miss entirely.
- Crowd Reaction: These biscuits disappear faster than you can say “holiday party,” making them the ultimate crowd‑pleaser.
- Ingredient Quality: Using real butter and brown sugar instead of shortcuts ensures a buttery richness and caramel undertone.
- Cooking Method: The double‑bake technique locks in flavor while giving you that signature snap on the first bite.
- Make‑Ahead Potential: Store them in an airtight container for up to two weeks, or freeze for a month—perfect for busy holiday prep.
Inside the Ingredient List
The Flavor Base
Ground cinnamon, ginger, allspice, and cloves are the heartbeats of this biscotti. Cinnamon provides a sweet, woody backbone, while ginger adds a bright, peppery snap that cuts through the richness. Allspice contributes a subtle clove‑like nuance, and the cloves themselves bring a warm, almost floral depth. If you skip any of these, the flavor profile flattens faster than a deflated balloon—so keep them all. For a twist, try swapping half the cinnamon for pumpkin spice if you want a fall‑ish vibe.
The Texture Crew
The unsalted butter and brown sugar are the dynamic duo that give the biscotti its buttery crunch and caramel sweetness. Butter should be softened, not melted, to trap air during creaming, which translates to a lighter crumb. Brown sugar, with its molasses content, adds moisture and a deep amber hue. If you’re looking for a healthier route, you can replace half the butter with coconut oil, but expect a slightly coconutty aftertaste.
The Unexpected Star
Molasses is the secret weapon here. It’s not just for color; its robust, slightly bitter notes balance the sweetness and give the biscuits that signature chew. Unsulfured molasses is preferred because it’s less harsh and more nuanced. If you can’t find it, dark corn syrup works in a pinch, though the flavor won’t be as complex.
The Final Flourish
All‑purpose flour provides the structure, while baking soda gives a gentle lift, ensuring the biscotti aren’t dense. The pinch of black pepper may sound daring, but it awakens the spices, adding a whisper of heat that makes the flavor pop. Table salt amplifies all the other flavors—without it, the sweetness would feel flat. If you’re gluten‑free, a 1‑to‑1 blend of rice flour and tapioca starch works, but the texture will be slightly more crumbly.
Everything's prepped? Good. Let's get into the real action...
The Method — Step by Step
Preheat your oven to 350°F (175°C). While the oven warms, line a large baking sheet with parchment paper and set a cooling rack nearby. This is the moment of truth: the oven should feel like a warm, inviting cavern, not a scorching furnace. A quick tip—place a small oven‑safe bowl of water on the lower rack to maintain a gentle humidity that prevents the biscotti from drying out too quickly.
In a medium bowl, whisk together the flour, baking soda, and all the spices—cinnamon, ginger, allspice, cloves, black pepper, and salt. The spices should swirl together like a mini‑tornado, releasing that intoxicating aroma even before they touch the butter.
Kitchen Hack: Sift the flour and spices together; it not only removes lumps but also aerates the mixture, leading to a lighter biscuit.In a large mixing bowl, cream the softened butter with the brown sugar until the mixture is pale, fluffy, and smells like a bakery in December. This should take about 3–4 minutes with a handheld mixer on medium speed. When you lift the beaters, the mixture should fall back into the bowl in soft ribbons—if it looks greasy, you’ve under‑creamed; if it looks dry, add a teaspoon of molasses.
Add the eggs one at a time, beating well after each addition, then stir in the vanilla. The batter will look glossy and a little thick, which is exactly what we want. The eggs act as a binder, ensuring the biscotti hold together during the double bake. If the mixture seems too thick, a splash of milk (about a tablespoon) will loosen it without compromising flavor.
Now, drizzle the molasses over the creamed mixture, letting it swirl in like dark ribbons of caramel. The molasses should blend in smoothly, turning the batter a deep mahogany color.
Kitchen Hack: Warm the molasses slightly (microwave 10 seconds) so it mixes more easily and doesn’t form stubborn clumps.Gradually fold the dry ingredient mixture into the wet ingredients using a spatula. This is where the magic happens—don’t over‑mix, or you’ll develop gluten and lose that tender crumb. The dough will be thick, slightly sticky, and hold together when you press it.
Watch Out: Over‑mixing can turn your biscotti into a dense, rubbery snack. Stop as soon as the flour disappears.Transfer the dough onto the prepared parchment and, using a dampened spatula, shape it into a log about 12 inches long and 3 inches wide. The surface should be smooth but not overly compacted. If the dough sticks, lightly flour your hands. This log is the first bake; it will rise slightly and develop a crust that’s essential for the final snap.
Slide the sheet into the oven and bake for 25‑30 minutes, or until the log turns a deep golden‑brown and the edges pull away from the parchment. You’ll know it’s ready when a faint crackle sounds as the crust sets—trust your ears. Let the log cool on the rack for about 10 minutes; this rest period allows the interior to set, making it easier to slice.
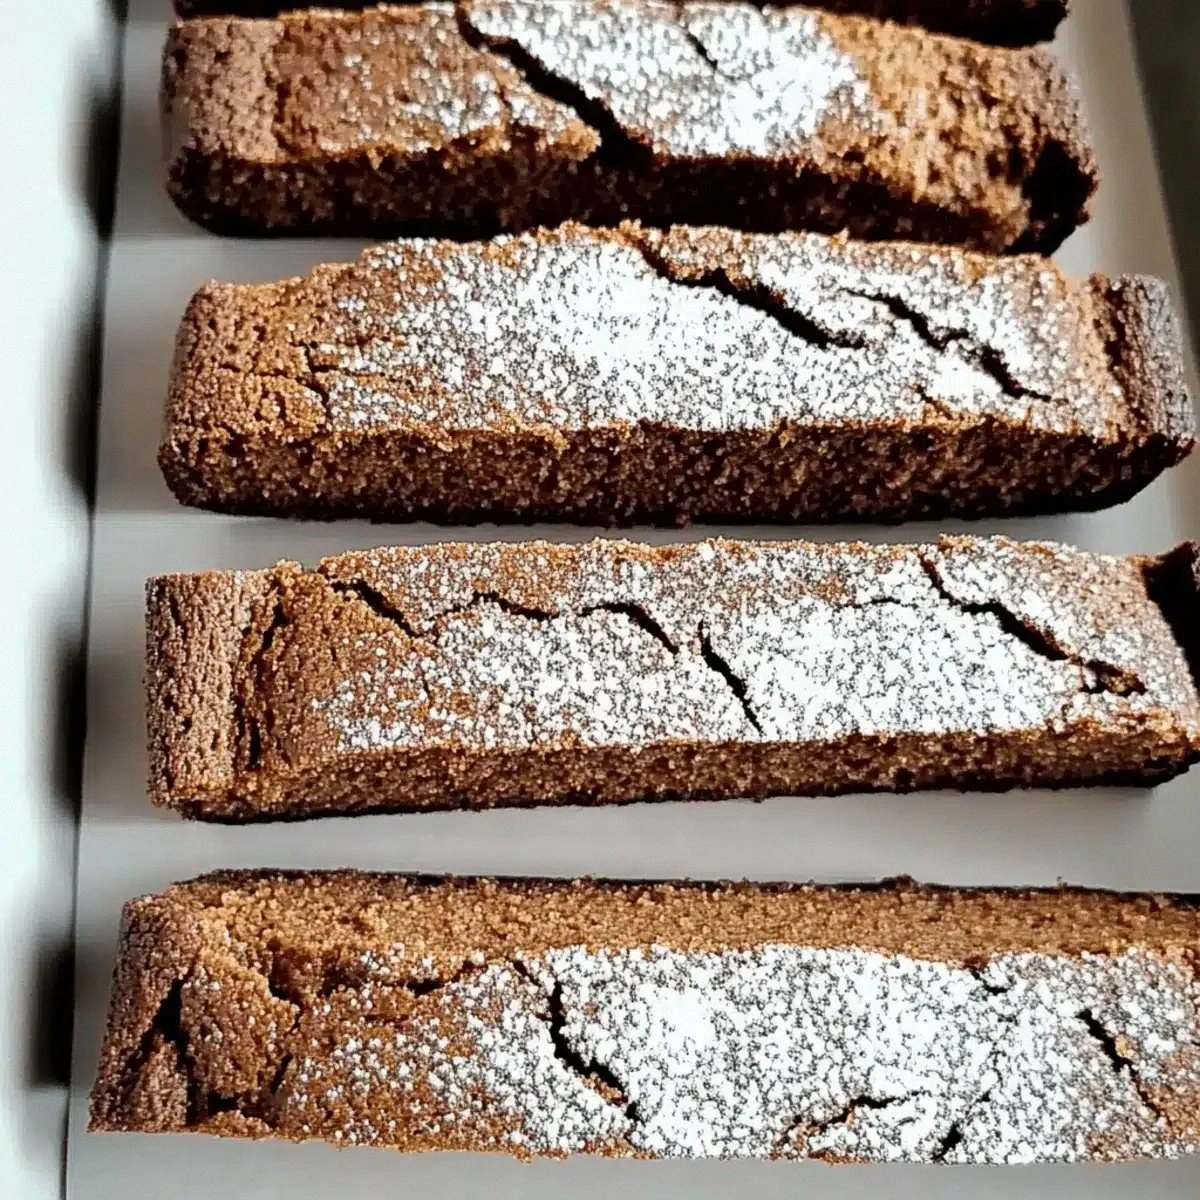
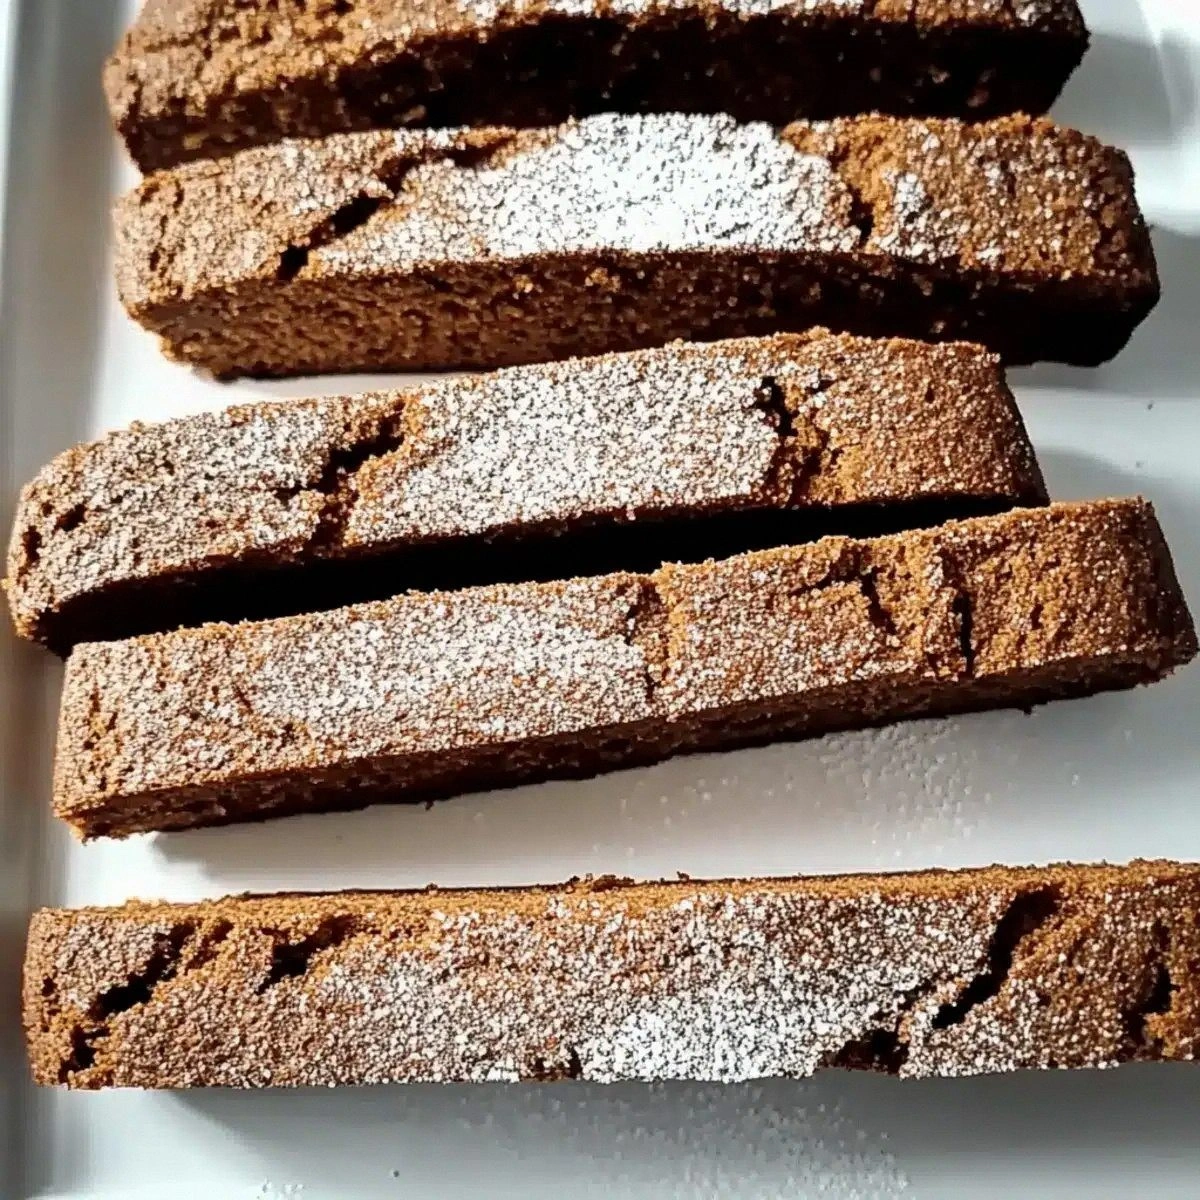
Using a serrated knife, cut the log diagonally into ½‑inch thick slices. Place the slices cut‑side down back on the baking sheet and bake for an additional 12‑15 minutes, flipping halfway through, until they’re crisp and dry. The second bake is where the biscotti achieve that signature crunch that shatters like thin ice when you bite. Keep an eye on the color; you want a deep amber, not burnt.
While the biscuits are still warm, dust them lightly with powdered sugar. The sugar will melt just enough to create a subtle glaze that glistens like fresh snow. Transfer the finished biscotti to a wire rack to cool completely. Once cooled, store them in an airtight container, and prepare for the inevitable dunk‑fest. That’s it — you did it. But hold on, I’ve got a few more tricks that’ll take this to another level...
Insider Tricks for Flawless Results
The Temperature Rule Nobody Follows
Never bake biscotti on a cold oven. Preheat the oven fully and let it stabilize for at least 10 minutes before sliding your tray in. A stable temperature ensures the exterior crisps before the interior dries out, giving you that perfect snap. I once tried to rush the process by turning the oven on low and extending the bake; the result was a sad, soggy biscuit that never recovered.
Why Your Nose Knows Best
Don’t rely solely on a timer—use your sense of smell. When the dough starts to emit a sweet, caramel‑spiced aroma, you’re within minutes of the perfect bake. If the scent turns slightly bitter, pull the tray immediately; over‑baking will make the biscotti taste burnt, no matter how golden they look.
The 5‑Minute Rest That Changes Everything
After the first bake, let the log rest for exactly five minutes before slicing. This short pause lets the interior steam settle, making the dough firm enough to cut cleanly without crumbling. Skipping this step leads to ragged edges and uneven slices, which ruins the visual appeal and the dunking experience.
Cold Butter, Warm Oven
Keeping the butter cold until the moment you cream it creates tiny air pockets that expand during baking, contributing to a lighter texture. If you let the butter soften too much, the biscotti become dense and heavy—something I learned the hard way after a lazy weekend.
Even Slices, Even Toast
Use a serrated knife and a gentle sawing motion; press down too hard and you’ll crush the biscotti, making them uneven. For perfectly uniform slices, place the log on a cutting board and use a ruler to mark where each slice should go before you start cutting.
Creative Twists and Variations
This recipe is a playground. Here are some of my favorite ways to switch things up:
Chocolate‑Dipped Delight
After the biscotti have cooled, dip half of each piece in melted dark chocolate and sprinkle with sea salt. The bitterness of the chocolate balances the sweet spice, and the salt adds a pop that makes the flavor sing.
Cranberry‑Orange Burst
Fold in ½ cup dried cranberries and the zest of one orange into the dough before the first bake. The tart cranberries and citrus zest brighten the deep spices, making these biscuits perfect for a brunch spread.
Nutty Crunch
Stir in ¾ cup toasted chopped pecans or walnuts with the dry ingredients. The nuts add a buttery crunch that complements the biscotti’s crisp exterior and provides a pleasant surprise in every bite.
Spiced Chai Variation
Swap half the cinnamon for ground cardamom and add a pinch of ground star anise. The chai‑inspired spices create an exotic twist that pairs beautifully with a cup of black tea.
Gluten‑Free Friendly
Replace the all‑purpose flour with a 1‑to‑1 gluten‑free blend and add a tablespoon of xanthan gum. The texture changes slightly, but the flavor remains just as festive.
Holiday Peppermint
After the second bake, drizzle the biscotti with a thin stream of peppermint‑flavored white chocolate and sprinkle crushed candy canes on top. The minty finish turns these into a holiday centerpiece.
Storing and Bringing It Back to Life
Fridge Storage
Place the cooled biscotti in an airtight container and store them in the refrigerator for up to two weeks. The cool environment preserves the crispness, and the container prevents them from absorbing other odors.
Freezer Friendly
Layer the biscotti between sheets of parchment paper, then seal them in a freezer‑safe zip‑top bag. They’ll keep for up to three months. When you’re ready to enjoy, let them thaw at room temperature for 15 minutes, then give them a quick 5‑minute warm‑up in a 300°F oven.
Best Reheating Method
To revive that fresh‑out‑of‑the‑oven snap, preheat your oven to 300°F, place the biscotti on a baking sheet, and sprinkle a tiny splash of water (about a teaspoon) over the batch. The steam revitalizes the interior while the oven restores the crisp exterior. In just 5 minutes, they’ll be as good as new.