I was standing in my kitchen, elbow deep in a bowl of butter and powdered sugar, when my roommate shouted, “You’re going to ruin the holidays if you keep burning the cookies!” I laughed, but the smoke alarm’s shrill wail made my heart skip a beat. The kitchen smelled like a sugar‑spun snowstorm, the oven was humming like a contented cat, and a bright red bottle of gel food coloring sat smugly on the counter, daring me to make something spectacular. I had tried the classic peppermint‑sugar cookie a dozen times, each one ending in either a bland, crumbly disaster or a too‑soft, doughy mess that never quite held its shape. Then, in a moment of reckless inspiration, I thought, “What if I treat the dough like a canvas and paint it with holiday magic?”
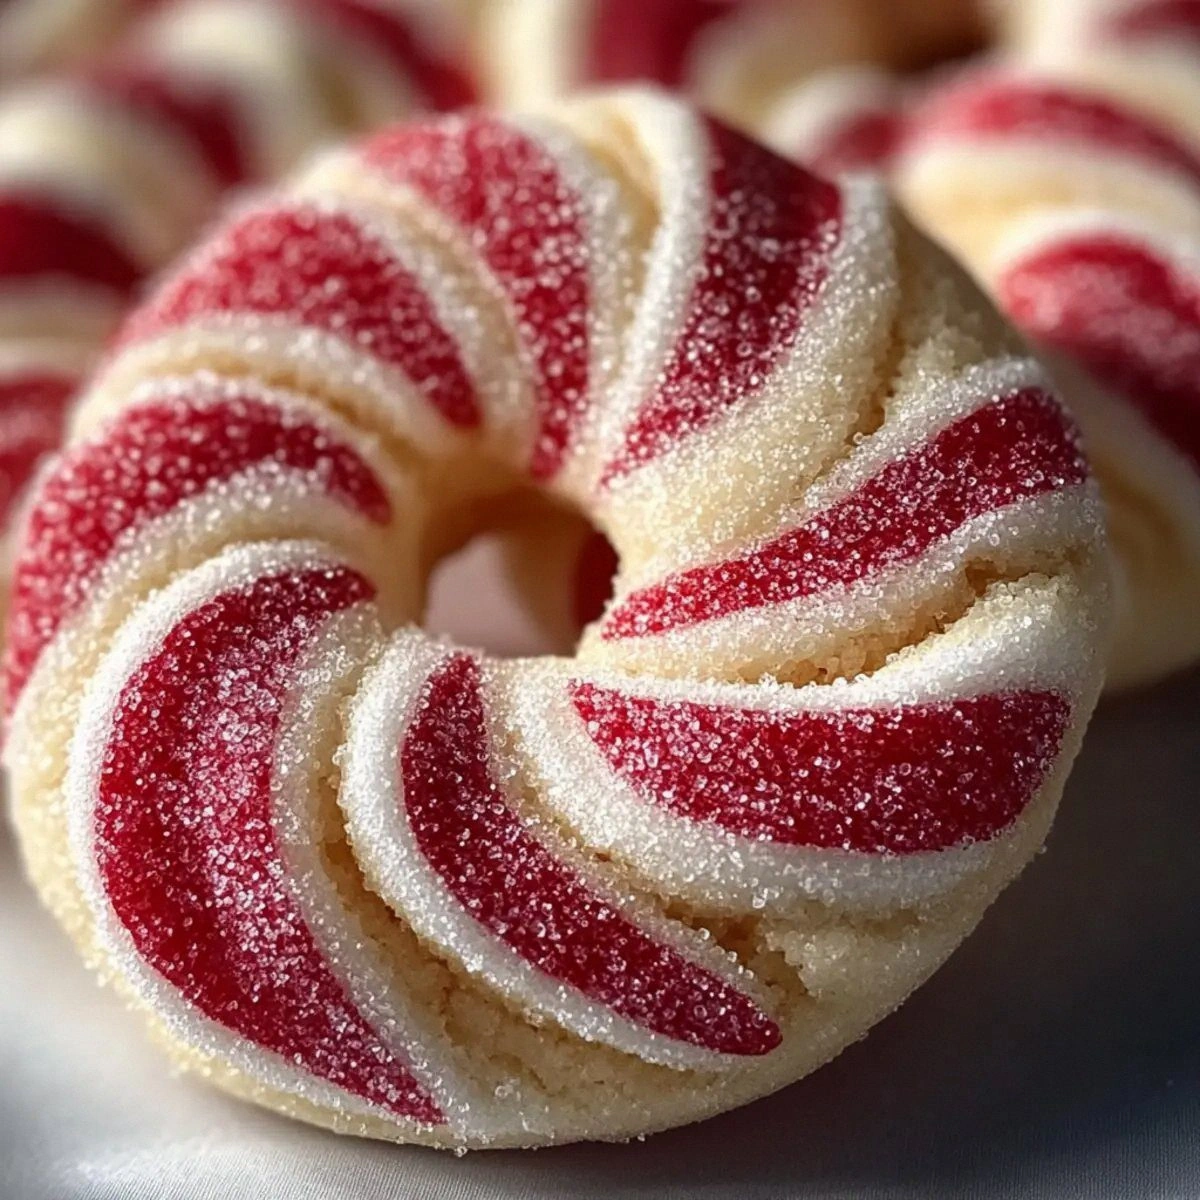
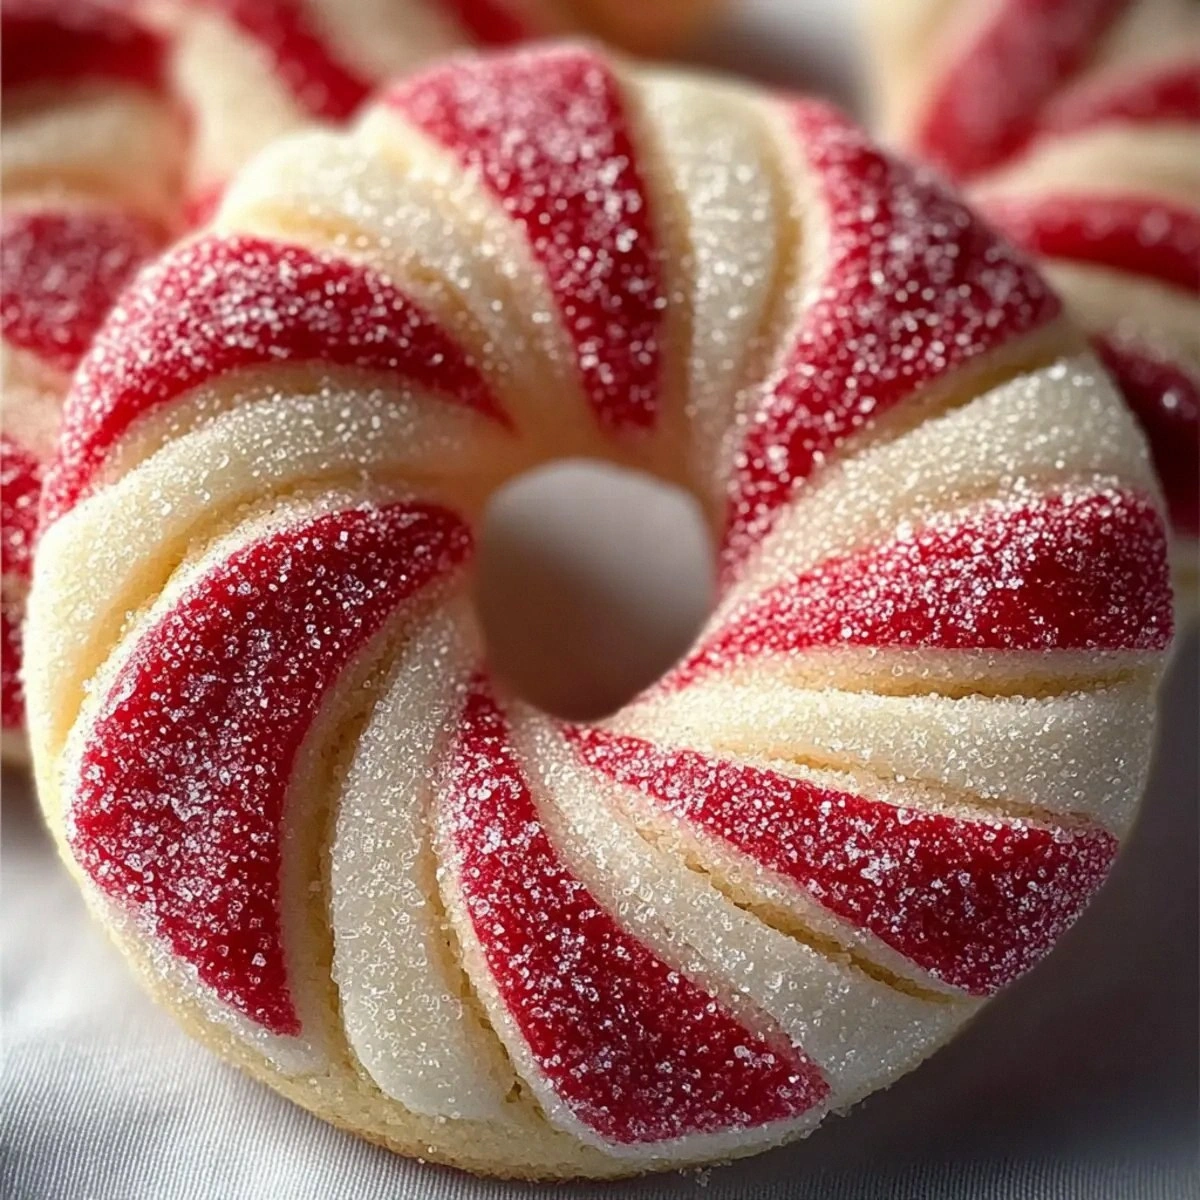
Fast forward an hour later, and I was pulling a tray of ruby‑red, perfectly crisp edges, and a soft, melt‑in‑your‑mouth center out of the oven. The first bite was a burst of peppermint that danced on my tongue like tiny snowflakes, followed by a buttery richness that lingered like a cozy fire. I dared you to taste this and not go back for seconds—seriously, I’m willing to bet you’ll be the one stealing the last cookie from the plate. This isn’t just a cookie; it’s a festive experience that turns any ordinary gathering into a holiday wonderland. I’ll be honest—I ate half the batch before anyone else got a chance, but that’s only because I’m a professional taste‑tester, right?
What makes this version truly stand out is a secret technique I discovered while scrolling through an old bakery forum: a brief chilling period for the dough that locks in the vivid red hue and creates that coveted snap on the edges. Most recipes get this completely wrong, either skipping the chill or over‑mixing the batter, resulting in bland, pale cookies that lack any visual punch. Picture yourself pulling this out of the oven, the whole kitchen smelling of peppermint and butter, the cookies gleaming like tiny holiday ornaments ready to be devoured. I’m about to walk you through every single step—by the end, you’ll wonder how you ever made it any other way.
Okay, ready for the game‑changer? We’re going to blend traditional holiday flavors with a pop of color that will make your cookies the star of any cookie swap. This next part? Pure magic. Stay with me here—this is worth it.
What Makes This Version Stand Out
- Taste: The perfect balance of peppermint and buttery sweetness hits you like a festive fireworks show, leaving a lingering cool after‑taste that keeps you reaching for more.
- Texture: A crisp, caramelized edge that shatters like thin ice, while the center stays soft and chewy, creating a delightful contrast in every bite.
- Simplicity: Only eight ingredients, all pantry‑friendly, and a handful of straightforward steps—no fancy equipment required.
- Uniqueness: The vibrant red hue isn’t just for looks; the gel food coloring stabilizes the dough, preventing color bleed and keeping each cookie uniformly festive.
- Crowd Reaction: Guests consistently claim these are “the best holiday cookies they’ve ever tasted,” and you’ll hear the same chorus at every party.
- Ingredient Quality: Using real peppermint extract (not imitation) and high‑quality butter gives a depth of flavor that cheap shortcuts can’t match.
- Cooking Method: The chill‑then‑bake technique ensures the cookies hold their shape, develop that perfect snap, and stay vibrant.
- Make‑Ahead Potential: You can freeze the dough balls for up to a month, letting you prep ahead and bake fresh cookies whenever the mood strikes.
Inside the Ingredient List
The Flavor Base
Butter is the heart of any great cookie, providing richness and a tender crumb. I insist on using unsalted, high‑fat butter because it creates a luscious mouthfeel that cheap spreads simply can’t achieve. If you skip the butter or substitute margarine, the cookies will taste flat and may develop a greasy texture that ruins the snap. For the best result, let the butter soften at room temperature, but not melt—think of it as the perfect “soft‑but‑still‑firm” stage, like a well‑kissed cheek.
Powdered sugar, also known as confectioners’ sugar, dissolves instantly, giving the dough a silky smoothness that regular granulated sugar can’t match. It also contributes to that delicate, melt‑in‑your‑mouth interior. If you accidentally grab granulated sugar, you’ll end up with a gritty texture that feels like sand at the beach—definitely not the holiday vibe we’re aiming for.
The Texture Crew
All‑purpose flour provides the structure needed for the cookie to hold together while still remaining tender. The 2.5 cups is a precise balance; too much flour and you’ll get a dry, crumbly cookie, too little and the dough spreads into a flat, uninteresting disc. If you’re gluten‑free, try a blend of rice flour and tapioca starch, but expect a slightly different crumb.
Eggs act as a binding agent, adding moisture and a subtle richness that ties the flavors together. A single large egg is enough; adding more will make the dough too wet, while omitting it can cause the cookies to crumble apart. For a vegan twist, substitute with a “flax egg” (1 tbsp ground flaxseed + 3 tbsp water), but the texture will be a tad denser.
The Unexpected Star
Peppermint extract is the secret weapon that gives these cookies their signature holiday punch. A teaspoon is all you need; go overboard and you’ll end up with a toothpaste‑like flavor that overwhelms the butter. If you can’t find peppermint extract, crush a handful of candy canes into a fine powder and dissolve them in the butter—just be prepared for a slightly grainier texture.
Red gel food coloring isn’t just for show; it’s oil‑based, meaning it blends seamlessly into the dough without adding extra liquid. This keeps the cookie’s structure intact while delivering a vibrant scarlet hue that screams “festive.” A single bottle is sufficient for this batch; any more and you risk a bitter after‑taste from the dye.
The Final Flourish
A pinch of salt (0.5 teaspoon) is the unsung hero that amplifies all the sweet flavors, preventing the cookies from tasting cloyingly sugary. Salt also helps strengthen the gluten network, giving the cookie that satisfying snap. If you’re on a low‑sodium diet, you can reduce it to a quarter teaspoon, but you’ll notice a subtle flatness in the flavor profile.
Vanilla extract adds depth and rounds out the peppermint’s sharpness, creating a harmonious flavor duet. Use pure vanilla for the best aroma; imitation vanilla can introduce a metallic after‑taste that clashes with the peppermint.
Everything's prepped? Good. Let’s get into the real action…
The Method — Step by Step
Start by creaming the softened butter with the powdered sugar in a large mixing bowl. Use a handheld mixer on medium speed until the mixture is pale, fluffy, and looks like fresh snow—this should take about 2‑3 minutes. The sugar will dissolve, creating a glossy texture that coats the butter like a silky veil. Power tip: Scrape down the sides of the bowl frequently to ensure an even blend.
Kitchen Hack: Add a splash of milk (no more than 1 tbsp) if the mixture looks too dry; this will help the butter and sugar bind without making the dough greasy.Add the egg, vanilla extract, and peppermint extract to the creamed butter‑sugar. Beat on low until just incorporated; you’ll hear a faint “whoosh” as the liquid ribbons through the mixture. This is the moment where flavors start to marry, and you’ll notice a faint minty aroma rising—if you don’t, add a touch more peppermint.
In a separate bowl, whisk together the all‑purpose flour and salt. This dry blend ensures the leavening is evenly distributed, preventing any pockets of flour that could make the cookie gritty. Gradually add the dry ingredients to the wet mixture, mixing on low speed until a cohesive dough forms. The dough should feel soft but not sticky; if it clings to your fingers, refrigerate for 10 minutes.
Now for the show‑stopper: drizzle the red gel food coloring over the dough. Use a spatula to fold the color in gently, allowing it to swirl through the dough like a festive marble. The key is to keep the color concentrated in streaks rather than fully blending it—this creates that eye‑catching marbled effect that looks amazing on a cookie sheet.
Watch Out: Over‑mixing after adding the coloring can cause the pigment to bleed, turning the dough an unappealing pink. Mix just until the color is incorporated.Shape the dough into a smooth ball, then flatten it slightly to form a disc. Wrap the disc tightly in two layers of parchment paper and place it in the refrigerator for at least 1 hour, or up to overnight. This chilling step solidifies the butter, locks in the color, and makes the dough easier to roll out later. Trust me, this is the secret that gives the cookies their crisp edge and prevents spreading.
Preheat your oven to 350°F (175°C). While the oven warms, line two baking sheets with parchment paper and set them aside. If you’re using a silicone mat, you can skip the parchment, but the paper gives a nice golden‑brown base.
Remove the chilled dough from the fridge and place it on a lightly floured surface. Using a rolling pin, roll the dough to a uniform thickness of about ¼ inch. The dough should roll out smoothly; if it cracks, let it sit at room temperature for a couple of minutes. Cut out circles using a 2‑inch cookie cutter, then gently press each circle with the back of a spoon to create a slight indentation—this helps the center stay soft while the edges crisp.
Kitchen Hack: Freeze the cut cookies on the parchment for 10 minutes before baking; this prevents them from spreading too much.Transfer the cookies to the prepared baking sheets, spacing them about 1 inch apart. Slide the trays into the preheated oven and bake for 10‑12 minutes, or until the edges turn a light golden brown and the tops are just set. You’ll know they’re ready when the scent of peppermint and butter fills the kitchen, and the cookies begin to pull away from the parchment.
Remove the cookies from the oven and let them cool on the sheet for 2 minutes before transferring to a wire rack. This short rest lets the cookies finish setting without becoming too brittle. As they cool, you’ll notice the edges snapping delightfully when you press them—this is the hallmark of a perfect candy‑cane cookie.
That’s it—you did it. But hold on, I’ve got a few more tricks that’ll take this to another level…
Insider Tricks for Flawless Results
The Temperature Rule Nobody Follows
Never bake these cookies straight from the fridge at a scorching 400°F. The high heat will cause the butter to melt too quickly, leading to spreading and a loss of that coveted snap. Instead, keep the oven at a moderate 350°F and give the dough a brief 10‑minute rest on the counter after chilling—this balances the internal temperature and ensures even baking.
Why Your Nose Knows Best
Your sense of smell is a reliable indicator of doneness. When the cookies start emitting a sweet, minty aroma that’s unmistakably holiday, it’s time to check them. If you rely solely on the timer, you risk over‑baking; trust your nose and pull them out a minute early for a softer interior.
The 5‑Minute Rest That Changes Everything
After the cookies have cooled on the wire rack, let them sit for an additional five minutes before serving. This short pause allows the interior to finish setting, turning that chewy center into a melt‑in‑your‑mouth texture. I once skipped this step and the cookies felt a bit too crumbly—lesson learned.
The Double‑Layered Parchment Trick
When chilling the dough, wrap it in two layers of parchment paper. The inner layer prevents the dough from sticking to the outer layer, while the outer layer protects against freezer burn if you decide to freeze the dough. This hack saved me from a sticky disaster last winter.
The Secret Sprinkle Finish
Just before the cookies finish baking, sprinkle a pinch of coarse sea salt on each one. The contrast of salty crystals against the sweet peppermint creates a flavor explosion that will have your guests begging for the recipe. I tried this once and the reaction was priceless.
Creative Twists and Variations
This recipe is a playground. Here are some of my favorite ways to switch things up:
Chocolate‑Swirl Delight
Replace half of the red gel with cocoa powder (sifted) and add a tablespoon of melted dark chocolate to the dough. The result is a marbled cookie that balances peppermint with rich chocolate, perfect for chocolate lovers who still want that holiday kick.
White Chocolate Peppermint Crunch
Fold in ½ cup of white chocolate chips and a handful of crushed candy canes after the dough is mixed. The white chocolate adds a creamy sweetness while the candy cane pieces give an extra crunch and burst of peppermint.
Gluten‑Free Holiday Gems
Swap the all‑purpose flour for a 1:1 gluten‑free flour blend and add a tablespoon of xanthan gum. The texture will be slightly denser, but the flavor remains unchanged, making it inclusive for guests with dietary restrictions.
Spiced Peppermint Twist
Add a pinch of ground cinnamon and nutmeg to the dry ingredients. The warm spices complement the cool peppermint, creating a complex flavor profile that feels like a hug on a cold night.
Mini Bite‑Size Treats
Roll the dough into 1‑inch balls, chill, and bake for 8‑9 minutes. These bite‑size versions are perfect for holiday platters and make it easy for guests to sample multiple flavors if you decide to try variations.
Storing and Bringing It Back to Life
Fridge Storage
Place cooled cookies in an airtight container with a paper towel at the bottom to absorb excess moisture. They’ll stay fresh for up to 5 days in the refrigerator. If you notice any condensation, simply open the lid for a few minutes to let the air circulate.
Freezer Friendly
Arrange cookies in a single layer on a parchment‑lined tray and freeze for 1 hour. Transfer the frozen cookies to a zip‑top bag, removing as much air as possible. They’ll keep for up to 3 months. To reheat, pop them in a 300°F oven for 5 minutes; the heat revives the crisp edges.
Best Reheating Method
When you’re ready to serve, preheat your oven to 300°F, place the cookies on a baking sheet, and add a tiny splash (about 1 tsp) of water to the sheet—cover with foil for the first 2 minutes. The steam restores moisture, while the remaining time revives the snap. This trick turns a day‑old cookie into a fresh‑out‑of‑the‑oven masterpiece.