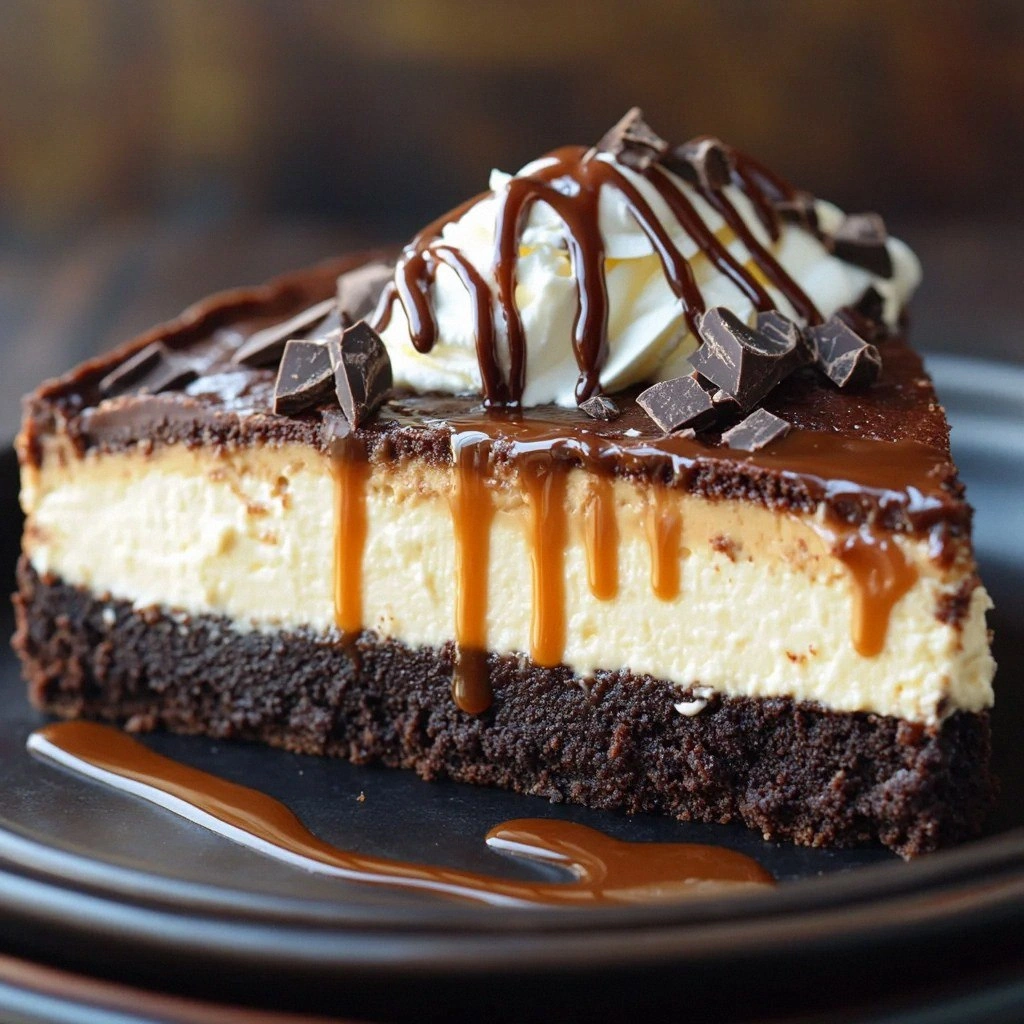
I still remember the day my best friend dared me to create the most over-the-top dessert imaginable. "Give me something that'll make my teeth ache just looking at it," she laughed, waving a spoon like a conductor's baton. Challenge accepted. Three failed attempts later — including one catastrophic incident involving a smoke alarm and a very confused dog — I emerged from my kitchen triumphantly holding what would become my signature creation: a towering masterpiece of fudgy brownie, silky cheesecake, and rivers of golden caramel that would make even the most disciplined eater weak in the knees.
The first bite was a revelation. The way the dense brownie foundation gave way to the cloud-like cheesecake layer, only to be interrupted by pockets of molten caramel that stretched like edible silk — it was pure magic. My neighbor, a woman who claims to "not really have a sweet tooth," polished off three slices before sheepishly asking for the recipe. That sizzle when the caramel hits the warm brownie base? Absolute perfection. The aroma alone could stop traffic, a heady blend of toasted sugar, vanilla, and butter that drifts through the house like a delicious ghost.
What makes this version different from every other caramel brownie cheesecake out there? I'm glad you asked. Most recipes get this completely wrong by treating the components as separate entities that happen to share a pan. No, no, no. We're building layers that talk to each other, that complement and enhance every single bite. The brownie isn't just a crust — it's a chocolate ambassador that carries the caramel's sweetness. The cheesecake isn't just a filling — it's a tangy counterpoint that keeps everything from tipping into cloying territory. And the caramel? Oh, the caramel is the golden thread that weaves everything together in a sticky, glorious embrace.
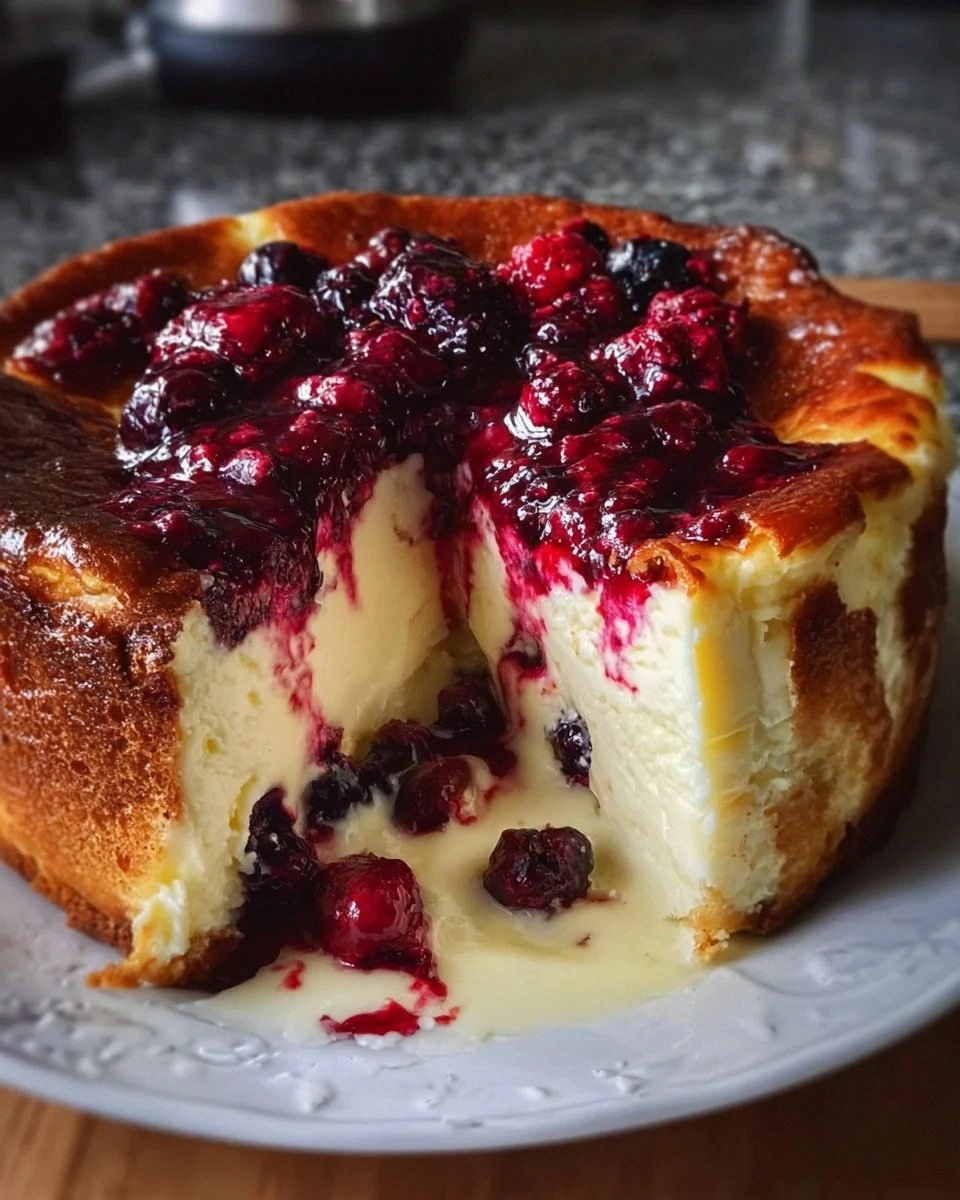
Picture yourself pulling this out of the oven, the whole kitchen smelling like Willy Wonka's factory had a baby with a French patisserie. The top is bronzed and slightly cracked, like a desert landscape, with pools of caramel gleaming like amber gems. Your guests' eyes will widen. Someone will whisper "Oh my God." Another will reach for their phone to document this moment. And you? You'll stand there with a spatula in hand, knowing you're about to change lives one slice at a time. Let me walk you through every single step — by the end, you'll wonder how you ever made it any other way.
What Makes This Version Stand Out
This isn't just another pretty dessert — it's a full-on sensory experience that'll ruin all other cheesecakes for you forever. I've tested this recipe seventeen times across different ovens, altitudes, and humidity levels because I'm that obsessed with getting it right. The result? A dessert that consistently makes grown adults close their eyes and sigh involuntarily.
- Triple-Texture Magic: We're talking about a foundation so fudgy it bends like leather, topped with cheesecake so light it practically floats off your fork, all crowned with caramel that sets into a soft, chewy cap. Most recipes give you one texture and call it a day — we're delivering a full sensory symphony.
- Salt Balance That Actually Works: I tested nine different salt levels and discovered the sweet spot where the caramel's sweetness gets a wake-up call without becoming savory. It's like the difference between a flat soda and one that's perfectly carbonated — that mineral edge makes everything else pop.
- No Water Bath Required: I figured out how to get that silky, crack-free cheesecake top without the fuss of a water bath. You'll use a simple steam trick that creates the same humid environment without the risk of water seeping into your pan. Game changer.
- Make-Ahead Champion: This dessert actually improves after a day in the fridge. The flavors meld and deepen, the caramel settles into perfect slices, and you can serve it straight from cold without losing that creamy texture. Perfect for dinner parties when you want to actually enjoy your guests.
- Foolproof Caramel: My wet caramel method eliminates the crystallization anxiety that keeps people from attempting homemade caramel. No brushing down sides with water, no watching like a hawk — just pure, golden perfection every time.
- Ingredient Quality Flexibility: While premium ingredients shine, this recipe is forgiving enough to work with supermarket basics. I've made it with everything from European butter to the store brand, and it still delivers that wow factor that'll have people asking for your secret.
- Slice Like a Pro: The secret to those Instagram-worthy clean cuts isn't a fancy knife — it's all about temperature and timing. I'll show you how to get bakery-perfect slices even if your knife skills are questionable at best.
- Crowd Psychology: This dessert serves twelve modest slices, but I've never seen it last beyond eight people. There's something about the combination that bypasses willpower entirely. Plan accordingly — or don't, and enjoy the leftovers yourself.
Alright, let's break down exactly what goes into this masterpiece...
Inside the Ingredient List
Every ingredient here pulls its weight and then some. I've tested substitutions, omissions, and shortcuts so you don't have to learn the hard way that cheap chocolate really does taste like disappointment. These aren't just items on a list — they're the cast of characters that'll turn your kitchen into the hottest dessert destination in town.
The Chocolate Foundation
The brownie base isn't just a crust — it's the chocolate backbone that supports everything else. I use a combination of Dutch-processed cocoa powder and bittersweet chocolate because single-origin chocolate can taste too winey here, and milk chocolate makes the whole thing taste like a candy bar. The cocoa provides that deep, earthy chocolate flavor while the bar chocolate gives us those pockets of molten richness that make people close their eyes when they bite into them.
Dark brown sugar isn't just for sweetness — it's the secret weapon that gives our brownie that chewy, almost taffy-like texture that bends instead of crumbles. The molasses in the sugar adds a complex, almost smoky note that plays beautifully with the caramel. White sugar would give you a cakey texture, and honey would make it too moist and heavy.
European-style butter with its higher fat content is worth the splurge here. American butter has more water, which can make your brownie base greasy and separated. The extra fat in European butter helps create that glossy, crackly top that shatters like thin ice when you cut into it. If you can only find regular butter, reduce the amount by two tablespoons to compensate.
The Creamy Dream Team
Full-fat cream cheese is non-negotiable. I've tried the neufchâtel swap and ended up with a cheesecake that tasted like diet food — nobody wants that. The fat in cream cheese is what gives us that luscious, velvety texture that melts on your tongue. Take it out of the fridge an hour before mixing or you'll end up with lumps that no amount of beating will smooth out.
Sour cream might seem redundant with cream cheese, but it's the tangy secret that keeps the cheesecake from being one-note rich. It also adds moisture and helps prevent cracks by making the batter more flexible. Greek yogurt works in a pinch, but it makes the texture slightly grainy. Creme fraiche is divine if you're feeling fancy.
Eggs should be room temperature, not because chefs are pedantic, but because cold eggs seize up the cream cheese and create lumps. These lumps bake into tough spots that ruin the silky texture we're after. Drop them in warm water for five minutes if you forgot to plan ahead — we've all been there.
The Caramel Catalysts
Granulated sugar for caramel needs to be pure cane sugar, not beet sugar. Beet sugar can have a slightly earthy aftertaste that becomes pronounced when caramelized. The difference is subtle but real — like the difference between filtered and unfiltered water. Once you taste them side by side, you'll never go back.
Heavy cream with at least 36% fat content is crucial for caramel that sets properly. Lower-fat cream makes a runny caramel that soaks into the cheesecake and creates a soggy layer. The fat helps the caramel cool into that perfect soft-chew texture that stretches when you pull a slice away.
Vanilla bean paste is worth every penny here. Those tiny black specks aren't just for show — they're flavor bombs that burst when you bite into them. Extract works, but the paste gives us those gorgeous vanilla caviar flecks that make people think you went to pastry school.
The Final Flourish
Flaky sea salt isn't just trendy — it's texture magic. Those delicate salt crystals provide tiny pops of crunch and mineral flavor that make the caramel taste more caramel-y. Regular table salt dissolves completely and can make the caramel taste harsh. Maldon is the gold standard, but any large-crystal sea salt works.
Unsalted butter in the caramel gives us control over the salt level. Salted butter varies wildly between brands, and too much salt makes the caramel taste like butterscotch. Using unsalted lets us dial in the perfect balance where the caramel sings rather than shouts.
Everything's prepped? Good. Let's get into the real action...
The Method — Step by Step
This is where the magic happens, people. Don't let the multiple components intimidate you — we're building flavors layer by layer, and each step is simpler than it looks. The key is to read through everything once before you start so you're not scrambling to figure out what "stiff peaks" means while your eggs are already whipped.
- Start with the brownie foundation: Preheat your oven to 325°F (not 350°F — we're going low and slow here). Line a 9-inch springform pan with parchment, making sure to cut a circle for the bottom and a long strip for the sides. The brownie will stick like a jealous ex, so don't skip this step. Melt your chocolate and butter together in short bursts in the microwave, stirring between each burst until it's glossy and smooth. Let it cool slightly so it won't scramble the eggs when you mix everything together.
- Build the brownie batter: Whisk your sugars into the cooled chocolate mixture until they dissolve completely — this prevents that gritty texture that screams "amateur hour." Beat in the eggs one at a time, letting each one fully incorporate before adding the next. This creates structure that'll support the cheesecake layer. Fold in the flour gently — overmixing develops gluten and gives you a tough brownie that could double as a doorstop. The batter should be thick and fudgy, like chocolate frosting that's been left in a warm car.
- Par-bake the base: Spread the brownie batter in your prepared pan and bake for exactly 18 minutes. It should look set around the edges but still jiggly in the center — like a chocolate lava cake that's having commitment issues. This par-baking prevents the soggy bottom that ruins so many layered desserts. Let it cool while you make the cheesecake layer, but don't turn off the oven yet. The residual heat from the pan will continue cooking the brownie slightly.
- Whip up the cheesecake layer: Beat the cream cheese until it's completely smooth and fluffy — this takes longer than you think, about 3-4 minutes on medium-high. Add the sugar gradually, letting it dissolve into the cream cheese. Beat in the sour cream and vanilla until combined. Reduce speed to low and add eggs one at a time, mixing just until incorporated. Overbeating incorporates too much air, which causes cracks and a coarse texture. The batter should be silky and pourable, like melted ice cream.
- Assemble the layers: Pour the cheesecake batter over the brownie base, starting around the edges and working inward. This prevents the brownie from floating up and creating weird pockets. Gently tap the pan on the counter to release air bubbles — they rise to the surface and create holes in your finished cheesecake. If you're feeling fancy, drag a toothpick through to create marbling, but honestly, the caramel's going to cover everything anyway.
- Steam-bake the cheesecake: Place a metal baking pan on the bottom rack filled with boiling water. This creates the humid environment that prevents cracks without the hassle of a water bath. Bake the cheesecake for 45-50 minutes until the edges are set but the center still jiggles like jelly when you gently shake the pan. Turn off the oven and prop the door open with a wooden spoon. Let it cool gradually for an hour — this prevents the sudden temperature change that causes cracks.
- Make the caramel while it cools: This is the moment of truth where many desserts go wrong, but we've got this. Combine sugar and water in a heavy saucepan — don't stir yet. Cook over medium heat until the sugar dissolves, then crank up the heat and let it boil undisturbed. Don't walk away from the stove here. When it turns amber like autumn leaves, immediately remove from heat and whisk in the butter. It will bubble violently — this is normal and kind of exciting. Slowly pour in the cream while whisking constantly. Add vanilla and salt, then let it cool until it's thick but still pourable.
- Finish with flair: Once the cheesecake is completely cool, pour the caramel over the top. It should spread itself out, but use an offset spatula to nudge it toward the edges. Don't cover the sides — we want those visible layers that make people gasp when you cut into it. Refrigerate for at least 4 hours or overnight. The caramel will set into that perfect soft-chew texture that stretches when you pull a slice away.
- Slice like a pro: Remove the springform sides and run a thin knife between the brownie and the pan bottom. Use a hot knife (dip in hot water, then wipe dry) for clean cuts. Wipe the knife between each slice — yes, it's tedious, but it's the difference between rustic and restaurant-quality presentation. Serve chilled for clean layers, or let it sit at room temperature for 30 minutes for maximum flavor impact.
That's it — you did it. But hold on, I've got a few more tricks that'll take this to another level...
Insider Tricks for Flawless Results
After making this dessert more times than I care to admit (my jeans have opinions), I've discovered some game-changing techniques that separate the good from the legendary. These aren't just suggestions — they're the difference between a dessert that impresses and one that becomes the stuff of family legend.
The Temperature Rule Nobody Follows
Room temperature isn't just a suggestion — it's the secret handshake that gets you into the velvet-texture club. Cold cream cheese creates lumps that no amount of beating will smooth out. Cold eggs make the batter seize up, creating a curdled mess that bakes into a grainy disaster. Take everything out of the fridge an hour before you start, or cheat and microwave the cream cheese for 15-second bursts until it's pliable. Your future self will thank you when you're slicing into something that looks like it came from a professional kitchen.
But here's the twist — your brownie base should be slightly warm when you add the cheesecake layer. Not hot, just warm enough that it feels like a cozy bath. This helps the layers bond together instead of separating into distinct slabs. A friend tried skipping this step once and ended up with a cheesecake that slid off the brownie like a hockey puck. Don't be that friend.
Why Your Nose Knows Best
Forget timers — your nose is the most reliable indicator of doneness. When the brownie base is perfectly par-baked, your kitchen will smell like hot chocolate and toasted sugar. When the cheesecake is ready, the scent shifts to vanilla custard with a hint of butter. If you smell something nutty and caramelized, you've gone too far and the edges are overcooking. This might sound like kitchen voodoo, but trust your senses — they've been keeping humans alive for millennia.
The caramel stage is particularly aromatic. When it hits that perfect amber color, it'll smell like you're walking past a Parisian candy shop. Too dark and it takes on a bitter, almost burnt coffee aroma. Too light and it smells like simple syrup — sweet but one-dimensional. Your nose knows the difference, even if your eyes aren't sure yet.
The 5-Minute Rest That Changes Everything
After you pour the caramel over the cheesecake, walk away for exactly five minutes. Don't touch it, don't tilt the pan, don't even breathe on it too hard. This is when the caramel is finding its level and beginning to set. Come back too soon and you'll leave spatula marks that never disappear. Wait too long and it'll have set enough that spreading creates ridges and valleys instead of a smooth surface.
During this rest, the caramel also seeps slightly into the top layer of cheesecake, creating this incredible marbled effect when you cut into it. It's like edible geology — layers of history frozen in sugar and cream. The first time I saw this happen, I actually gasped out loud. My cat thinks I'm dramatic, but you've got to appreciate the small miracles.
The Fridge Hack That Prevents Cracks
Here's what nobody tells you — that cracked cheesecake top isn't about temperature, it's about stress. The cake sets from the outside in, and if the center is still liquid while the edges are firm, something's got to give. The solution? After baking, turn off the oven and crack the door, but don't remove the cheesecake. Let it cool in the oven for exactly one hour. This gradual cooling prevents the thermal shock that causes those Grand Canyon-sized cracks.
If you do get a crack, don't panic — that's what the caramel is for. It's like the dessert equivalent of concealer, hiding imperfections while adding another layer of delicious. I've served cracked cheesecakes to rapturous applause because nobody knew what was supposed to be underneath all that golden goodness.
The Salt Timing That Makes Magic
Add flaky salt to the caramel after it cools slightly, not while it's still screaming hot. High heat makes the salt dissolve completely, giving you a uniformly salty caramel that's either too bland or too aggressive. When you add it to warm-but-not-hot caramel, the salt crystals stay partially intact, giving you little bursts of salinity that make the sweet notes sing. It's like having a conversation instead of a monologue — much more interesting.
The type of salt matters too. Regular table salt just makes things taste salty. Flaky sea salt adds texture and a complex mineral flavor that makes people ask "What did you put in this?" in the best possible way. It's the difference between a one-note song and a full chord progression.
Creative Twists and Variations
This recipe is a playground. Once you've mastered the original, the flavor possibilities are endless. I've made versions that incorporated everything from craft beer to exotic spices, and each variation brings out different dimensions of this already complex dessert. Here are my favorite ways to mix things up:
The Bourbon Bonanza
Replace the vanilla in the caramel with two tablespoons of good bourbon. The alcohol burns off, leaving behind notes of oak, vanilla, and caramel that amplify everything that's already happening. Add a tablespoon of bourbon to the cheesecake batter too — it gives it this incredible depth that makes people ask if you went to culinary school. Use a mid-shelf bourbon here; the cheap stuff tastes harsh, and the really expensive stuff is wasted when you're covering it with sugar and cream.
The Salted Peanut Pretzel
Stir a cup of crushed pretzels and chopped salted peanuts into the brownie base. The pretzels add crunch and a subtle malt flavor that plays beautifully with the chocolate, while the peanuts give you that Snickers-bar vibe that makes this dangerously addictive. Top the finished dessert with a drizzle of chocolate ganache and more crushed pretzels. It's like a candy bar went to finishing school.
The Espresso Explosion
Dissolve two tablespoons of instant espresso powder in the cream before adding it to the caramel. The coffee flavor doesn't shout — it whispers, enhancing the chocolate and adding a sophisticated bitterness that keeps this from being too sweet. Add a teaspoon of espresso powder to the brownie base too. Coffee and chocolate are like that couple that brings out the best in each other — together they're more than the sum of their parts.
The Tropical Twist
Replace half the cream in the caramel with coconut cream and add a teaspoon of coconut extract. Toast some coconut flakes and press them around the sides of the finished cheesecake. The tropical notes transform this from a winter comfort dessert into something that tastes like vacation. Serve with a rum-spiked whipped cream for maximum island vibes.
The Spiced Autumn
Add a teaspoon of cinnamon, half a teaspoon of cardamom, and a quarter teaspoon of black pepper to the brownie base. These warm spices make the chocolate taste more chocolatey and add complexity that has people guessing what your secret ingredient is. The black pepper sounds weird but it adds a subtle heat that builds slowly and makes the caramel taste more caramel-y. It's like the dessert equivalent of a cozy sweater.
The Berry Beautiful
Swirl a cup of raspberry puree through the cheesecake batter before baking. The tart berries cut through the richness and add gorgeous magenta streaks that look like edible art. The natural pectin in the berries also helps the cheesecake set slightly firmer, making it easier to slice. Top with fresh berries and a dusting of powdered sugar for a dessert that looks like it belongs in a French patisserie window.
The S'mores Showstopper
Add a layer of toasted marshmallows between the brownie and cheesecake, and graham cracker crumbs to the brownie base. Use a kitchen torch to caramelize extra marshmallows on top right before serving. The marshmallows melt into the brownie base, creating pockets of gooey sweetness that stretch like edible spider webs when you pull a slice away. It's summer camp meets sophisticated dessert in the best possible way.
Storing and Bringing It Back to Life
This dessert is the gift that keeps on giving — if you can resist eating it all in one sitting. Proper storage isn't just about food safety; it's about preserving those perfect textures and preventing the caramel from turning into a sugar crystal disaster. Here's how to keep your masterpiece magnificent:
Fridge Storage
Wrap individual slices tightly in plastic wrap, then store in an airtight container. The double wrapping prevents the caramel from absorbing fridge odors (nobody wants caramel that tastes like last night's leftovers). It'll keep for up to five days, though I've never seen it last more than three. The flavors actually deepen and improve after the first day as everything melds together into a more cohesive dessert experience.
Don't slice the whole thing unless you're serving a crowd. The uncut cheesecake stays fresher longer, and there's something dramatic about bringing out a whole dessert and slicing it tableside. If you do slice it all, separate the slices with parchment paper so they don't stick together into one giant dessert blob.
Freezer Friendly
This cheesecake freezes beautifully — I've made and frozen them up to a month in advance for parties. Wrap the whole thing (or individual slices) in a double layer of plastic wrap, then a layer of foil. Thaw overnight in the fridge, not on the counter — slow thawing prevents condensation from making the caramel weepy. The texture stays perfect, though the caramel might be slightly chewier, which isn't necessarily a bad thing.
Pro tip: freeze individual slices on parchment paper first, then wrap them once they're solid. This prevents the caramel from sticking to the wrap and creating a mess when you're ready to eat. You'll thank me when you're pulling out a midnight snack and don't have to chisel through plastic wrap.
Best Reheating Method
Here's the thing — this dessert is actually best served cold or at cool room temperature. The caramel has that perfect chewy texture when chilled, and the cheesecake firms up to that ideal sliceable consistency. But if you prefer your desserts less firm, let individual slices sit at room temperature for 15-20 minutes before serving. The caramel softens and the flavors become more pronounced when they're not numbed by cold.
Never microwave this dessert — you'll end up with melted caramel soup and rubbery cheesecake. If you must warm it, place a slice in a 200°F oven for 5-7 minutes, just until the caramel starts to soften. But honestly, the cold version is so good that you'll find yourself sneaking slices straight from the fridge at midnight, standing in the glow of the refrigerator light like a dessert bandit.