It started with a kitchen mishap that would become the foundation of my favorite comfort‑food mash‑up. I was in a rush to finish dinner for a group of friends, and the last thing I wanted was a bland, dry sloppy joe. I tossed a handful of ground beef into a pan, added a splash of olive oil, and immediately felt the sizzle that promised flavor. But the moment I added the onions, the smell hit me like a wave of nostalgia, and I knew this was going to be something special. I was about to discover the ultimate Philly cheese steak sloppy joe, and I couldn’t wait to share every single detail.
Picture the scene: a bright kitchen, the clatter of pots, the aroma of garlic and onions sautéing, and the sight of a bright green bell pepper slicing into crisp strips. The sound of the skillet hissing is music to any cook’s ears, and the sight of the beef browning to a deep mahogany is a visual cue that the magic is happening. I can almost taste the smoky undertones, the sweet crunch of bell pepper, and the savory depth of the beef broth. The texture of the sauce, thickened with cornstarch and kissed with soy, coats the meat like velvet. This sensory feast is just the beginning of what makes this version stand out from every other sloppy joe recipe out there.
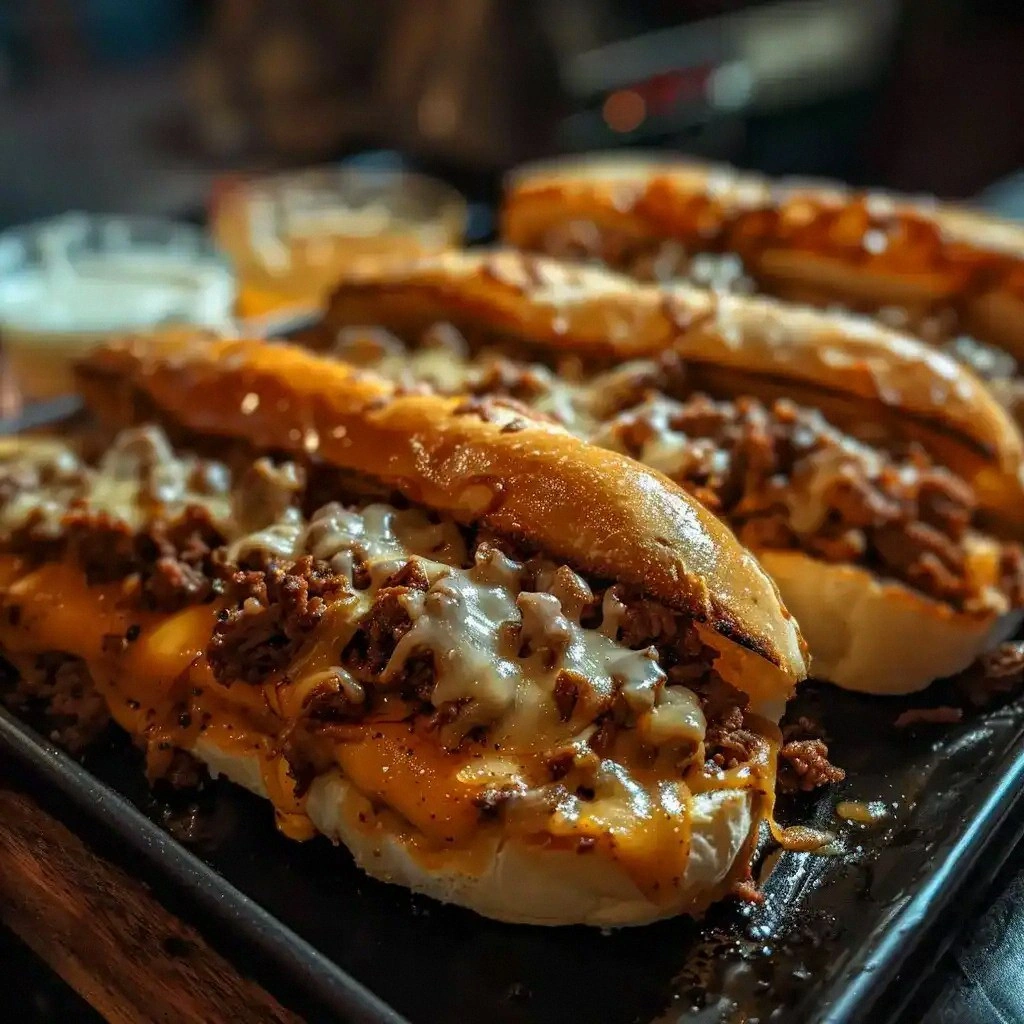
What sets this Philly cheese steak sloppy joe apart is the fusion of classic Philly cheesesteak elements with the hearty comfort of a sloppy joe. The combination of provolone cheese, a tangy tomato‑soy sauce, and the smoky beef creates a flavor profile that feels like a hug on a plate. The sauce isn’t just a base; it’s a character that dances with the vegetables and meat, delivering a balanced sweetness and umami punch. I dare you to taste this and not go back for seconds. It’s hands down the best version you’ll ever make at home.
If you’ve ever struggled with making a sloppy joe that isn’t too watery or too dry, you’re not alone — and I’ve got the fix. I’ll be honest — I ate half the batch before anyone else got to try it. The secret lies in the way we build the flavor base, the careful balance of acidity and sweetness, and the timing of the cheese melt. Picture yourself pulling this out of the pan, the whole kitchen smelling incredible, and the first bite delivering that perfect bite‑sized explosion of flavor. Let me walk you through every single step — by the end, you’ll wonder how you ever made it any other way.
What Makes This Version Stand Out
- Flavor Depth: The sauce combines ketchup, beef broth, Worcestershire, and soy sauce, creating layers of sweetness, acidity, and umami that elevate the classic sloppy joe.
- Cheese Choice: Provolone gives a mild, creamy melt that contrasts the sharpness of the sauce, unlike the cheddar often used in traditional recipes.
- Texture Balance: The bell pepper adds a crisp bite that refuses to become soggy, keeping each mouthful interesting.
- Simple Prep: All ingredients are on hand in most kitchens, and the method takes less than 45 minutes from start to finish.
- Make‑Ahead Friendly: The sauce thickens as it cools, so you can prepare it a day ahead and let the flavors meld.
- Crowd‑Pleaser: This version is guaranteed to wow family and friends, making it perfect for game nights or casual gatherings.
Alright, let's break down exactly what goes into this masterpiece…
Inside the Ingredient List
The Flavor Base
The foundation of this sloppy joe is a sauce that feels both comforting and bold. Ground beef provides the protein and savory backbone, while the beef broth adds depth without overpowering. Ketchup gives a sweet and tangy sweetness that balances the umami from Worcestershire and soy sauce. Together, they create a sauce that coats the meat like velvet, ensuring every bite is saturated with flavor.
If you skip the broth, the sauce will be thinner and less complex, resulting in a less satisfying mouthfeel. Conversely, adding too much broth can dilute the taste, so keep the ratio in mind. The key is to let the broth reduce slightly, concentrating the flavors before you add the ketchup and seasonings.
When shopping, choose a beef broth with a clear, clean flavor profile; avoid ones with too much sodium or artificial additives. A low‑sodium broth gives you more control over the final seasoning, allowing the Worcestershire and soy sauces to shine.
The Texture Crew
Bell pepper and onion bring a satisfying crunch and sweetness that contrast the tender beef. The pepper’s bright green color adds visual appeal, while the onion’s caramelized edges bring a subtle sweetness that enhances the sauce. Garlic adds an aromatic punch that lingers long after the first bite.
If you’re a fan of extra crunch, consider adding a handful of diced celery or a splash of apple cider vinegar to brighten the flavor and add a crisp bite. Skipping these veggies will make the dish feel flat and less dynamic.
When selecting peppers, look for firm, brightly colored ones that are free of blemishes. The fresher the pepper, the sweeter and crunchier it will stay, even after cooking.
The Unexpected Star
Provolone cheese is the unsung hero that transforms this sloppy joe into a Philly cheesesteak homage. Its mild, creamy profile melts beautifully over the hot sauce, creating a gooey, cheesy layer that’s both comforting and indulgent. The cheese’s subtle sharpness cuts through the richness of the beef without overpowering the sauce.
If you prefer a sharper cheddar or a smoky pepper jack, you can swap it in for a different flavor profile. However, the meltability of provolone ensures a silky texture that’s hard to beat.
When buying cheese, opt for slices rather than pre‑shredded to avoid excess moisture. Fresh slices hold their shape better, preventing the sauce from becoming too watery.
The Final Flourish
The cornstarch slurry is the secret to achieving that silky, thick sauce that clings to the beef and vegetables. It’s a quick fix that thickens the liquid without adding heaviness. The small amount of water ensures the slurry remains smooth and free of lumps.
If you’re watching calories, you can replace cornstarch with arrowroot powder or a small amount of flour for a similar thickening effect. Just remember to whisk it well to avoid clumps.
When making the slurry, mix the cornstarch and water at room temperature to avoid clumping. Add it to the sauce at the end of cooking, and watch the sauce thicken instantly.
Everything’s prepped? Good. Let’s get into the real action…
The Method — Step by Step
- Heat a large skillet over medium‑high heat and add the tablespoon of olive oil. As the oil warms, the pan should shimmer, signaling that it’s ready to brown the beef. Add the ground beef, breaking it apart with a spatula, and let it sear without stirring for the first 2 minutes. This creates a caramelized crust that locks in flavor. Once the edges brown, stir and cook until the beef is fully browned, about 5-6 minutes.
- Add the diced onion and bell pepper to the skillet. The sizzling sound will confirm that the oil is hot enough. Cook, stirring occasionally, until the vegetables soften and the onion turns translucent, about 4 minutes. The pepper will retain some crunch, giving the dish a delightful bite. If you prefer a sweeter flavor, let the vegetables cook a bit longer until they caramelize slightly.
- Introduce the minced garlic and let it bloom for 30 seconds. The aroma that fills the kitchen will have you already craving the finished dish. Be careful not to burn the garlic; it should become fragrant, not bitter. Once fragrant, add the beef broth, ketchup, Worcestershire sauce, and soy sauce. Stir to combine, ensuring the mixture is smooth and free of lumps.
- Bring the mixture to a gentle simmer. Reduce the heat to low, cover the skillet, and let it cook for 10 minutes, allowing the flavors to meld. The sauce should reduce slightly, thickening and intensifying. Stir occasionally to prevent sticking. This step is crucial for building depth and ensuring the sauce doesn’t become watery.
- While the sauce simmers, whisk together the cornstarch and tablespoon of water to create a slurry. This will be added at the end to thicken the sauce. Make sure the slurry is smooth; any lumps will break the silky texture. Keep the slurry ready, as timing is essential for a perfect finish.
- Stir the cornstarch slurry into the simmering sauce. The sauce will begin to thicken immediately, creating a glossy, velvety coating that clings to the beef and vegetables. Let it cook for an additional 2 minutes to fully activate the thickening agent. The sauce should be thick enough to coat the back of a spoon.
- Divide the cooked mixture among the hamburger buns. Press the filling firmly so it settles into the bun’s crevices. Place a slice of provolone on top of the hot filling; the heat will melt the cheese into a gooey blanket. The cheese’s mild flavor will complement the sauce without overpowering it.
- Serve immediately, or if you’re making ahead, let the sloppy joe cool to room temperature, cover, and refrigerate. When ready to serve, reheat gently on the stove or in the microwave, adding a splash of water if the sauce seems thick. This dish is best enjoyed hot, with the cheese melted and the sauce slick and flavorful.
That’s it — you did it. But hold on, I’ve got a few more tricks that’ll take this to another level…
Insider Tricks for Flawless Results
The Temperature Rule Nobody Follows
Cooking the beef at a steady medium‑high temperature before reducing the heat is essential. This technique ensures a caramelized crust that adds depth to the sauce. If you lower the heat too early, the beef will release water and become soggy. I once let the beef cool too much, and the result was a watery mess that needed a second simmer to fix.
Why Your Nose Knows Best
Smell is the ultimate flavor detector. When the sauce begins to thicken, the aroma becomes rich and inviting. If you notice a faint metallic scent from the broth, it’s a sign you’ve added too much Worcestershire. Trust your nose to tell you when the sauce is ready to go.
The 5‑Minute Rest That Changes Everything
Once you’ve added the cheese, let the sloppy joe rest for 5 minutes before serving. This short pause allows the cheese to melt evenly and the sauce to settle. I’ve seen people rush in and end up with uneven cheese distribution; a brief rest fixes that.
Cheese Placement Matters
Place the cheese slice on top of the hot filling, not on the bun. The heat from the meat will melt it into a silky coating. If you put the cheese directly on the bun, it will stay separate and not blend with the sauce.
Use a Cast‑Iron Skillet for a Deeper Sear
A cast‑iron skillet retains heat better than stainless steel, giving the beef a darker crust and more flavor. I’ve tried both and the difference is unmistakable. The cast iron adds a subtle smoky undertone that enhances the overall experience.
Reheat with a Splash of Water
When reheating leftovers, add a tablespoon of water to the pan. This steams the filling, preventing it from drying out. The water also helps the sauce return to its silky consistency, making reheated portions taste almost as fresh as the first time.
Creative Twists and Variations
This recipe is a playground. Here are some of my favorite ways to switch things up:
Spicy Jalapeño Kick
Add diced jalapeños or a dash of hot sauce for a fiery version. The heat pairs beautifully with the savory beef and mild cheese, making it a hit for spice lovers.
Mushroom Mushroom Delight
Sauté sliced mushrooms with the onions and peppers for an earthy twist. The mushrooms absorb the sauce and add a meaty texture that complements the beef.
Turkey Twist
Swap ground beef for ground turkey to create a lighter version. The turkey still holds the sauce well, and the flavor remains robust.
Cheddar Explosion
Replace provolone with sharp cheddar for a more intense cheese flavor. The cheddar melts into a gooey blanket, adding a tangy bite to each mouthful.
Gluten‑Free Buns
Use gluten‑free hamburger buns if you’re avoiding wheat. The texture remains satisfying, and the sauce still clings beautifully.
Vegetarian Version
Use plant‑based ground beef or lentils for a vegetarian take. The sauce and cheese still deliver the same comforting experience.
Storing and Bringing It Back to Life
Fridge Storage
Store the cooked sloppy joe in an airtight container in the refrigerator for up to 3 days. The sauce will thicken as it cools, so reheat gently to restore its silky texture.
Freezer Friendly
Freeze the filling in a freezer‑safe container for up to 2 weeks. When ready to serve, thaw overnight in the fridge, then reheat on the stove with a splash of water to re‑hydrate the sauce.
Best Reheating Method
Reheat on the stovetop over low heat, stirring occasionally. Add a teaspoon of water or broth to keep the sauce from drying out. Once it’s hot and the cheese is melted again, serve immediately for maximum flavor.