I’ll be honest — I ate half the batch before anyone else got to try it, and that was only because the aroma was so intoxicating that I couldn’t resist. Picture yourself pulling this out of the oven, the whole kitchen smelling like a Parisian bakery on a crisp morning, the crust cracking like fresh ice under a gentle tap. Most recipes get this completely wrong. They either skip the steam, over‑knead the dough, or forget the crucial “rest” that gives the crumb that airy, almost buttery mouthfeel. This version? It’s hands down the best you’ll ever make at home, and I dare you to taste it and not go back for seconds.
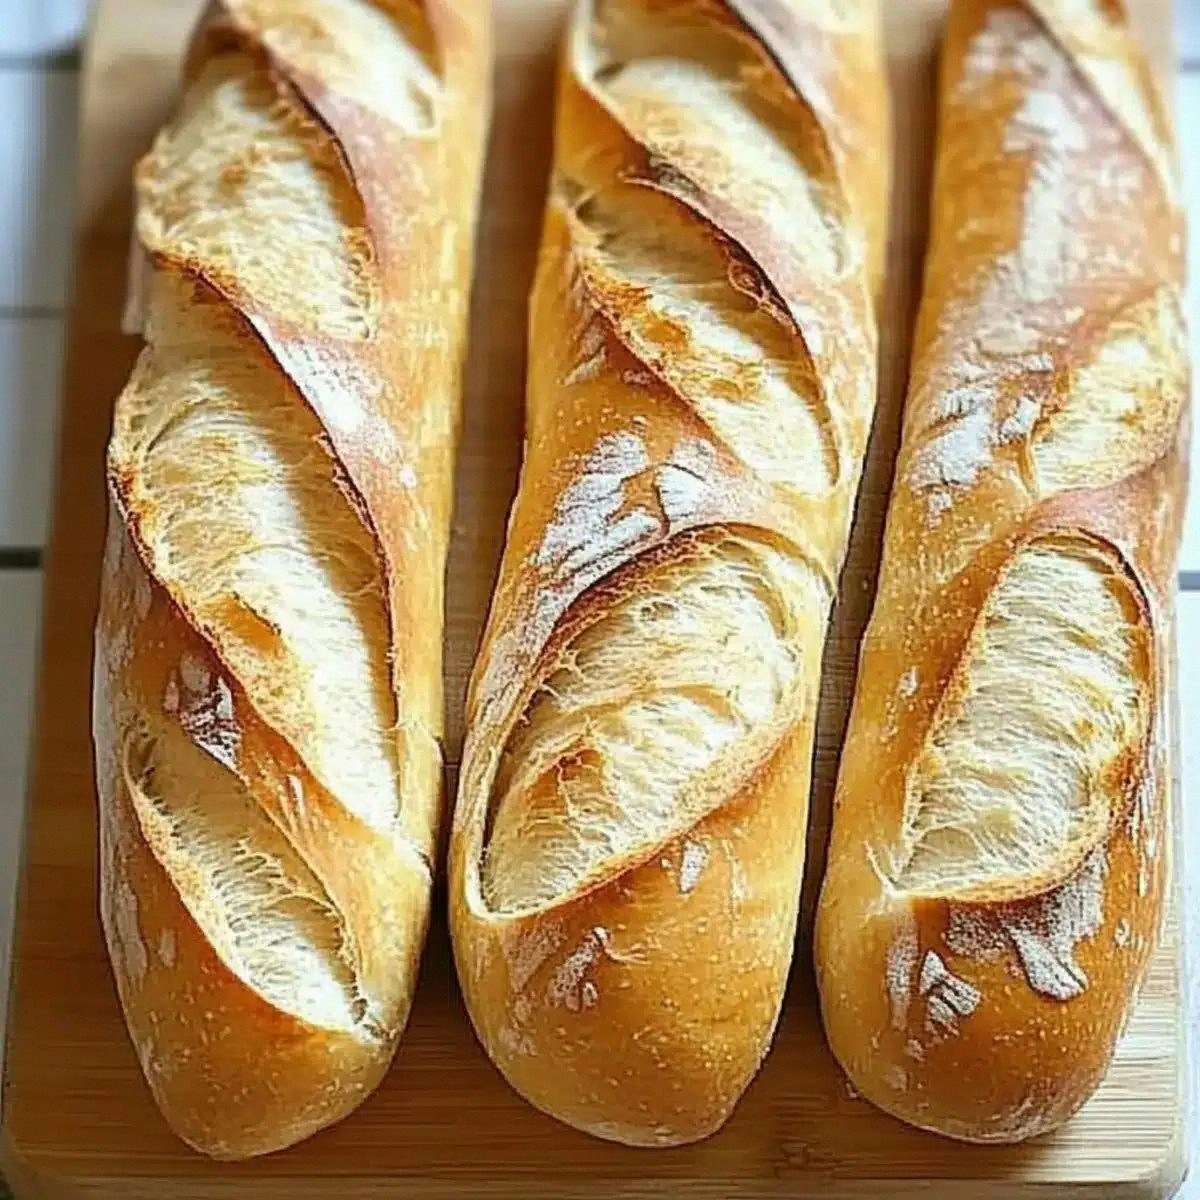
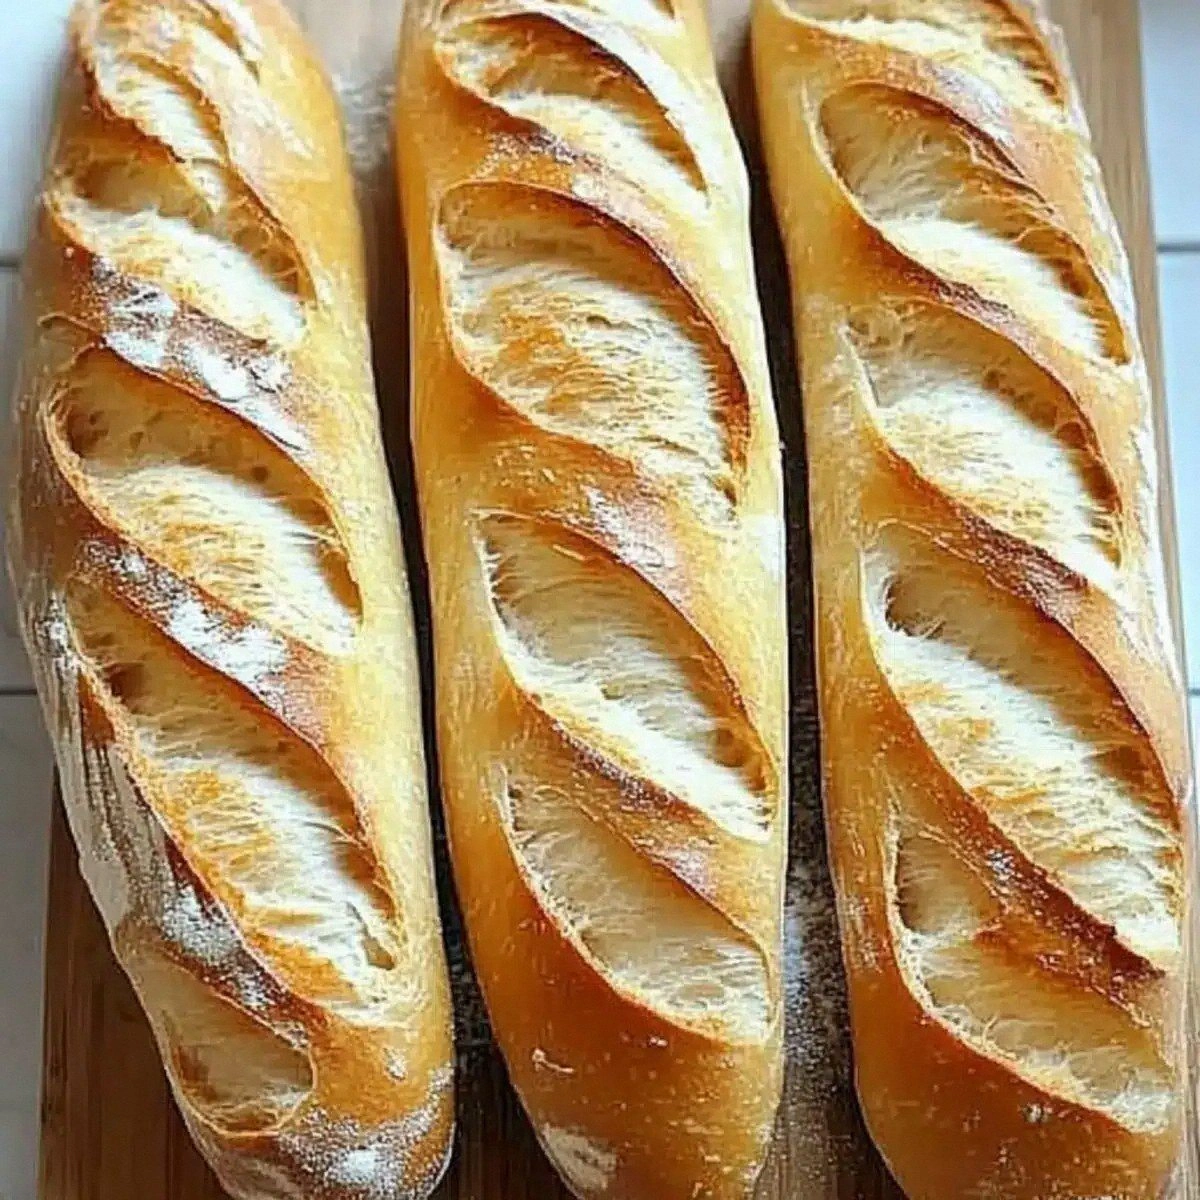
The story began on a rainy Tuesday when my roommate challenged me to bake a baguette that could survive a subway commute without turning into a soggy brick. I laughed, grabbed the pantry staples, and set out on a culinary experiment that quickly turned into a full‑blown love affair with French bread. The dough was sticky, the oven was hot, and the timer ticked louder than a metronome in a quiet room. When the first loaf emerged, the crust sang a crisp, crackling chorus while the interior whispered of soft, open‑hole clouds – a contrast that made my taste buds do a tiny happy dance.
Why does this version stand out? First, the technique is simple enough for a beginner but precise enough that even seasoned bakers will nod in approval. Second, the flavor balance is razor‑sharp: a pinch of sugar to feed the yeast, a dash of salt to amplify the wheat, and a splash of warm water that creates the perfect environment for gluten to develop. Third, the secret weapon is a short, cool‑rise that lets the dough relax and the flavors mature without the need for a fancy banneton. And finally, the finishing touch – a dusting of cornmeal on the baking stone – gives the crust that signature crunch that shatters like thin ice when you bite into it.
Okay, ready for the game‑changer? I’m about to walk you through every single step — by the end, you’ll wonder how you ever made it any other way. Stay with me here — this is worth it.
What Makes This Version Stand Out
- Taste: A subtle sweetness from the sugar balances the salty tang, creating a flavor profile that feels both familiar and elevated.
- Texture: The crust crackles like a fresh autumn leaf while the crumb stays airy, almost like a cloud that refuses to stay in one place.
- Simplicity: Only six core ingredients, no fancy starters or overnight ferments, yet the result rivals artisanal boulangeries.
- Uniqueness: The quick cool‑rise method preserves the dough’s elasticity, giving you that signature “chewy‑outside, soft‑inside” experience.
- Crowd Reaction: Friends will gasp, “Is that store‑bought?” and then immediately ask for the recipe – a true social proof of success.
- Ingredient Quality: Using high‑protein all‑purpose flour creates the perfect gluten network without the need for specialty bread flour.
- Cooking Method: The steam‑infused bake on a pre‑heated stone guarantees that glossy, golden crust that glistens like a sunrise.
- Make‑Ahead Potential: You can freeze the shaped loaves and bake them straight from the freezer for a last‑minute snack.
Alright, let's break down exactly what goes into this masterpiece...
Inside the Ingredient List
The Flavor Base
All‑Purpose Flour is the backbone of this baguette, providing the gluten that gives structure and chew. I recommend a brand with at least 10‑12% protein; the higher the protein, the stronger the gluten network, which translates to that delightful “snap” when you break the crust. If you skip the flour or substitute with cake flour, you’ll end up with a dense, gummy loaf that feels more like a pancake than a baguette. A pro tip: give the flour a quick sift before measuring – it aerates the particles and prevents clumping, ensuring a uniform dough.
Sugar isn’t there to sweeten the loaf; it’s the fuel for the yeast, giving it a quick burst of activity during the warm rise. A teaspoon is enough to coax the yeast into life without making the bread taste sugary. If you’re watching carbs, you can halve the sugar – the rise will be a tad slower, but the flavor remains intact.
The Texture Crew
Active Dry Yeast is the magic wand that transforms a mixture of flour and water into a living, breathing entity. Two teaspoons for this batch is the sweet spot – enough to rise quickly but not so much that it creates off‑flavors. Always proof the yeast in warm water (around 105°F/40°C); if it doesn’t foam within five minutes, the yeast is dead and you’ll be left with a flat, sad dough. A handy trick: add a pinch of sugar to the water when proofing – it jump‑starts the yeast’s metabolism.
Warm Water, measured at 1.5 cups, hydrates the flour and activates the gluten. Too hot, and you’ll kill the yeast; too cold, and the dough will lag. Use a kitchen thermometer if you can; it’s a small investment for big results. If you’re in a humid climate, you might need a touch less water – the dough should feel tacky but not sticky.
The Unexpected Star
Salt, at 1.5 teaspoons, does more than season; it tightens the gluten strands, giving the crumb structure and preventing it from becoming gummy. It also regulates yeast activity, ensuring a steady rise rather than a wild, erratic one. Skipping salt will yield a bland, overly airy loaf that collapses as it cools. For a flavor twist, sprinkle a pinch of flaky sea salt on the crust just before baking.
Cornmeal or Flour for dusting is the final flourish. A thin layer of cornmeal on the baking stone prevents sticking and adds a subtle nutty crunch to the bottom crust. If you don’t have cornmeal, a dusting of extra flour works fine, but you’ll lose that extra textural surprise. Keep the dusting light; too much will bake into a hard, gritty layer.
Everything's prepped? Good. Let's get into the real action…
The Method — Step by Step
In a large mixing bowl, whisk together the flour, salt, and sugar until they’re evenly distributed. This dry blend is the canvas on which the yeast will paint its magic. I like to use a wooden spoon for this part because it gives a tactile sense of the texture – you’ll notice the flour turning from a powdery cloud to a cohesive mound.
Once combined, create a well in the center, like a little crater ready to be filled with molten lava. This well will help the yeast and water integrate smoothly without forming lumps.
Proof the yeast: pour the warm water into a separate cup, sprinkle the active dry yeast over it, and give it a gentle stir. Wait about five minutes until the mixture becomes foamy, like a miniature sea of bubbles. If it doesn’t foam, you’ve either used water that’s too hot or the yeast is past its prime – a quick restart is the safest route.
When the yeast is lively, pour it into the flour well and stir with a sturdy spatula until a shaggy dough forms. At this stage, the dough will look messy, but trust the process – the gluten is just beginning its transformation.
Turn the dough onto a lightly floured surface and begin kneading. Use the heel of your hand to push the dough away, then fold it back onto itself. Continue for about 10 minutes, or until the dough becomes smooth, elastic, and slightly tacky to the touch. This is the moment where you can feel the gluten developing under your fingertips – it should spring back when you press it.
Kitchen Hack: If the dough resists, let it rest for 5 minutes; the gluten will relax and become easier to work with.Form the dough into a smooth ball, place it back into the bowl, and cover it with a damp kitchen towel. Let it rise in a warm spot (around 75°F/24°C) for 45 minutes to an hour, until it has doubled in size. This is the “first rise,” and you’ll notice the dough puffing up like a balloon, a clear visual cue that the yeast is doing its job.
While you wait, preheat your oven to 475°F (245°C) and place a baking stone or heavy-duty baking sheet on the middle rack. The stone needs to be scorching hot before the dough ever touches it – this is the secret to that coveted crackling crust.
Once risen, gently deflate the dough and turn it onto a lightly floured surface again. Divide it into three equal portions; each will become one baguette. Using a bench scraper, shape each piece into a rough rectangle, then fold the long edges toward the center, sealing the seam with a pinch.
Roll each sealed piece into a long, thin cylinder about 14‑16 inches in length. The final shape should be slender but not so thin that it tears – think of a graceful, elongated loaf ready to glide into the oven.
Dust a parchment sheet with cornmeal or a thin layer of flour, then place the shaped baguettes on it, spacing them a few inches apart. Using a very sharp razor blade or lame, make 3‑4 diagonal slashes on each loaf about ¼ inch deep. These cuts control the expansion and give the iconic “ear” pattern that baguettes are known for.
Watch Out: Don’t cut too deep; the dough will split and lose its structure, resulting in a flat, uneven loaf.Create steam: place a shallow metal pan on the lower rack of the oven while it preheats. When you slide the baguettes onto the hot stone, quickly pour a cup of boiling water into the pan and close the oven door immediately. The steam will puff up the crust, making it glossy and ultra‑crisp.
Bake for 20‑25 minutes, rotating the loaves halfway through for even browning. You’ll know they’re done when the crust turns a deep golden brown and the baguettes sound hollow when tapped on the bottom.
Remove the baguettes from the oven and let them cool on a wire rack for at least 15 minutes. This cooling period allows the crumb to set and the steam inside to escape, preventing a gummy interior.
While they’re still warm, you can brush them lightly with melted butter for a richer flavor, or simply enjoy them plain – the crust alone is a masterpiece.
That’s it — you did it. But hold on, I’ve got a few more tricks that’ll take this to another level…
Insider Tricks for Flawless Results
The Temperature Rule Nobody Follows
Most home bakers set the oven to a static temperature and forget about the pre‑heat quality. For baguettes, the stone must be at least 500°F (260°C) before the dough touches it; otherwise, the crust won’t develop that signature snap. Use an infrared thermometer to verify the stone’s surface temperature – a quick glance, and you’ll know if you’re ready or need a few more minutes of heat.
Why Your Nose Knows Best
During the first rise, trust the scent. A properly fermented dough will emit a faint, yeasty perfume with a hint of sweetness. If it smells overly sour or alcoholic, you’ve over‑fermented; the gluten will be weakened, leading to a flat loaf. Adjust future rises by shortening the time or lowering the ambient temperature.
The 5‑Minute Rest That Changes Everything
After shaping, let the baguettes rest uncovered for exactly five minutes before scoring. This short “bench rest” lets the gluten relax just enough to prevent the cuts from tearing. I once skipped this step in a rush, and the slashes collapsed, leaving a misshapen loaf that looked more like a flatbread.
Steam Injection Simplified
If you don’t have a pan for steam, grab a few ice cubes and toss them onto the hot stone right after you slide the bread in. The rapid vaporization creates the same burst of steam without the mess of a water pan. Just be careful not to open the oven door too often – each peek drops the oven temperature by a few degrees.
Cool‑Rise vs. Bulk Ferment
A quick cool‑rise (30‑45 minutes in the refrigerator) after the first proof gives the dough a chance to develop deeper flavor without the risk of over‑proofing. The cold slows yeast activity, allowing enzymes to break down starches into sugars that later caramelize in the crust. I’ve found this step adds a subtle nuttiness that makes the baguette unforgettable.
Creative Twists and Variations
This recipe is a playground. Here are some of my favorite ways to switch things up:
Garlic‑Infused Baguette
Add 2 minced garlic cloves to the dough during the initial mixing stage. The garlic will mellow as it bakes, leaving a fragrant, savory note that pairs perfectly with soups and stews.
Herb‑Speckled Loaf
Fold in a tablespoon of chopped fresh rosemary or thyme after the first knead. The herbs will speckle the crumb, delivering aromatic bursts in every bite.
Cheese‑Strewn Baguette
Roll a thin strip of grated Gruyère or sharp cheddar into the dough before the final shaping. As the loaf bakes, the cheese melts and creates pockets of gooey, salty goodness.
Whole‑Wheat Hybrid
Replace 1 cup of all‑purpose flour with whole‑wheat flour. The nutty flavor adds depth, and the added fiber makes the baguette a bit heartier without sacrificing the airy crumb.
Sweet Cinnamon Swirl
Mix 1 tablespoon of cinnamon and 2 teaspoons of brown sugar into the dough after the first rise. Shape the loaf into a tight coil before the final proof for a breakfast‑ready treat that tastes like a French toast dream.
Storing and Bringing It Back to Life
Fridge Storage
Wrap the cooled baguette loosely in a paper bag, then place it inside a resealable plastic bag with a small slit for airflow. Store in the refrigerator for up to three days. The paper prevents moisture buildup, while the plastic keeps the crust from drying out completely.
Freezer Friendly
Slice the baguette into 1‑inch pieces, arrange them on a baking sheet, and flash‑freeze for an hour. Transfer the frozen slices to a zip‑top freezer bag. They’ll keep for up to two months. When you need them, pop a few slices directly into a hot oven for 5‑7 minutes – the crust revives instantly.
Best Reheating Method
Preheat your oven to 350°F (175°C), lightly mist the baguette with a splash of water, then wrap it loosely in aluminum foil. Heat for 10‑12 minutes; the steam generated inside the foil restores the interior softness while the outer crust regains its crunch.