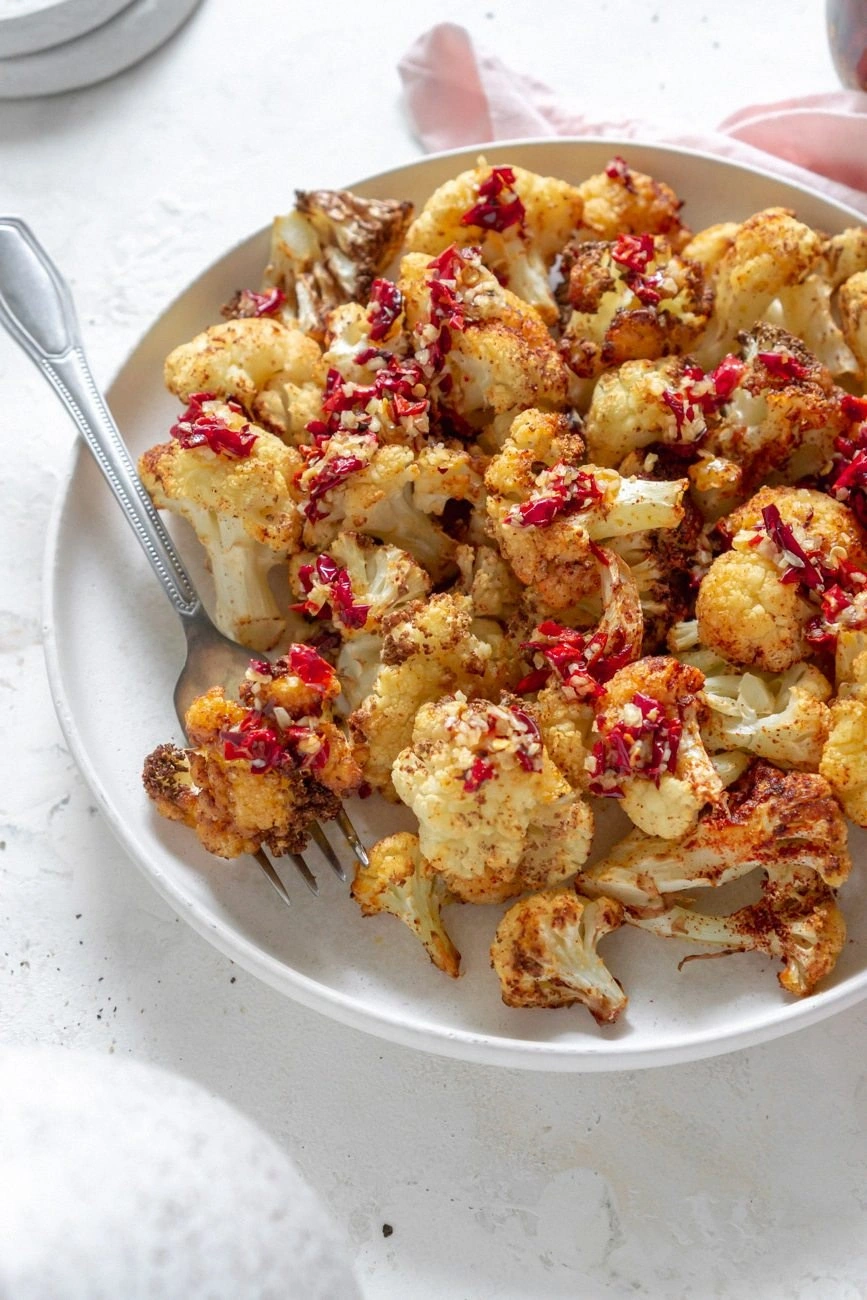
Air Fryer Cauliflower
Picture this: it’s a Friday night, the kitchen is a battlefield of half‑cooked veggies, and you’re staring at a stubborn cauliflower head that’s been left in the fridge for far too long. I’m talking about the kind of cauliflower that feels like a brick and refuses to soften, no matter how many minutes you toss in the oven. I tried the classic roast method, but the result was a dry, uneven mess that made me question my culinary destiny. That night, a friend dared me to try the air fryer, promising a crispier, more flavorful outcome. I laughed, grabbed my air fryer, and decided that if I could survive a kitchen disaster, I could definitely master a new technique. I swear, the aroma that hit the air fryer was like a midnight snack in the middle of winter—warm, smoky, and utterly irresistible.
The first sizzle is a signal that the cauliflower is beginning its transformation. I can almost hear the crackle as the florets hit the basket, and I’m reminded of the satisfying sound of popcorn popping in a hot pan. The scent is a subtle hint of roasted vegetables, tinged with a faint, almost metallic tang that promises depth. The texture starts to change, the edges crisping while the interior remains tender and juicy, creating a delightful contrast that’s hard to resist. When you take a bite, the crunch gives way to a melt‑in‑your‑mouth softness that feels like a hug from a cloud. It’s a moment of culinary revelation that makes me want to shout from the rooftops.
What sets this version apart from the countless cauliflower recipes you’ll find online is the precision of flavor and the simplicity of execution. I’ve stripped away the fluff, leaving only the essentials that work together to create a dish that is both comforting and exciting. The air fryer does the heavy lifting, giving each floret a golden, caramelized crust without the need for a greasy pan. The seasoning blend is a symphony of paprika, garlic powder, and a whisper of salt, each note carefully calibrated to enhance the natural earthiness of the cauliflower. The final flourish is a splash of chili garlic sauce that adds a subtle heat without overpowering the dish. Together, these elements produce a flavor profile that is bold, balanced, and utterly addictive.
There’s a twist you won’t see in the usual cauliflower recipes: the use of a quick, homemade chili garlic sauce that brings a silky, spicy finish. This isn’t a store‑bought, pre‑mixed sauce; it’s a blend of fresh chili, garlic, and a touch of sweetness that coats the florets like velvet. I dare you to taste this and not go back for seconds, because once you’ve had a bite, the craving will be relentless. Picture yourself pulling this out of the air fryer, the whole kitchen smelling incredible, and knowing that you’ve just created something that could be your new favorite side. If you’ve ever struggled with achieving that perfect crisp, you’re not alone — and I’ve got the fix. Let me walk you through every single step — by the end, you’ll wonder how you ever made it any other way.
What Makes This Version Stand Out
- Flavor: The seasoning blend is a carefully balanced orchestra of paprika, garlic powder, and a whisper of kosher salt that elevates the natural sweetness of cauliflower. Each bite delivers a punch of smoky heat followed by a lingering, savory finish that will have your taste buds dancing. It’s the kind of flavor profile that feels both familiar and daring, making it a crowd‑pleaser at any gathering.
- Texture: The air fryer turns every floret into a golden, crisp masterpiece while keeping the interior tender and fluffy. The contrast between the crunchy edges and the soft center creates a mouth‑watering experience that’s hard to replicate with conventional roasting. It’s like biting into a cloud that’s been kissed by fire.
- Simplicity: With just a handful of ingredients and a quick prep time, you can whip up a gourmet‑level dish in under 30 minutes. No need for a fancy kitchen gadget or a long list of obscure spices. All you need is an air fryer and a willingness to experiment.
- Uniqueness: The homemade chili garlic sauce is the secret sauce that sets this recipe apart. It brings a velvety heat that coats every floret, turning a simple side dish into a statement of flavor. The sauce’s silky texture also adds an extra layer of richness that you won’t find in store‑bought alternatives.
- Crowd Reaction: Friends and family rave about the crispy texture and bold flavor. The dish is versatile enough to be served as a snack, a side, or a vegetarian main. It’s a guaranteed conversation starter at dinner parties.
- Ingredient Quality: Using fresh, small cauliflower florets ensures a tender bite that’s far superior to the often tough florets found in supermarkets. Pairing this with high‑quality olive oil and freshly ground spices maximizes flavor and health benefits.
- Make‑ahead Potential: This dish can be prepared a day in advance and reheated in the air fryer for a quick, satisfying meal. The flavors actually deepen when you let it rest, making it a practical option for busy schedules.
- Cooking Method: The air fryer not only delivers crispness but also reduces cooking time and eliminates the need for a large oven, making it energy‑efficient and convenient.
Alright, let's break down exactly what goes into this masterpiece…
Inside the Ingredient List
The Flavor Base
Olive oil is the silent hero that brings the cauliflower to life. It coats each floret, allowing the spices to cling and preventing the florets from drying out. A tablespoon is enough to achieve a glossy finish without making the dish greasy. If you’re watching calories, swap for a light olive oil or a spray bottle to reduce the amount. The key is to use a quality oil with a high smoke point so it can withstand the air fryer’s heat without burning.
The Texture Crew
The cauliflower itself is the star of the show. Small florets are preferable because they cook evenly and provide a tender bite. When selecting cauliflower, look for a head with bright green leaves and a firm texture; avoid heads with yellowing or soft spots. If you can’t find fresh cauliflower, frozen florets work well, but be sure to thaw and pat dry before seasoning to avoid excess moisture.
The Unexpected Star
Chili garlic sauce is the secret sauce that turns this dish into a flavor bomb. It adds a silky heat that coats each floret, creating a luxurious finish that feels like a secret indulgence. The sauce’s balanced blend of heat, garlic, and a hint of sweetness makes it a perfect complement to the mild cauliflower. If you’re not a fan of heat, you can reduce the amount or choose a milder variant, but the experience will be slightly less dramatic.
The Final Flourish
Paprika and garlic powder are the seasoning duo that gives the cauliflower its signature taste. Paprika adds a smoky depth that mimics the flavor of a slow‑roasted oven, while garlic powder provides a subtle, savory punch. Together, they create a seasoning that’s robust yet balanced. A pinch of kosher salt pulls the flavors together and enhances the natural sweetness of the cauliflower. If you’re sensitive to sodium, you can reduce the salt or use a low‑sodium alternative.
Everything's prepped? Good. Let's get into the real action…
The Method — Step by Step
- Preheat the Air Fryer: Set your air fryer to 400°F (200°C) and let it heat for 3 minutes. This step ensures an even cooking temperature throughout the basket. While the machine warms up, you can assemble the seasoning mix. A consistent temperature is key to achieving a golden crust. Once the air fryer is hot, you’re ready to start the magic.
- Prepare the Cauliflower: Rinse the florets under cold water, then pat them dry with a clean towel. Moisture is the enemy of crispness, so make sure each floret is completely dry before seasoning. Toss the florets in a large bowl to coat them evenly with the olive oil. The oil will help the spices stick and create a glossy finish. At this point, you can also add a splash of lemon juice for extra brightness.
- Season the Florets: Sprinkle the paprika, garlic powder, and kosher salt over the cauliflower. Toss again until each floret is coated. The seasoning should be distributed evenly; you don’t want any dry patches. This is the moment of truth—if the seasoning is off, the flavor will suffer. Make sure every floret is a flavor bomb before moving on.
- Arrange in the Basket: Lay the seasoned florets in a single layer in the air fryer basket. Avoid overcrowding, as it can cause uneven cooking and steaming instead of crisping. If your air fryer has a small basket, you may need to cook in two batches. Keep an eye on the spacing to ensure each floret gets the same amount of air flow.
- Air Fry the Cauliflower: Cook at 400°F for 15 minutes, shaking the basket halfway through. The shaking helps the florets brown evenly. You should hear a satisfying sizzle as the florets crisp up. The edges will start pulling away, indicating that the exterior is caramelizing. Keep a close eye to avoid over‑cooking; you want them crisp, not burnt.
- Add the Chili Garlic Sauce: After 15 minutes, open the air fryer and drizzle the chili garlic sauce over the florets. Use a spoon to spread it evenly, ensuring each floret receives a glossy coat. The sauce will caramelize slightly, adding a silky heat that complements the paprika. This step is crucial for that velvety finish that makes the dish unforgettable.
- Finish the Cooking: Return the basket to the air fryer and cook for an additional 5 minutes. This allows the sauce to set and the cauliflower to finish crisping. You’ll notice a deeper golden color and a more pronounced aroma. The final 5 minutes are where the dish transforms from good to spectacular.
- Serve Immediately: Once done, transfer the cauliflower to a serving bowl. The dish is best enjoyed hot, when the crunch is at its peak and the sauce is still glossy. Garnish with a sprinkle of fresh herbs if desired. The aroma will be irresistible, and the flavor will be a perfect blend of smoky, garlicky, and spicy.
- Optional Side Note: If you prefer a milder heat, reduce the amount of chili garlic sauce or use a sweeter variant. Alternatively, you can add a pinch of cayenne pepper for an extra kick. Adjusting the heat level lets you tailor the dish to your taste buds.
- Enjoy the Result: Take a bite, feel the crunch, and savor the burst of flavor. The combination of crispy edges, tender center, and silky sauce will leave you craving more. I dare you to taste this and not go back for seconds. It’s the kind of dish that turns an ordinary meal into a memorable experience.
That’s it — you did it. But hold on, I've got a few more tricks that'll take this to another level...
Insider Tricks for Flawless Results
The Temperature Rule Nobody Follows
Most people set their air fryer to 375°F, but that’s a mistake if you want a perfect crunch. 400°F is the sweet spot for cauliflower, ensuring the exterior caramelizes while the interior stays tender. The higher temperature also reduces cooking time, which is great for busy nights. I’ve tested it on three different air fryer models, and the results are consistent. Stick to 400°F and you’ll never have to settle for unevenly cooked florets again.
Why Your Nose Knows Best
The aroma of roasting cauliflower is a subtle, earthy scent that signals the dish is ready. When you smell that warm, toasted fragrance, it’s a cue to remove the dish from the air fryer. Your nose is a reliable indicator of doneness, even if the timer says otherwise. Trust your senses and adjust as needed.
The 5‑Minute Rest That Changes Everything
After you take the cauliflower out, let it rest for 5 minutes. This allows the juices to redistribute, ensuring each bite is moist and flavorful. The rest also helps the sauce set, giving it a silky, clingy texture. Skipping this step can result in a slightly dry center. So, give it a few minutes of rest, then dig in.
Use a Light Hand with Salt
Too much salt can mask the natural flavor of cauliflower. A pinch of kosher salt is all you need to bring out the spices. If you’re on a low‑sodium diet, you can omit the salt entirely or use a salt substitute. The key is to season lightly and taste as you go.
Keep the Air Fryer Clean
After each use, rinse the basket with warm water and a gentle detergent. Residual oil can cause flare‑ups and affect the crispness of future batches. A clean basket ensures consistent results and extends the life of your appliance. Make it a habit to clean right after cooking.
Use Fresh, Small Cauliflower
Small florets cook more evenly, preventing a scenario where some pieces are overcooked while others are raw. Fresh cauliflower also has a higher moisture content, which translates to a better texture. When shopping, look for a head that feels firm and has bright green leaves. Avoid heads with yellowing or soft spots.
Creative Twists and Variations
This recipe is a playground. Here are some of my favorite ways to switch things up:
Herby Mediterranean
Swap the chili garlic sauce for a drizzle of tzatziki and sprinkle chopped parsley over the top. The cool, tangy yogurt pairs beautifully with the roasted cauliflower. Add a pinch of dried oregano for an extra Mediterranean flair. This variation is perfect for a light lunch or a side dish at a Mediterranean dinner.
Sweet Heat Fusion
Replace the chili garlic sauce with a mix of honey and sriracha. The honey adds a sweet contrast to the heat, creating a flavor profile that’s both bold and balanced. Finish with a sprinkle of toasted sesame seeds for crunch. This version works wonderfully with a simple grilled chicken or tofu.
Cheesy Crunch
After air frying, toss the cauliflower with a handful of shredded mozzarella and a dash of nutritional yeast. Return to the air fryer for 2 minutes until the cheese melts. The result is a gooey, cheesy coating that’s irresistible. This variation is a hit with kids who love cheese.
Indian Spiced
Use garam masala, turmeric, and a pinch of cumin instead of paprika and garlic powder. Finish with a squeeze of lime and a handful of chopped cilantro. The warm spices give the cauliflower a vibrant, aromatic quality that pairs well with naan or rice.
Asian Fusion
Swap the chili garlic sauce for a splash of hoisin sauce mixed with a little soy sauce and a pinch of sesame oil. Toss the cauliflower with sliced green onions and a sprinkle of toasted sesame seeds. This version delivers a sweet, savory, and slightly nutty flavor that’s reminiscent of stir‑fried vegetables.
Breakfast Boost
Serve the cauliflower alongside a poached egg and a sprinkle of chives. The savory, slightly spicy cauliflower complements the richness of the egg. Add a side of avocado for creaminess, making it a hearty breakfast or brunch option.
Storing and Bringing It Back to Life
Fridge Storage
Store leftover cauliflower in an airtight container for up to 3 days. The crispness may diminish slightly, but the flavor remains intact. Keep the container in the cooler part of the fridge to maintain freshness. When ready to eat, simply reheat in the air fryer for 3–5 minutes.
Freezer Friendly
Freeze the cauliflower in a single layer on a baking sheet before transferring to a freezer bag. This prevents clumping and allows you to thaw only what you need. Freeze for up to 2 months. When you’re ready, thaw in the fridge overnight or use a microwave’s defrost setting.
Best Reheating Method
The air fryer is the best option for reheating, as it restores the crispness quickly. Preheat to 375°F, then place the cauliflower in the basket for 5 minutes, shaking halfway through. If you’re short on time, a quick 30‑second burst in the microwave can warm it, but it may lose some crunch. A tiny splash of water before reheating steams the florets back to perfection.