I still remember the year I tried to impress my future in-laws with a "simple" holiday appetizer that ended up looking like a pastry crime scene. There was brie oozing everywhere, cranberry sauce bleeding across the baking sheet, and my dignity slowly deflating like a sad balloon. Fast forward to last Christmas Eve, when I pulled this Pistachio Cranberry Brie Swirl Christmas Tree from the oven and watched my mother-in-law's eyes light up like the Rockefeller tree. The transformation from that first disaster to this show-stopping centerpiece wasn't just about practice — it was about understanding why most recipes get this completely wrong.
Here's what nobody tells you about those Pinterest-perfect holiday appetizers: they're designed to look good in photos, not to taste like anything worth eating. Most versions pile on ingredients until you can't taste the brie anymore, or they cook so long that the pastry turns into cardboard and the cheese becomes a puddle of disappointment. But this version? This is the one that made my notoriously picky nephew ask for the recipe, that had my brother sneaking pieces before dinner, that had me hiding leftovers in the vegetable crisper because I couldn't bear to share them all. The secret lies in the swirl technique that keeps the brie molten but contained, the timing that leaves the pastry shatteringly crisp, and the flavor balance that makes every bite feel like Christmas morning.
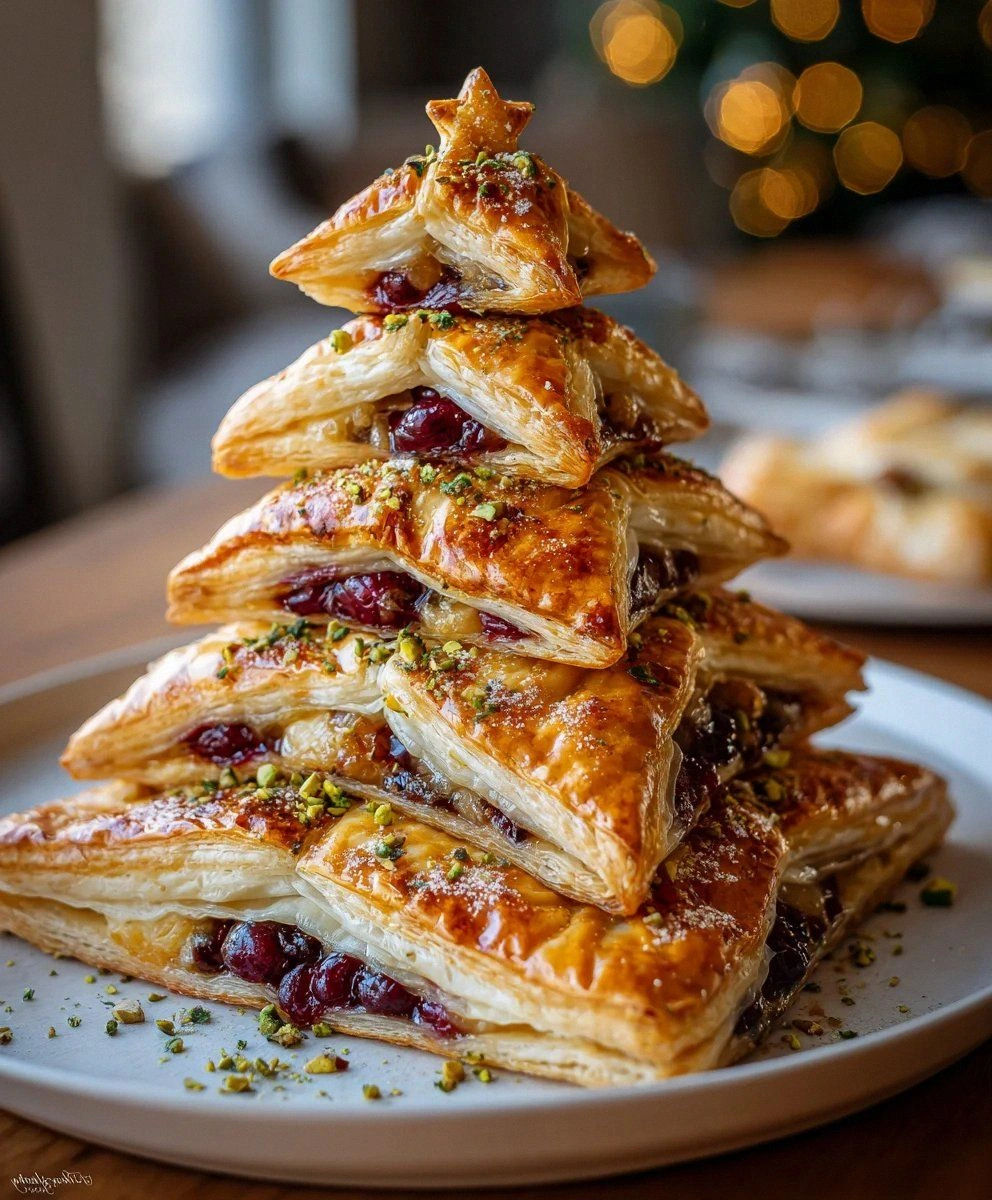
Picture this: golden puff pastry branches spiraling with creamy brie that melts just enough to mingle with tart cranberry sauce, while pistachios toast to nutty perfection in the oven's heat. The orange zest hits your nose first — bright and promising — then comes the buttery pastry, then the oozy cheese that stretches like edible tinsel when you pull apart a piece. That sizzle when it hits the pan? Absolute perfection. I dare you to taste this and not go back for seconds. Actually, I'll be honest — I ate half the batch before anyone else got to try it, standing over the counter in my pajamas at midnight, telling myself "just one more piece" until the tree looked like it had survived a squirrel attack.
Let me walk you through every single step — by the end, you'll wonder how you ever made it any other way.
What Makes This Version Stand Out
Flavor Bomb: Most recipes drown the brie in too many competing flavors, but this version lets the creamy, earthy cheese be the star while cranberry provides bright contrast and pistachio adds crunch. The orange zest is the secret handshake — just enough to make people ask "what's that amazing flavor?" without being able to place it immediately.
Texture Paradise: We're talking crispy, shattering pastry edges that give way to molten cheese centers, punctuated by the satisfying crunch of toasted pistachios. It's like a textural symphony where every element plays its part perfectly, no mushy disappointments allowed.
Foolproof Technique: The swirl method isn't just for show — it creates natural serving portions while keeping the cheese contained so it doesn't escape like a pastry prison break. Each spiral becomes its own little pocket of perfection.
Make-Ahead Magic: You can assemble this entire tree up to 24 hours ahead, keep it wrapped in the fridge, then pop it in the oven when guests arrive. Try that with most appetizers and you'll end up with soggy disappointment — this actually gets better as the flavors meld.
Crowd Psychology: There's something about food shaped like a Christmas tree that makes people lose their minds. I've seen reserved adults turn into competitive vultures, politely jockeying for the "best" pieces. It's conversation-startopping, Instagram-worthy, and disappears faster than you can say "happy holidays."
Ingredient Integrity: No fake cheese here — real brie develops those complex, mushroomy notes when heated properly. The cranberry sauce isn't just sweet; it's tart and bright, cutting through richness. And those pistachios? They're not just green for color — they bring buttery, slightly sweet nuttiness that complements everything else.
Timing Perfection: Most recipes overcook the pastry while undercooking the cheese, leaving you with burnt edges and a cold center. This version uses temperature science to ensure everything finishes at exactly the right moment — golden pastry, molten cheese, toasted nuts.
Alright, let's break down exactly what goes into this masterpiece...
Inside the Ingredient List
The Flavor Base
Brie cheese is the diva of this show, and like any diva, it demands respect. Don't even think about using that rubbery processed "brie" from the discount aisle — we're talking real, slightly funky, properly aged brie that develops those gorgeous mushroom and ammonia notes when heated. The wheel should feel supple but not squishy, with a white rind that's slightly fuzzy but not cracked or discolored. Skip it and you'll end up with a melted mess that tastes like plastic and disappointment. When you cut into good brie, it should gently ooze rather than pour out like nacho cheese — that's how you know it's going to create those Instagram-worthy cheese pulls without becoming a puddle.
Cranberry sauce is your tart, bright counterpoint to all that richness, but here's where most recipes go wrong: they use the canned jellied stuff that tastes like fruit-scented candle wax. You want real cranberry sauce, whether homemade or a quality store-bought version with actual fruit pieces. The sauce should be thick enough to stay put but not so firm that it sits there like a red iceberg. When heated, it should melt slightly and create these gorgeous ruby streaks through the cheese — like edible stained glass that tastes like Christmas morning.
The Texture Crew
Puff pastry is where texture magic happens, but only if you treat it right. Those ready-rolled sheets in the freezer section? They're your best friend when you don't want to make laminated dough from scratch (and honestly, who has time for that during the holidays?). The key is keeping it cold — warm pastry won't puff properly, leaving you with dense, greasy layers instead of light, flaky perfection. When you unroll it, you should hear that satisfying crackle that sounds like winter leaves underfoot. If it's soft and floppy, pop it back in the freezer for ten minutes. Trust me, your future self will thank you when you bite into those shatteringly crisp layers.
Pistachios aren't just here for their festive green color — they're the textural backbone that prevents this from becoming a soft, one-note experience. Roughly chopped is key here; too fine and they disappear, too coarse and they overwhelm each bite. When they toast in the oven, they develop this incredible aroma that's nutty and slightly sweet, with a crunch that contrasts beautifully against the creamy brie. Don't even think about using those sad, pre-chopped pistachio bits from the baking aisle — they taste like cardboard and have the texture of sawdust.
The Unexpected Star
Orange zest might seem optional, but it's the difference between good and "holy cow, what is this magic?" Just half an orange worth of zest adds this incredible brightness that makes all the other flavors pop. It's like turning up the saturation on a photo — suddenly everything tastes more like itself. The oils in the zest contain all these complex aromatic compounds that hit your nose before your taste buds, creating anticipation that pays off in every bite. Skip it and the whole thing tastes flat, like a joke without a punchline.
The egg yolk wash isn't just for pretty golden color — it creates a glossy, professional finish that makes your tree look bakery-worthy. Mixed with a splash of water, it brushes on smoothly and bakes into this gorgeous mahogany sheen that screams "I know what I'm doing in the kitchen." Plus, it helps seal the edges and adds a subtle richness to the pastry itself. Without it, your tree looks pale and anemic, like it needs a vacation in the tropics.
The Final Flourish
All-purpose flour is the unsung hero that prevents pastry disasters. Just a light dusting keeps everything from sticking when you're rolling and shaping, but too much creates tough, dry pastry that tastes like cardboard. Think of it as insurance — you hope you won't need much, but you'll be grateful it's there when your pastry starts acting like it's glued to the counter. A pinch is plenty; we're not breading chicken here.
Baking paper is your insurance policy against the heartbreak of a stuck Christmas tree. There's nothing worse than spending time on beautiful pastry only to have it weld itself to the pan, forcing you to serve "rustic torn pieces" while pretending it's intentional. Good quality baking paper ensures your tree slides off intact, ready for its Instagram debut. Don't substitute with wax paper — it smokes and can ruin both your pastry and your oven.
Everything's prepped? Good. Let's get into the real action...
The Method — Step by Step
- Start with your puff pastry sheets completely thawed but still cold — this is the sweet spot where they're pliable but not soft and floppy. Unroll them gently onto a lightly floured surface, and if you see any cracks, don't panic. Just press them back together with your fingers; the swirl technique will hide any imperfections like pastry concealer. Using a sharp knife or pizza cutter, trim each sheet into a large triangle, about 12 inches tall and 10 inches wide at the base. Don't stress about perfect geometry — trees in nature aren't symmetrical either, and any wonkiness just adds character. Save those trimmings for cheese straws later, because wasting puff pastry should be a criminal offense.
- Now for the fun part: position your brie wheel in the center of one triangle, right where the trunk would be. If your brie came in one of those wooden boxes, you've probably got about 200-250 grams of cheese perfection. Slice it horizontally like you're making a cheese sandwich, creating two thinner rounds that will melt more evenly. This is crucial — thick brie takes forever to melt, leaving you with burnt pastry and a cold center. Arrange the slices so they cover the central third of your triangle, leaving about an inch border at the bottom and tapering off as you move up. Think of it as creating a cheesy spine for your tree.
- Time to add the flavor layers that make people lose their minds. Spoon cranberry sauce over the brie in a thin, even layer — resist the urge to pile it on like you're frosting a cake. Too much and it'll leak out during baking, creating a sticky situation that no amount of kitchen towels can fix. Aim for about 3-4 tablespoons total, just enough to create ruby streaks without overwhelming the cheese. Scatter your chopped pistachios over the cranberry, pressing gently so they stick but don't disappear into the sauce. Finally, zest your orange directly over the nuts — those tiny oils spray everywhere, creating an aromatic cloud that'll have you dreaming of Christmas markets.
- Here comes the moment of truth: place your second pastry triangle on top, aligning it as best you can with the bottom one. Press gently around the filling to seal, working from the center out to push any air bubbles toward the edges. This isn't just aesthetics — trapped air creates steam pockets that'll make your tree explode like a pastry volcano. Use your fingers to create a tight seal around the filling, then grab a fork and crimp the bottom edge like you're making a decorative pie crust. Not only does this look adorable, but it creates a barrier against cheese escape attempts.
- Now for the magic that transforms this from flat pastry to Christmas tree glory. Using sharp scissors or a knife, cut strips from the edges toward the center, creating branches about 1 inch wide and 3 inches long. Don't cut all the way through — leave about an inch uncut in the center to hold everything together. This is where most recipes get it wrong; they make the strips too thin, and they burn before the cheese melts, or too thick, and they don't cook through. Aim for Goldilocks width — not too skinny, not too fat.
- This next part? Pure magic. Take each strip and twist it, like you're wringing out a towel. The twisting creates those gorgeous spiral branches that expose the filling in the most Instagram-worthy way possible. Twist gently but firmly — too loose and they'll untwist during baking, too tight and they'll snap. As you work, you'll see the brie and cranberry creating these beautiful swirls that look like holiday ribbon candy. Don't worry if some filling peeks through — those caramelized bits will be the best parts.
- Transfer your creation to a baking sheet lined with baking paper, using a large spatula or your hands supporting the bottom. If it stretches a bit, that's fine — just reshape it on the pan. Brush the entire tree with your egg wash, making sure to get into all the nooks and crannies where branches meet the trunk. This isn't just for color; the egg wash helps seal the edges and creates that gorgeous glossy finish. Don't drown it — a light, even coat is all you need. Any excess will pool and burn, creating bitter spots that ruin the whole thing.
- Into the oven it goes at 400°F (200°C) for 25-30 minutes of transformation. Here's where you need to stay alert — ovens vary, and this goes from perfect to burnt faster than you can say "eggnog." After 20 minutes, start checking every 2-3 minutes. You're looking for deep golden brown branches that look like they're reaching for the sky, and a center that's puffed and glorious. The cheese might bubble up through the swirls — that's perfect. Those caramelized bits where cranberry meets pastry? That's concentrated flavor gold.
That's it — you did it. But hold on, I've got a few more tricks that'll take this to another level...
Insider Tricks for Flawless Results
The Temperature Rule Nobody Follows
Here's the thing about puff pastry: it's basically layers of butter and dough that need to be cold when they hit the oven. If your kitchen is warm or your pastry has been sitting out, pop the whole assembled tree in the freezer for 15 minutes before baking. This seems obsessive, but it's the difference between spectacular lift and sad, flat branches. The cold butter creates steam when it hits the hot oven, and that's what gives you those gorgeous flaky layers. A friend tried skipping this step once — let's just say it didn't end well. Her tree looked like it had been through a windstorm, all droopy and defeated.
Why Your Nose Knows Best
Forget timers — your nose is the most reliable indicator of when this is perfectly done. When you start smelling intense butter and toasted nuts, you're about 2-3 minutes away from perfection. The aroma should fill your kitchen with this heady mix of butter, cheese, and something that smells like Christmas morning at your grandmother's house. If you wait for the timer to go off without checking, you'll probably overshoot into burnt territory. That first whiff of browning pastry is your cue to hover by the oven like a pastry guardian angel.
The 5-Minute Rest That Changes Everything
I know it's torture, but letting your tree rest for 5 minutes after baking is what separates the pros from the amateurs. During this time, the cheese sets slightly so it doesn't run all over when you serve it, the pastry finishes crisping as steam escapes, and the flavors concentrate. Use this time to plate it properly, maybe add a few rosemary sprigs for garnish, or just breathe and accept the compliments that are about to come your way. Those 5 minutes feel like forever when you're staring at molten cheese, but they're the difference between elegant appetizer and hot mess.
The Cheese Selection Secret
Not all brie is created equal, and this is not the time to grab whatever's on sale. Look for brie that's soft but not squishy, with a white rind that's slightly fuzzy but not cracked or brown. If it smells strongly of ammonia, it's overripe and will taste like cleaning products when melted. Triple-cream brie is incredible here — it's so luxurious it feels like eating velvet — but regular brie works beautifully too. Just avoid the rubbery processed stuff that comes in those plastic-wrapped wedges. That's not brie; that's cheese-adjacent sadness.
The Make-Ahead Miracle
This is where this recipe really shines: you can assemble the entire tree up to 24 hours ahead, wrap it tightly in plastic wrap, and keep it refrigerated until you're ready to bake. The flavors actually improve as they meld, and the cold resting time helps the pastry stay crisp. Just add 5-7 minutes to the baking time if you're going straight from fridge to oven. I've made this for New Year's Eve parties where I assembled it Christmas morning, and it was even better than the fresh version. The key is wrapping it well so it doesn't dry out — plastic wrap directly on the surface, then loosely over the whole thing.
Creative Twists and Variations
This recipe is a playground. Here are some of my favorite ways to switch things up:
The Mediterranean Holiday
Swap the cranberry sauce for sun-dried tomato pesto and replace pistachios with pine nuts. Add some fresh basil leaves and use goat cheese instead of brie. The result tastes like Christmas in the Italian countryside — bright, herbaceous, and sophisticated. The tomato pesto creates these gorgeous ruby streaks that look almost like cranberry but taste completely different. My wine club friends went crazy for this version, especially with a crisp white wine.
The Decadent Decadence
Use triple-cream brie, add a thin layer of fig jam instead of cranberry, and sprinkle with candied walnuts. Drizzle with honey right when it comes out of the oven. This version is so rich it's practically dessert, but in the best possible way. The fig jam adds this luxurious sweetness that pairs beautifully with the creamy cheese, while the candied walnuts provide crunch and extra indulgence. Save this one for your most special occasions.
The Savory Surprise
Replace cranberry with caramelized onions, use gruyere instead of brie, and add fresh thyme leaves. The onions cook down to this incredible jammy sweetness that contrasts with the nutty gruyere. It's like French onion soup meets Christmas tree, and it's absolutely magnificent. The thyme adds this woodsy note that makes your whole house smell like you're cooking something much more complicated than you actually are.
The Spicy Celebration
Mix some pepper jelly with the cranberry sauce for a sweet-heat situation, add some chopped candied jalapeños, and use pepper jack cheese along with the brie. This version has this incredible sweet-spicy thing going on that keeps people coming back for more. The heat builds slowly, so it's not overwhelming, but it definitely wakes up your taste buds. Perfect for parties where you want to serve something memorable.
The Breakfast Tree
Use everything bagel seasoning instead of pistachios, add some smoked salmon pieces, and use cream cheese along with brie. Serve with bagel chips for the ultimate holiday breakfast appetizer. It sounds weird but tastes like the best everything bagel you've ever had, just in Christmas tree form. The smoked salmon adds this luxurious touch that makes it feel special occasion-worthy.
The Kid-Friendly Version
Replace the cranberry with a thin layer of strawberry jam, use mozzarella instead of brie, and add mini pepperoni pieces. Kids go absolutely bonkers for this pizza-flavored tree, and adults secretly love it too. The mozzarella gives you those incredible cheese pulls without the strong flavor that some kids object to in brie. It's like Christmas and pizza had a delicious baby.
Storing and Bringing It Back to Life
Fridge Storage
If you somehow have leftovers (and that's a big if), let the tree cool completely before wrapping individual pieces in plastic wrap and storing in an airtight container. It'll keep for up to 3 days, though the pastry won't be quite as crisp as fresh. The key is cooling it completely first — warm pastry creates condensation that makes everything soggy. I like to separate the pieces with parchment paper so they don't stick together in a cheesy mass that's impossible to separate later.
Freezer Friendly
Here's a game-changer: you can freeze individual pieces and reheat them later for quick appetizers. Wrap each piece tightly in plastic wrap, then foil, and freeze for up to 2 months. When you're ready, thaw overnight in the fridge, then reheat in a 350°F oven for 8-10 minutes until warmed through. They won't be quite as spectacular as fresh, but they're miles better than most frozen appetizers. I keep a stash for emergency entertaining — nothing says "I'm totally prepared for unexpected guests" like pulling homemade Christmas tree appetizers from your freezer.
Best Reheating Method
The microwave is your enemy here — it'll turn the pastry into a rubbery mess faster than you can say "leftovers." Instead, use a 350°F oven or toaster oven for 8-10 minutes until heated through. Add a tiny splash of water to the pan before reheating — it creates steam that helps re-crisp the pastry without drying it out. If you're reheating individual pieces, wrap them loosely in foil for the first 5 minutes, then uncover for the final 3-4 minutes to recrisp. The result isn't quite as perfect as fresh, but it's close enough that you'll still be proud to serve it.