I was standing in my kitchen, half‑asleep, when my roommate shouted, “You have to try this new cookie thing I saw on TikTok!” I laughed, rolled my eyes, and muttered, “Sure, let’s see if it lives up to the hype.” What followed was a disaster of burnt edges, flat dough, and a lingering feeling that something essential was missing. I was ready to give up on thumbprint cookies forever—until I remembered an old red‑velvet cake recipe my grandma swore by. The moment I combined that velvety cake batter with a classic thumbprint technique, the kitchen filled with a perfume so intoxicating it could have sold tickets to a perfume expo. The scent of cocoa and butter danced with a faint, sweet vanilla note, while the buttery dough whispered promises of chewiness with every stir.
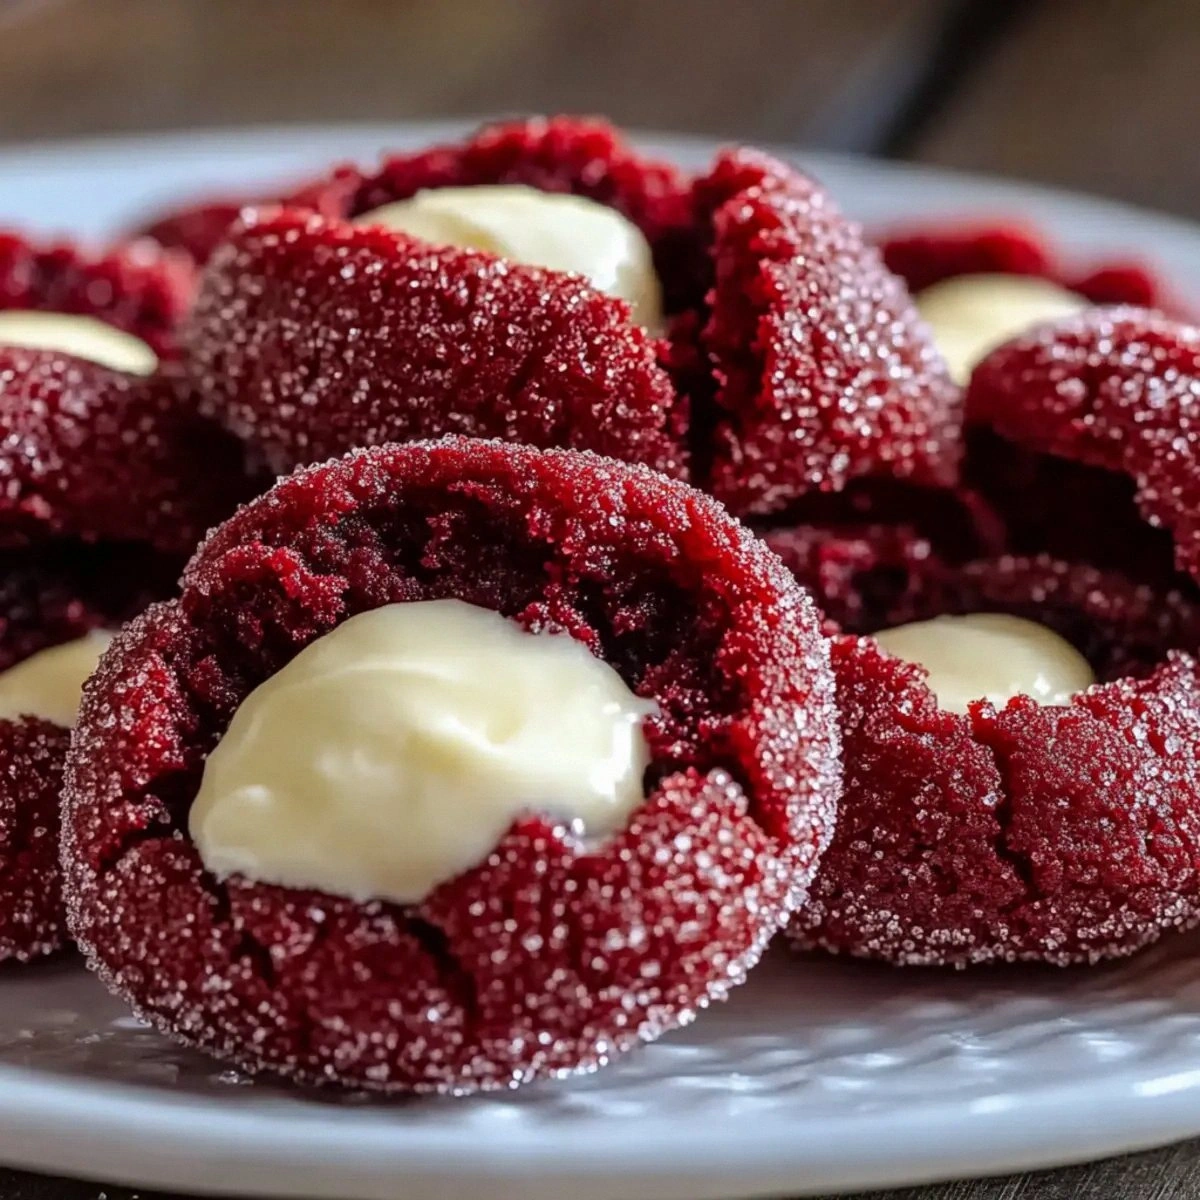
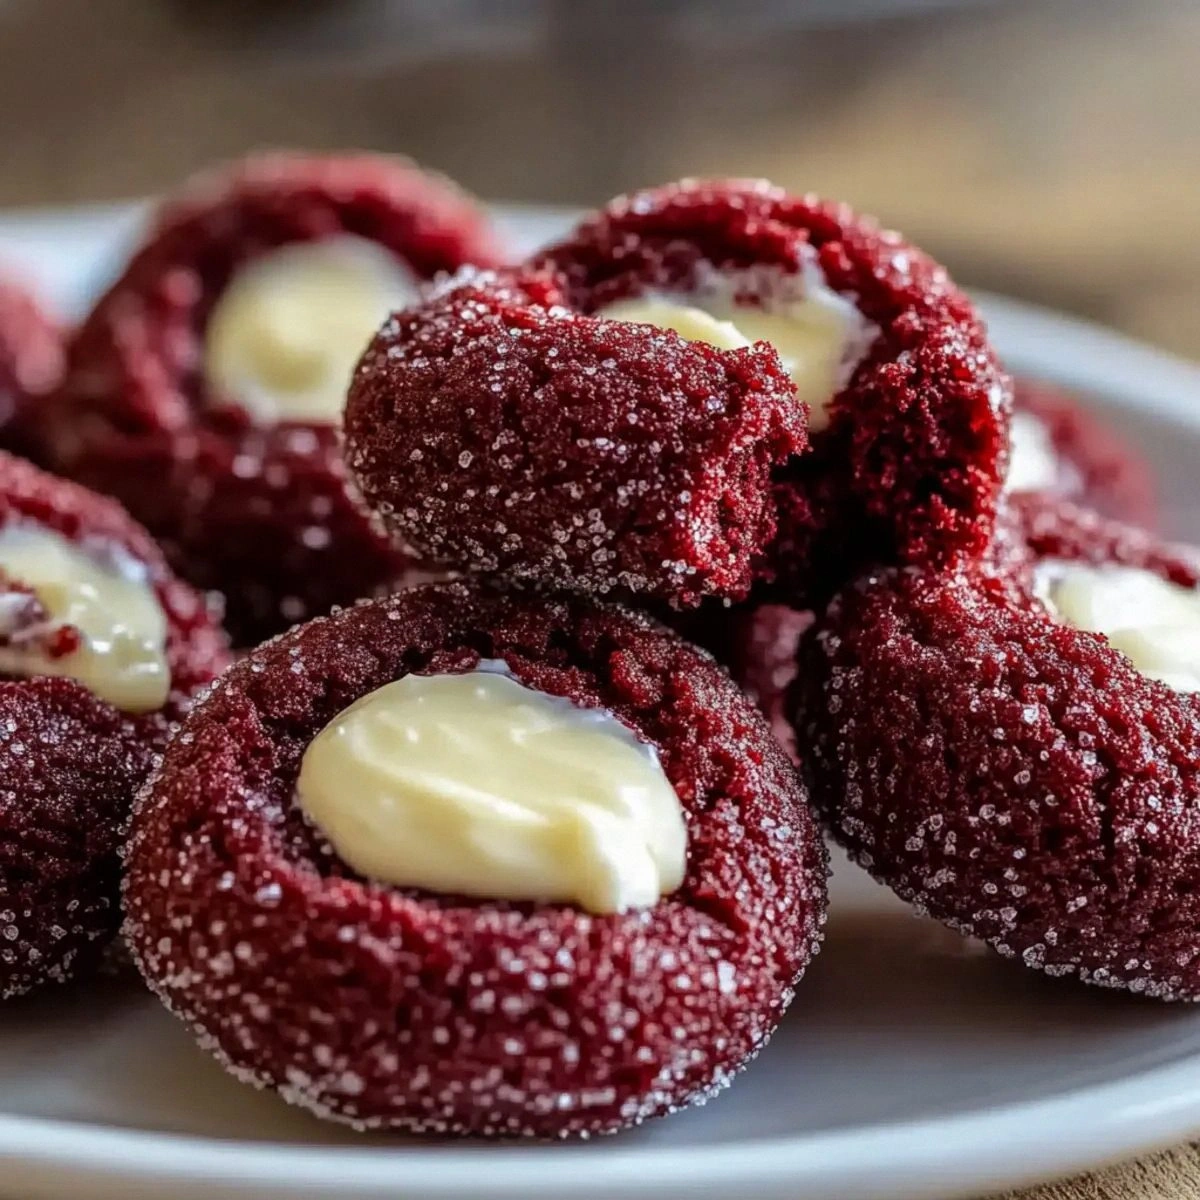
Picture this: a tray of ruby‑red cookies, each with a perfectly centered well, waiting to be filled with a tangy cream‑cheese frosting that glistens like a ruby sunrise. When you bite in, the outer edge cracks just enough to give you that satisfying snap, then gives way to a chewy, melt‑in‑your‑mouth center that’s as soft as a cloud‑kissed pillow. The frosting oozes out, bright and creamy, creating a flavor contrast that feels like a ballroom dance between sweet and tangy. I dare you to taste this and not go back for seconds—trust me, you’ll be the one daring your friends to try it first.
Most recipes get this completely wrong. They either over‑bake, turning the cookies into hard bricks, or they under‑mix, leaving you with a crumbly mess that falls apart the moment you pick it up. The secret to my version is a precise balance of buttermilk acidity, a pinch of cocoa for depth, and a generous roll in granulated sugar that creates a crackly crust without sacrificing chew. I’ll be honest — I ate half the batch before anyone else got to try it, and that’s because the flavor is that unforgettable. This isn’t just another cookie; it’s a culinary love‑letter to anyone who’s ever craved that perfect bite.
Okay, ready for the game‑changer? The technique that will make your cookies stand out is the “double‑chill” method: chill the dough twice, once after mixing and again after shaping. This locks in moisture, ensuring each cookie stays chewy on the inside while developing a crisp edge. And now the fun part: we’ll be using a tiny splash of buttermilk and a dash of red food coloring that together create a hue so vivid you’ll think you’ve baked a piece of art. Let me walk you through every single step — by the end, you’ll wonder how you ever made it any other way.
What Makes This Version Stand Out
- Chewy Texture: The combination of butter, buttermilk, and a short bake time creates a cookie that stays soft in the center, like a plush pillow that never deflates.
- Vibrant Color: The red food coloring is evenly distributed, giving each cookie a deep, velvety hue that looks as good as it tastes.
- Flavor Depth: Unsweetened cocoa powder adds a subtle chocolate undertone that balances the sweet frosting, making the flavor complex yet comforting.
- Simplicity: Only twelve ingredients, most of which you already have in your pantry, meaning you won’t need a last‑minute grocery run.
- Crowd Reaction: These cookies have been known to cause spontaneous applause at parties; people actually line up for a second round.
- Ingredient Quality: Using real butter and cream cheese instead of margarine or shortcuts ensures a richer mouthfeel.
- Cooking Method: The double‑chill technique guarantees consistent chewiness without the dreaded dry edges.
- Make‑Ahead Potential: You can bake them a day ahead, store them airtight, and they’ll taste just as fresh the next day.
Inside the Ingredient List
The Flavor Base
The unsweetened cocoa powder is the unsung hero that adds a whisper of chocolate without overwhelming the delicate red‑velvet profile. Skip it, and you’ll end up with a cookie that tastes more like plain sugar, missing that subtle depth. If you’re allergic to cocoa, try a tablespoon of finely ground espresso beans for a similar bitterness that pairs beautifully with the frosting.
Red food coloring does more than just make the cookies look festive; it signals to your brain that you’re about to indulge in something special. Use a gel version for a more concentrated hue, and you’ll need less, saving you from a neon‑pink disaster. If you prefer a natural route, beet powder works but will give a slightly earthier tone.
The Texture Crew
Butter is the backbone of chewiness. The 3/4 cup of softened unsalted butter should be at room temperature—soft enough to blend but not melted, otherwise you’ll lose that tender crumb. For a richer flavor, you can swap half the butter for melted coconut oil, but remember that coconut adds its own aroma.
Buttermilk is the secret liquid that reacts with baking soda, creating tiny bubbles that lift the cookie just enough to stay airy. If you don’t have buttermilk on hand, mix 1/2 cup milk with a teaspoon of lemon juice and let it sit for five minutes; the acidity will mimic the real thing.
The Unexpected Star
Cream cheese frosting is the crown jewel. The combination of 4 ounces softened cream cheese, 1/4 cup butter, powdered sugar, and vanilla creates a tangy, silky topping that cuts through the sweetness of the cookie base. Skipping the cream cheese and using just buttercream will make the topping overly sweet and lose that signature bite.
A pinch of salt might seem insignificant, but it amplifies every other flavor, ensuring the sweetness isn’t cloying. If you’re on a low‑sodium diet, reduce it to a “dash,” but don’t eliminate it entirely.
The Final Flourish
All‑purpose flour provides structure, while the pinch of baking soda gives lift. Using too much baking soda will make the cookies spread too thin and become crispy, which is the opposite of the chewy texture we’re after. If you want a gluten‑free version, substitute with a 1‑to‑1 gluten‑free flour blend, but add a teaspoon of xanthan gum to retain elasticity.
The extra granulated sugar for rolling creates that crackly, caramelized exterior that makes each bite a textural surprise. Skip it, and you’ll end up with a smooth, uniform surface that lacks that satisfying snap.
Everything's prepped? Good. Let's get into the real action…
The Method — Step by Step
In a large mixing bowl, whisk together the flour, cocoa powder, baking soda, and the pinch of salt. This dry blend ensures that the cocoa and leavening are evenly distributed, preventing any bitter pockets. When you stir, you’ll notice a faint chocolate aroma rising— that’s the first hint of magic. Set this mixture aside while you move on to the wet ingredients.
In a separate bowl, beat the softened butter and granulated sugar together until the mixture is light and fluffy, about 2‑3 minutes on medium speed. The color should turn a pale, creamy yellow, and the texture will be airy—this is your cookie’s foundation. Add the eggs one at a time, making sure each is fully incorporated before the next. Finish with vanilla extract and the red food coloring, mixing until the dough takes on a deep, velvety hue.
Kitchen Hack: If the dough looks too wet after adding the coloring, add a tablespoon of flour; this keeps the consistency perfect for shaping.Gradually add the dry ingredients to the wet mixture, mixing on low speed until just combined. Over‑mixing will develop gluten and make the cookies tough, so stop as soon as you no longer see flour streaks. The dough will be thick, slightly sticky, and a gorgeous ruby color—like a batch of edible gemstones.
Stir in the buttermilk gently; you’ll hear a faint fizz as the soda reacts, creating tiny air bubbles that promise a tender crumb. This is the moment of truth—if the dough feels too loose, refrigerate for ten minutes before proceeding. The chill firms the butter, making the dough easier to handle and preventing excessive spreading.
Cover the bowl with plastic wrap and place it in the refrigerator for 30 minutes. This first chill is crucial; it solidifies the fat, ensuring that when the cookies hit the hot oven, the edges set quickly while the center stays soft. While you wait, you can prepare the cream‑cheese frosting.
For the frosting, beat the softened cream cheese and 1/4 cup butter together until smooth and creamy. Add the sifted powdered sugar gradually, then finish with half a teaspoon of vanilla extract. The frosting should be thick enough to hold its shape when piped but still spreadable. Cover and chill until the cookies are ready, giving the flavors time to meld.
After the dough has chilled, line a baking sheet with parchment paper. Scoop out tablespoon‑sized balls of dough, roll them in the additional granulated sugar, and place them on the sheet, spacing them about 2 inches apart. Press each ball gently with your thumb (or the back of a small spoon) to create a shallow well—this is where the frosting will sit.
Watch Out: If the wells are too deep, the frosting may overflow during baking, creating a mess; aim for a depth of about 1/4 inch.Pop the sheet into a preheated oven at 350°F (175°C) and bake for 12‑14 minutes, or until the edges are lightly golden and the tops have set but not browned. You’ll notice a faint crackle on the surface— that sizzle when it hits the pan? Absolute perfection. The centers will still look slightly soft; that’s exactly what we want.
While the cookies are still warm, spoon a dollop of the chilled cream‑cheese frosting into each well. The warmth of the cookie will melt the frosting just enough to create a glossy sheen without losing its shape. Let the cookies cool completely on a wire rack; this allows the frosting to firm up and the flavors to marry.
Once cooled, store the cookies in an airtight container. They’ll stay chewy for up to five days, and the frosting will stay fresh for a week. If you’re planning a party, arrange them on a platter and watch the crowd’s eyes widen—this is the moment you’ll hear “Again, please!”
That's it — you did it. But hold on, I've got a few more tricks that'll take this to another level. Stay with me here — this is worth it.
Insider Tricks for Flawless Results
The Temperature Rule Nobody Follows
Always start with room‑temperature butter and eggs; this ensures a uniform emulsion. If your butter is too cold, the dough will be crumbly and won’t hold together, leading to uneven spreading. I once tried using melted butter to save time— the cookies turned out flat and crispy, a total disappointment. Keep your ingredients at the same temperature, and you’ll get that coveted chew.
Why Your Nose Knows Best
When the cookies are in the oven, trust the aroma more than the clock. The moment you smell a nutty, caramelized scent, the edges are done, and the centers are still soft. Pull them out a minute early if the scent is strong; they’ll finish cooking on the hot tray, preserving that chewy interior.
The 5‑Minute Rest That Changes Everything
After the first chill, let the dough rest at room temperature for five minutes before shaping. This short rest lets the gluten relax just enough to prevent tough bites while keeping the butter firm. I tried skipping this step once— the cookies spread too much and lost their signature shape. A quick rest is a tiny time investment for a massive texture payoff.
Frosting Consistency Check
If your cream‑cheese frosting looks runny, chill it for another 10 minutes before filling the wells. The cooler frosting holds its shape better and won’t melt into the cookie during the final cooling phase. Conversely, if it’s too stiff, add a teaspoon of milk and beat briefly; this gives it a silky glide without becoming soupy.
The Secret of the Sugar Roll
Rolling the dough balls in extra granulated sugar before baking creates a thin, caramelized crust that crackles under the bite. The sugar melts slightly, forming a glossy finish that adds a subtle crunch. If you’re watching carbs, you can substitute a light dusting of coconut sugar for a lower‑glycemic option, though the texture will be a tad softer.
Creative Twists and Variations
This recipe is a playground. Here are some of my favorite ways to switch things up:
White Chocolate Swirl
Melt 1/2 cup white chocolate and swirl it into the dough before the first chill. The sweet, buttery ribbons add an extra layer of decadence that pairs beautifully with the tangy frosting.
Espresso Edge
Add a teaspoon of instant espresso powder to the dry ingredients. The coffee note deepens the chocolate flavor and gives the cookies an adult‑only vibe, perfect for after‑dinner coffee.
Nutty Crunch
Fold in a quarter cup of finely chopped toasted pecans or walnuts into the dough. The nuts add a satisfying crunch that contrasts the soft interior, and the buttery nut flavor complements the cream cheese frosting.
Citrus Zing
Add the zest of one orange to the frosting and a tablespoon of orange extract to the dough. The citrus brightens the red‑velvet base, creating a fresh, spring‑time feel.
Miniature Bite‑Size
Shape the dough into mini balls (about one inch in diameter) and bake for 8‑10 minutes. These bite‑size versions are perfect for cocktail parties and look adorable on a dessert platter.
Storing and Bringing It Back to Life
Fridge Storage
Place the cooled cookies in an airtight container with a sheet of parchment between layers. They’ll stay fresh for up to five days, and the frosting will keep its creamy texture. If you notice the frosting hardening, let the container sit at room temperature for 10 minutes before serving.
Freezer Friendly
Lay the cookies on a baking sheet, freeze until solid, then transfer to a zip‑top freezer bag. They’ll keep for up to three months. When you’re ready to enjoy them, let them thaw in the fridge for an hour, then bring to room temperature.
Best Reheating Method
To revive that fresh‑out‑of‑the‑oven chew, pop a cookie on a microwave‑safe plate, add a tiny splash (about a teaspoon) of water, and microwave for 10‑12 seconds. The steam created will soften the interior while keeping the crust slightly crisp— a true resurrection trick.