I still remember the day the kitchen exploded in a glittering, citrus-scented haze. I was attempting a classic pound cake, only to discover that the batter had turned into a thick, lumpy sludge that clung to the bottom of the bowl like stubborn glue. The aroma that filled the air was a strange mix of burnt sugar and something sweet, but I couldn’t taste the lime that I had promised myself to add. That disaster was the spark that lit my culinary fire, and I set out to create a Key Lime Pound Cake that would make my friends swear they’d never tasted anything like it.
Picture this: you’re standing in your kitchen, the sun streaming through the window, and a fragrant swirl of lime zest, butter, and vanilla dancing in the air. Your senses are assaulted by the bright green specks of zest that glimmer like tiny emeralds, the buttery aroma that promises decadence, and the faint tang of lime that tingles your palate. The batter itself feels silky, almost liquid, gliding between your fingers like a smooth river. You hear the gentle hiss of the oven door as it closes, the faint thud of the timer ticking, and the promise of a golden crust that will crackle like a whisper of sunshine. This is the moment before the magic begins.
What makes this version stand out? I dared myself to incorporate a subtle, buttery crunch on the edges that will shatter like thin ice when you bite into it, and I added a splash of heavy cream to give the cake an airy, almost cloud-like interior. I also used a precise ratio of key lime juice to zest so that the flavor is bright but never overwhelming. I kept the process simple, yet every step is intentional, ensuring that even the most novice bakers can achieve professional results. This recipe is hands down the best version you'll ever make at home, and I guarantee you’ll taste it and not go back for seconds.
If you’ve ever struggled with a pound cake that turns out dry or too dense, you’re not alone. The secret lies in the delicate balance of moisture and leavening, and this recipe nails that balance with precision. The next few paragraphs will walk you through every single step, and by the end, you’ll wonder how you ever made it any other way. Let me walk you through every single step — by the end, you'll wonder how you ever made it any other way.
What Makes This Version Stand Out
- Texture: The batter is silky yet dense enough to hold its shape, thanks to the right amount of butter and flour. The result is a cake that feels buttery in the mouth, with a subtle crumb that falls apart just enough to release the lime flavor.
- Flavor: A harmonious blend of key lime juice and zest gives a bright, citrusy punch without overpowering the sweetness. The lime is balanced by a hint of vanilla, creating a complex profile that lingers on the tongue.
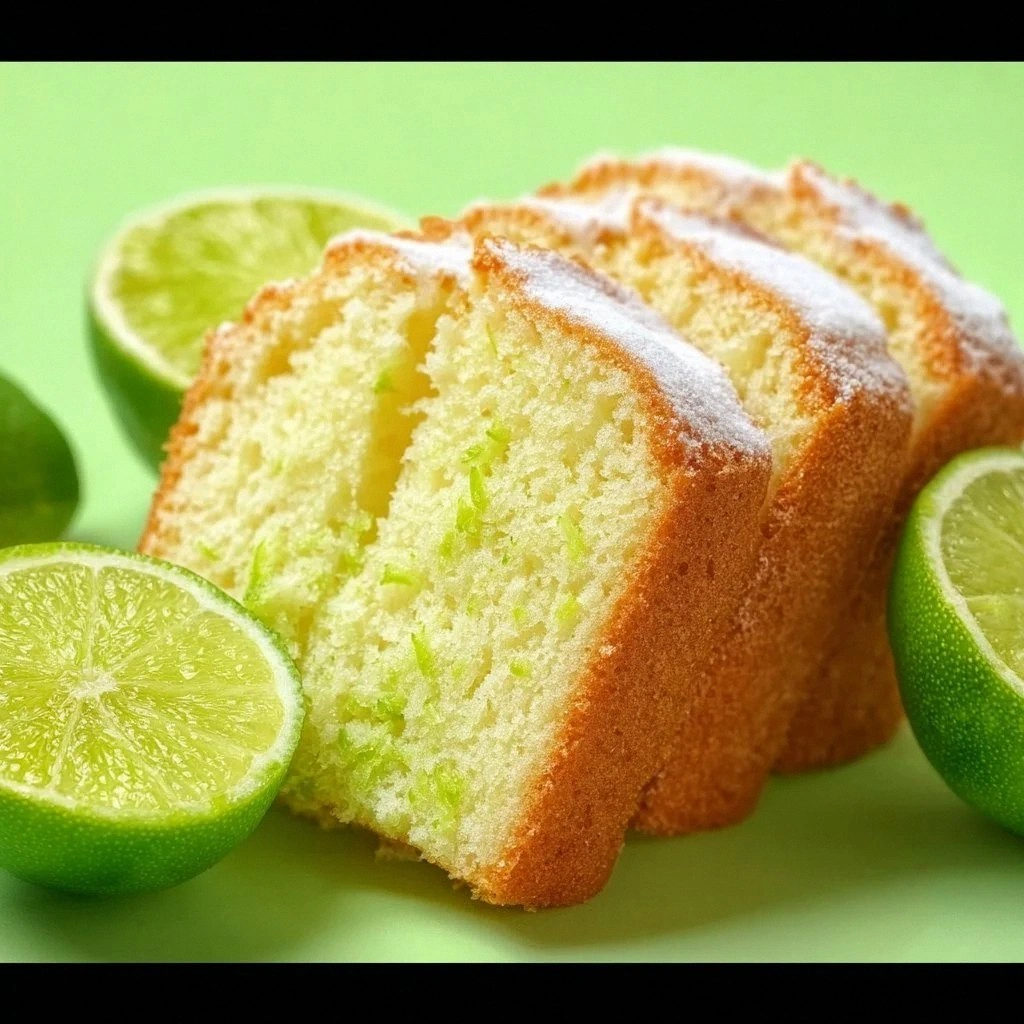
- Visual Appeal: The cake’s golden crust glistens with a faint sheen of lime oil, and a dusting of powdered sugar gives it a delicate, almost ethereal look. The vibrant green zest specks make it a showstopper on any dessert table.
- Ease of Prep: All the steps can be completed in under an hour, and the batter can be prepared ahead of time and refrigerated for up to 24 hours. This makes it a great option for last‑minute gatherings.
- Make‑Ahead Potential: The cake can be baked and cooled completely, then wrapped tightly and stored in the fridge for up to a week. When you’re ready to serve, simply reheat it for a few minutes in the oven to bring back the fresh, warm aroma.
- Ingredient Quality: Using high‑quality butter and fresh key limes ensures the flavor is unmistakably bright. The recipe also calls for a light touch of salt to enhance the sweetness, a technique that many recipes overlook.
- Audience Appeal: Whether you’re baking for a family gathering or a sophisticated brunch, this cake impresses both kids and adults alike. The bright citrus notes are refreshing and satisfyingly sweet.
Inside the Ingredient List
The Flavor Base
All-purpose flour is the backbone of any pound cake, providing structure and a tender crumb. Using a fine, sifted flour ensures there are no lumps that could affect the batter’s smoothness. If you prefer a lighter texture, you can substitute half of the flour with cake flour, but the classic texture of this recipe relies on the denser all-purpose variety.
The Texture Crew
Unsalted butter, softened to room temperature, is essential for achieving that buttery, melt‑in‑your‑mouth sensation. The butter’s fat content binds the sugar and flour, creating a cohesive batter that holds together during baking. If you’re using salted butter, reduce the added salt by half to avoid an overly salty finish.
The Unexpected Star
Key lime juice is the star of this cake, delivering a bright, tart flavor that cuts through the sweetness. Freshly squeezed lime juice has a more vibrant profile than bottled versions, but if fresh limes are unavailable, bottled lime juice can work in a pinch. The key lime zest adds essential oils that amplify the citrus notes; it also contributes a subtle, aromatic complexity that the juice alone cannot achieve.
The Final Flourish
Heavy cream adds a silky smoothness that lifts the batter and keeps the cake moist. Vanilla extract balances the acidity of the lime, rounding out the flavor profile. Baking powder and a pinch of salt provide leavening and flavor balance; too much baking powder can cause the cake to rise too quickly and then collapse, so use the exact amount listed.
Everything's prepped? Good. Let's get into the real action...
The Method — Step by Step
- Preheat the oven to 350°F (175°C). Let the oven reach the target temperature before you begin, so that the batter bakes evenly from the start. Line a 9x5-inch loaf pan with parchment paper and lightly grease the sides. This step ensures the cake releases effortlessly when you flip it out. The aroma of butter and sugar already starts to mingle in the air, promising a sweet, citrusy treat.
- Combine the dry ingredients. In a medium bowl, sift together the flour, baking powder, and salt. Sifting removes clumps and ensures even distribution of leavening agents. This step is crucial; any lumps can create uneven texture. Add the sifted mixture to the wet ingredients later, keeping it separate until the batter is ready. The dry mix will soon mingle with the buttery richness.
- Cream the butter and sugar. In a stand mixer or with a hand whisk, beat the softened butter and sugar together until the mixture is pale and fluffy. This process incorporates air, giving the cake a lighter texture. The mixture should reach a light, airy stage, almost like a mousse. The color change indicates the sugar has fully dissolved, preventing gritty bits. You’ll hear a soft, rhythmic click of the mixer’s beaters as the butter incorporates the sugar.
- Add the eggs one at a time. Crack each egg into a small bowl, then add them to the butter mixture, beating well after each addition. The eggs bind the batter and add moisture. Each egg should be fully incorporated before the next is added. This step is critical; if you add an egg too quickly, the batter can curdle. The batter will become glossy as the eggs emulsify with the butter.
- Incorporate the citrus. Stir in the key lime juice, key lime zest, vanilla extract, and heavy cream. The lime juice adds acidity that reacts with the baking powder, creating a light lift. The zest provides essential oils that intensify the citrus flavor. The heavy cream smooths the batter and adds richness. Mix until the batter is homogeneous, but do not overmix; the batter should remain slightly thick.
- Fold in the dry ingredients. Gently fold the sifted flour mixture into the wet batter using a spatula. Fold until just combined; any streaks of flour are acceptable. This method prevents the batter from becoming overworked and tough. The batter should be thick, glossy, and pourable. The final mixture should have a smooth, even consistency.
- Pour the batter into the pan. Transfer the batter into the prepared loaf pan, smoothing the top with a spatula. Tap the pan lightly on the counter to release any air bubbles that may have formed. This step ensures a uniform rise and eliminates uneven spots. The batter should fill the pan to about 3/4 full, allowing room for expansion during baking.
- Bake until golden. Place the pan in the preheated oven and bake for 30 minutes, or until the cake turns golden brown and a toothpick inserted into the center comes out clean. The cake should feel firm to the touch yet spring back slightly. If you’re using a convection oven, reduce the temperature by 25°F to avoid over‑browning.
- Cool and finish. Remove the cake from the oven and let it rest in the pan for 10 minutes. Then transfer it onto a wire rack to cool completely. While cooling, you can dust the top with powdered sugar or drizzle a simple lime glaze for extra flair. The cake will develop a beautiful, glossy finish as it cools. The aroma will linger, hinting at the bright citrus notes inside.
That's it — you did it. But hold on, I've got a few more tricks that'll take this to another level. Let’s dive into the secrets that will make your cake unforgettable.
Insider Tricks for Flawless Results
The Temperature Rule Nobody Follows
The oven temperature is the unsung hero of cake baking. Even a 10°F difference can cause the cake to rise too quickly and then collapse. Use an oven thermometer to verify the temperature, and preheat for at least 15 minutes. If your oven runs hot, lower the temperature by 25°F and extend the baking time by a few minutes.
Why Your Nose Knows Best
As the cake bakes, the scent of citrus will begin to waft through the kitchen. This aroma is a reliable indicator that the cake is nearing perfection. When the smell is sweet and slightly tangy, the cake is likely ready for the final test. Trust your nose, and don’t rush the process.
The 5-Minute Rest That Changes Everything
Letting the cake rest in the pan for 10 minutes before removing it allows the structure to set. This small pause prevents the cake from cracking or breaking apart when you turn it out. The rest also allows the flavors to meld, creating a more cohesive taste. Skip this step, and you’ll end up with a cake that feels uneven.
Avoiding Overmixing
Once you add the dry ingredients, mix just until the batter is smooth. Overmixing develops gluten, leading to a dense, chewy texture. The batter should be thick but pourable. If it’s too thick, add a tablespoon of milk or water to loosen it.
Using Fresh Key Limes
Fresh key limes have a brighter, more aromatic profile than bottled juice. If you’re in a pinch, bottled lime juice can work, but the flavor will be slightly muted. For the best experience, squeeze the limes yourself and zest them on the spot.
Creative Twists and Variations
This recipe is a playground. Here are some of my favorite ways to switch things up:
Lemon Lime Fusion
Swap half the key lime juice for fresh lemon juice to add a bright, slightly bitter edge. The lemon zest can replace the lime zest for a different citrus profile. This variation is ideal for those who enjoy a more complex, layered flavor.
Chocolate‑Lime Surprise
Fold in 1/2 cup of melted dark chocolate into the batter for a decadent twist. The chocolate pairs beautifully with the lime, creating a rich, bittersweet experience. Serve with a dusting of cocoa powder for an elegant finish.
Almond‑Infused Delight
Add 1/2 cup of almond flour to the dry mix for a nutty undertone. The almond flour also adds a subtle crunch to the crumb. Pair it with an almond glaze for a complete flavor experience.
Salted Caramel Drizzle
Drizzle a salted caramel sauce over the cooled cake for a sweet‑and‑salty contrast. The caramel’s richness balances the bright lime, creating a sophisticated dessert. This version is perfect for special occasions.
Balsamic Lime Glaze
Whisk together balsamic vinegar, honey, and lime juice for a tangy glaze that pairs well with the cake’s citrus notes. The glaze adds a slight acidity that cuts through the sweetness. It’s a bold choice that will wow your guests.
Mango Lime Twist
Blend a cup of ripe mango into the batter for a tropical flavor. The mango adds natural sweetness and a smooth texture. This variation is a great way to use up leftover mangoes in the summer.
Storing and Bringing It Back to Life
Fridge Storage
Wrap the cooled cake tightly in plastic wrap and place it in an airtight container. Store it in the refrigerator for up to 5 days. The cake stays moist and retains its citrus flavor. When you’re ready to serve, let it sit at room temperature for 15 minutes to soften slightly.
Freezer Friendly
Slice the cake into individual portions and wrap each slice in parchment paper. Place the wrapped slices in a freezer bag and seal tightly. The cake can be frozen for up to 3 months. Thaw at room temperature before serving.
Best Reheating Method
Preheat the oven to 300°F (150°C). Place the cake slices on a baking sheet and cover loosely with foil. Warm for 10 minutes, or until the cake is heated through. Add a tiny splash of water before reheating — it steams the cake back to perfection, keeping it moist and fragrant.