I remember the night I was supposed to make a quick dessert for my roommate’s birthday, but I had nothing on hand. The pantry was a barren wasteland save for a jar of peanut butter, a bag of chocolate graham crackers, and a tub of Cool Whip that had been sitting in the fridge for a week. I stared at the empty shelves, feeling the creeping dread of a culinary disaster. Then, in a moment of reckless inspiration, I decided to mash the peanut butter with the graham crackers, pour in the Cool Whip, and let the universe decide. The result? A chocolate peanut butter masterpiece that melted the kitchen into a sweet, creamy dreamscape. That night, the smell of toasted chocolate and the texture of a velvety mousse turned a potential flop into a triumph.
Picture this: the first bite feels like a silky chocolate river that swirls around the creamy peanut butter, the crunch of graham cracker crumbs giving a satisfying bite that snaps like a thin ice sheet. The aroma is a heady blend of roasted chocolate, nutty peanut, and a hint of vanilla that makes your nose do a happy dance. The texture is a paradoxical mix of smooth, airy Cool Whip and crunchy crumbs, creating a sensory orchestra that plays a sweet, savory melody. If you’ve ever struggled to find the perfect balance between chocolate and peanut, this recipe is your new holy grail.
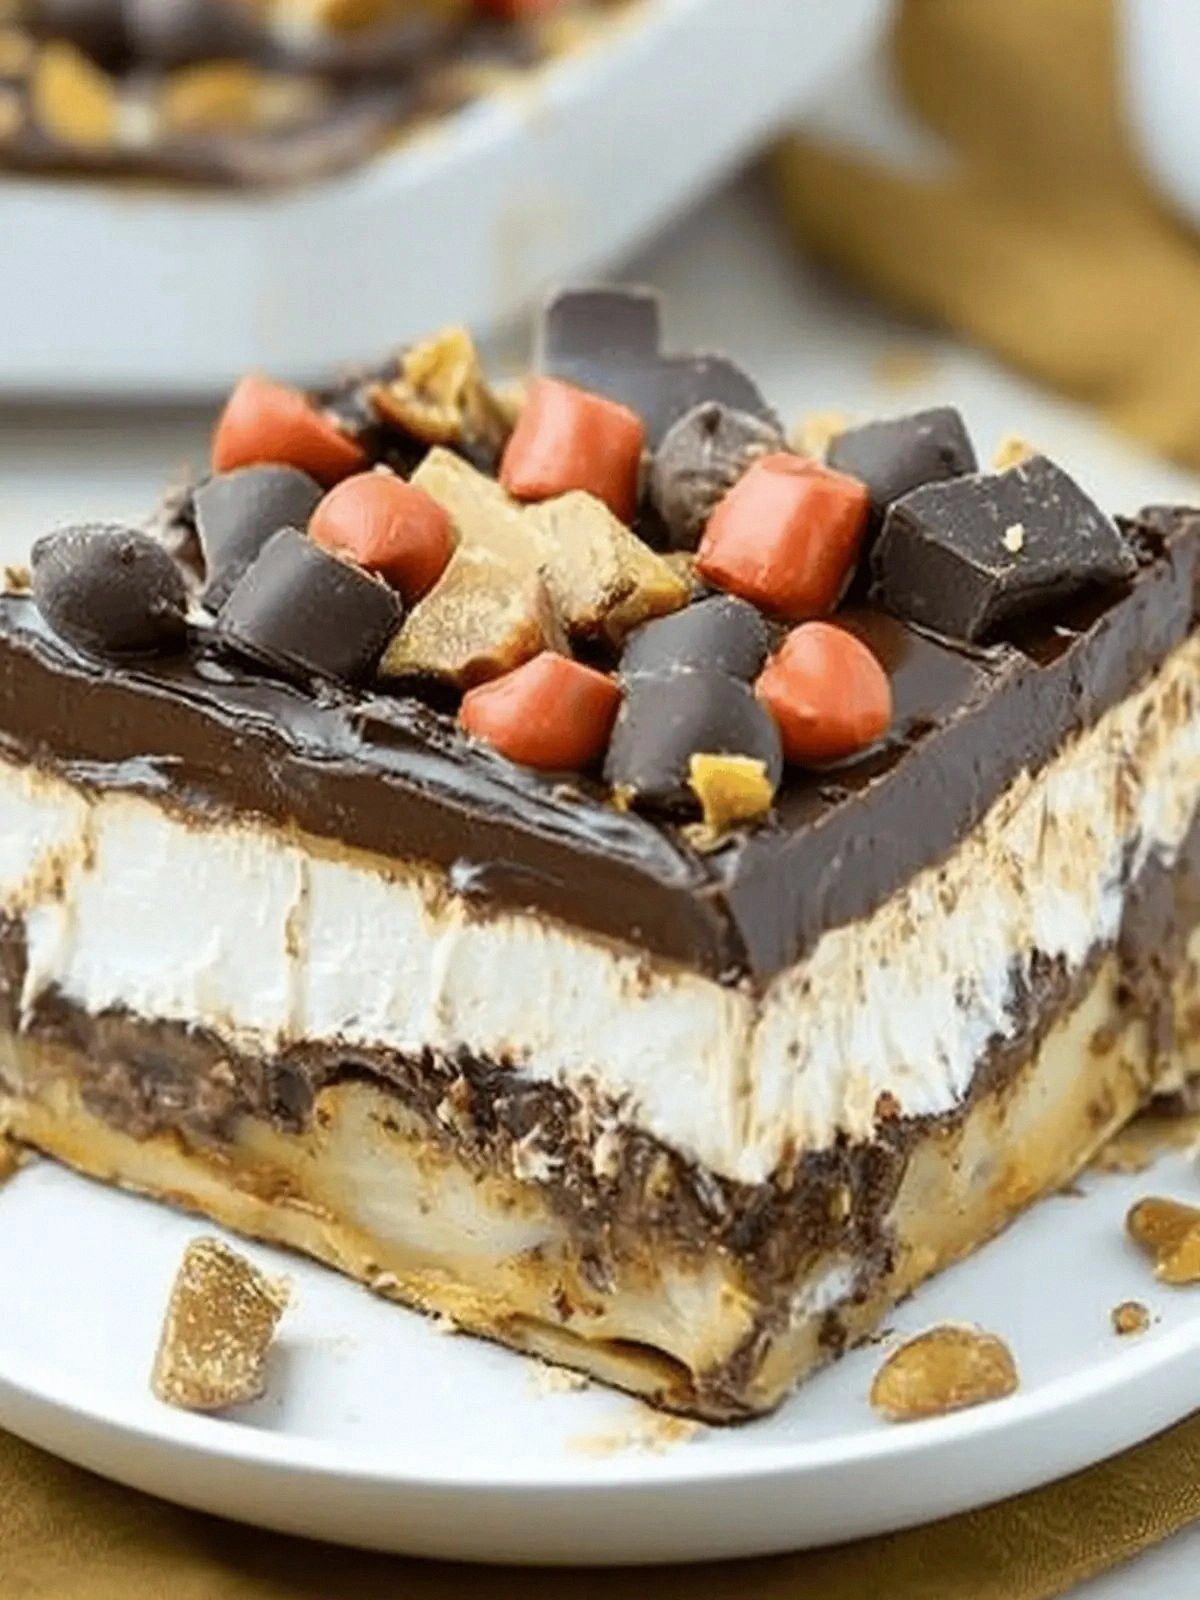
What sets this version apart from every other chocolate peanut butter dessert out there is the layered construction of flavors and textures. It’s not just a mousse or a cookie; it’s a multi-tiered delight that starts with a buttery graham base, climbs through a rich peanut butter core, and crowns itself with a fluffy Cool Whip finish. The instant pudding gives it a silky depth that would otherwise be missing, while the Reese’s pieces and cups add a playful crunch and an extra chocolate kick. This is hands down the best version you’ll ever make at home because it layers every element of taste, texture, and visual appeal into a single, cohesive bite.
I dare you to taste this and not go back for seconds. The first bite will have you questioning whether you’ve ever eaten anything else that’s as indulgently comforting yet so cleverly crafted. The second bite will confirm that you’re not dreaming, and the third will make you wonder how you survived without this on your menu. If you’ve ever been disappointed by a chocolate peanut butter dessert that felt flat or overly sweet, you’re not alone—and I’ve got the fix.
Okay, ready for the game‑changer? This recipe is a playground for your taste buds, a testament to the power of simple ingredients when they’re orchestrated with love and a dash of daring. By the end, you’ll wonder how you ever made it any other way, and you’ll be itching to share it with friends, family, and that one cousin who always asks for “the best dessert.” Let me walk you through every single step — by the end, you’ll wonder how you ever made it any other way.
What Makes This Version Stand Out
- Depth of Flavor: The combination of chocolate graham cracker crumbs and peanut butter creates a rich, complex taste profile that lingers on the palate.
- Texture Contrast: The crunchy crumbs, silky mousse, and airy Cool Whip layers deliver a satisfying bite that keeps you coming back.
- Ease of Assembly: No baking required, just blend, layer, and chill—perfect for a last‑minute dessert.
- Make‑Ahead Potential: Assemble the layers a day ahead, cover, and refrigerate; the flavors meld beautifully over time.
- Visual Appeal: The glossy Cool Whip top and the speckled Reese’s pieces make for a photogenic dessert that’s as beautiful as it is delicious.
- Ingredient Quality: Using high‑quality peanut butter and real chocolate graham crackers ensures authentic taste.
- Kid‑Friendly: The recipe is non‑baking, so it’s safe for kids to help assemble.
- Versatile: It works as a dessert, a snack, or even a sweet sandwich filling.
Alright, let's break down exactly what goes into this masterpiece…
Inside the Ingredient List
The Flavor Base
Chocolate graham cracker crumbs form the foundation of this dessert, delivering a buttery, slightly sweet base that anchors the other flavors. They’re the silent hero that provides structure and a subtle crunch that contrasts the creamy layers. Skipping them would strip away the essential texture and depth, leaving you with a flat, peanut‑centric mousse that lacks that satisfying bite. If you’re on a gluten‑free diet, look for certified gluten‑free graham crackers, or replace them with crushed gluten‑free rice cakes for a lighter crunch.
The Texture Crew
Unsalted butter, cream cheese, and Cool Whip are the textural backbone. The butter melts into the crumbs, creating a buttery crust that’s both firm and melt‑in‑your‑mouth. Cream cheese adds a silky, tangy richness that balances the sweetness, while Cool Whip provides a light, airy topping that keeps the dessert from becoming overly dense. If you’re craving a dairy‑free version, swap the cream cheese for a dairy‑free alternative and use coconut whipped cream instead of Cool Whip.
The Unexpected Star
Peanut butter is the star that ties everything together. Its nutty, slightly salty profile cuts through the sweetness of the graham base and the Cool Whip. The addition of melted peanut butter in the final layer amplifies the peanut flavor, creating a luscious, cohesive taste. If you’re allergic to peanuts, consider using almond butter for a similar texture, though the flavor will shift subtly. A pinch of sea salt can enhance the peanut’s natural sweetness without overpowering it.
The Final Flourish
Reese’s Pieces and Reese’s cups add the final flourish of chocolatey crunch and a burst of caramelized peanut butter flavor. They also contribute a visual pop of color, making the dessert Instagram‑ready. If you’re a fan of extra chocolate, sprinkle some shaved dark chocolate on top before serving. For a festive twist, add a few drops of orange zest or a splash of espresso powder to the Cool Whip for a subtle citrus or coffee kick.
Everything's prepped? Good. Let's get into the real action…
The Method — Step by Step
- First, preheat your oven to 350°F (if you plan to bake the graham base). In a bowl, combine 2 cups of chocolate graham cracker crumbs with 1/2 cup unsalted butter, melted. Stir until the crumbs are evenly coated. Spread the mixture in a 9×9 inch pan, pressing firmly to create an even crust. Bake for 8 minutes until golden, then let cool.
- While the crust cools, blend 8 oz of cream cheese with 1 cup of peanut butter and 1 cup powdered sugar until silky smooth. Add 1 teaspoon of vanilla for that aromatic lift. The mixture should be thick enough to hold its shape but still pourable.
- In a separate bowl, whisk 2 cups of Cool Whip until soft peaks form. Fold in 1 package of chocolate instant pudding prepared with 2 cups whole milk, following the package instructions. The pudding should be thick, yet glossy.
- Spoon the peanut butter mixture over the cooled crust, smoothing it into a flat layer. Gently spread a layer of the pudding‑Cool Whip mixture on top of the peanut butter. This is the moment of truth: the layers should look like a miniature dessert stack.
- Add a final layer of Cool Whip, smoothing the surface with a spatula. Sprinkle 1/2 cup Reese’s Pieces and 1/2 cup Reese’s cups evenly across the top. The visual contrast between the white whipped cream and the chocolatey pieces is simply irresistible.
- Refrigerate the assembled dessert for at least 4 hours, preferably overnight, so the layers set firmly. This chilling time also allows the flavors to marry beautifully, creating a cohesive taste experience.
- Just before serving, drizzle 1/2 cup melted peanut butter over the Cool Whip surface. The melted peanut butter pools in the valleys, creating a glossy, decadent glaze that will make your mouth water.
- Slice into squares and serve immediately, or keep chilled until ready to serve. If you’re serving at a party, bring the dessert on a platter and let guests pick their favorite pieces.
That's it — you did it. But hold on, I've got a few more tricks that'll take this to another level…
Insider Tricks for Flawless Results
The Temperature Rule Nobody Follows
The secret to a silky pudding layer is to let the instant pudding cool to room temperature before folding it with the Cool Whip. If you fold it while it's still warm, the mixture will become too liquid, and the layers will separate during chilling. A quick test: hold the mixture in your hand; it should feel firm enough to hold a spoon without dripping.
Why Your Nose Knows Best
When the graham base is baking, listen for the crackling of butter melting into the crumbs. That sound signals that the base is golden and ready. A dull, flat sound means you need to bake a few more minutes. Your nose will also detect the subtle scent of toasted chocolate, a sign that the flavor is fully developed.
The 5‑Minute Rest That Changes Everything
After spreading the peanut butter layer, let it rest for 5 minutes before adding the pudding. This brief pause allows the peanut butter to set slightly, preventing it from sinking into the pudding when you layer it on top. It also gives the flavors time to meld, creating a more cohesive bite.
Layering Technique for Even Distribution
When adding the Cool Whip top layer, use a spatula to spread it in a circular motion, ensuring an even thickness across the surface. A thin, even layer will melt into the melted peanut butter drizzle, creating a smooth, glossy finish that’s both attractive and delicious.
The Final Glaze Trick
Melt your peanut butter gently over low heat or in the microwave for 15‑seconds intervals, stirring in between. This method prevents scorching and keeps the peanut butter silky. If you like a bit of extra flavor, stir in a pinch of sea salt before drizzling.
Creative Twists and Variations
This recipe is a playground. Here are some of my favorite ways to switch things up:
Minty Madness
Add a handful of crushed peppermint candies to the Cool Whip layer, and drizzle a thin line of mint chocolate ganache over the top. The mint cuts through the sweetness, creating a refreshing finish.
Sea‑Salted Caramel
Replace the powdered sugar with a caramel sauce drizzle, and sprinkle a pinch of sea salt over the final layer. The caramel adds a buttery sweetness, while the sea salt elevates the peanut flavor.
Nutty Trio
Swap the peanut butter for a blend of almond, cashew, and pistachio butter. The nutty trio adds depth and a subtle earthy undertone that pairs beautifully with chocolate.
Citrus Burst
Stir in a tablespoon of orange zest into the peanut butter mixture and top with candied orange peel. The citrus brightness gives a bright, lively contrast to the rich chocolate.
Espresso Kick
Add a teaspoon of espresso powder to the Cool Whip layer for a subtle coffee undertone that complements the chocolate and peanut butter.
Vegan Version
Use a dairy‑free cream cheese, coconut whipped cream instead of Cool Whip, and a vegan chocolate instant pudding mix. This version is just as decadent while staying plant‑based.
Storing and Bringing It Back to Life
Fridge Storage
Keep the dessert refrigerated in an airtight container for up to 3 days. The layers will firm up, making slicing easier. Before serving, let it sit at room temperature for 10 minutes to soften slightly.
Freezer Friendly
Wrap the dessert tightly in plastic wrap and place in a freezer bag. Freeze for up to 2 weeks. Thaw overnight in the fridge, then let sit at room temperature for 15 minutes before serving.
Best Reheating Method
If you need to warm the dessert, place a small portion in the microwave for 10‑15 seconds. Add a splash of water to the Cool Whip layer before heating to keep it from drying out. This technique restores the airy texture and ensures a creamy mouthfeel.