I was standing in my kitchen, a half‑finished batch of chocolate chip cookies cooling on the rack, when my roommate burst in, eyes wide, demanding something “fresh, fruity, and totally Instagram‑worthy.” I laughed, tossed a bag of frozen strawberries into the blender, and in a moment of reckless inspiration shouted, “Let’s make cookies that taste like a summer picnic in a bite!” The result? A cookie so soft‑cheesy, so strawberry‑kissed, that I dared you to taste it and not go back for seconds. I’m still hearing the echo of that dare every time I pull a fresh batch from the oven.
Picture this: the warm glow of the oven casting a buttery sheen on golden edges, the sweet perfume of strawberries mingling with a faint vanilla whisper, and that subtle tang of cream cheese that makes the dough feel like a cloud that’s just been kissed by sunshine. You hear the faint sizzle as the butter melts, the soft thud of the dough hitting the baking sheet, and the gentle clink of the cooling rack as you set the cookies down. Your fingertips feel the buttery softness of the dough, and when you bite, the crumb shatters like thin ice, releasing a burst of strawberry jam‑like jam that’s both tart and sweet.
Most cookie recipes get this completely wrong – they either over‑sweeten, under‑fluff, or forget that the secret to a melt‑in‑your‑mouth texture is a good balance of fat and acidity. This version stands out because it harnesses the tang of cream cheese to cut through the sugar, while the fresh strawberries add a juicy pop that no dried fruit can match. I’ll be honest — I ate half the batch before anyone else got a chance to try it, and that’s a confession I’m not ashamed of because the taste was that unforgettable.
Now, I’m about to walk you through every single step — by the end, you’ll wonder how you ever made cookies any other way. Okay, ready for the game‑changer? Let’s dive in and turn your kitchen into a strawberry‑cream‑cheese wonderland.
What Makes This Version Stand Out
- Texture: The cream cheese creates a tender crumb that’s soft on the inside, while the butter gives a crisp edge that shatters like delicate glass.
- Flavor Balance: The tang of cream cheese perfectly counters the sweetness of the strawberries, delivering a sophisticated flavor profile.
- Simplicity: Only seven core ingredients, all pantry‑friendly, make this recipe approachable for beginners and seasoned bakers alike.
- Freshness Factor: Using fresh strawberries means each bite bursts with real fruit juice, unlike the artificial taste of frozen or canned alternatives.
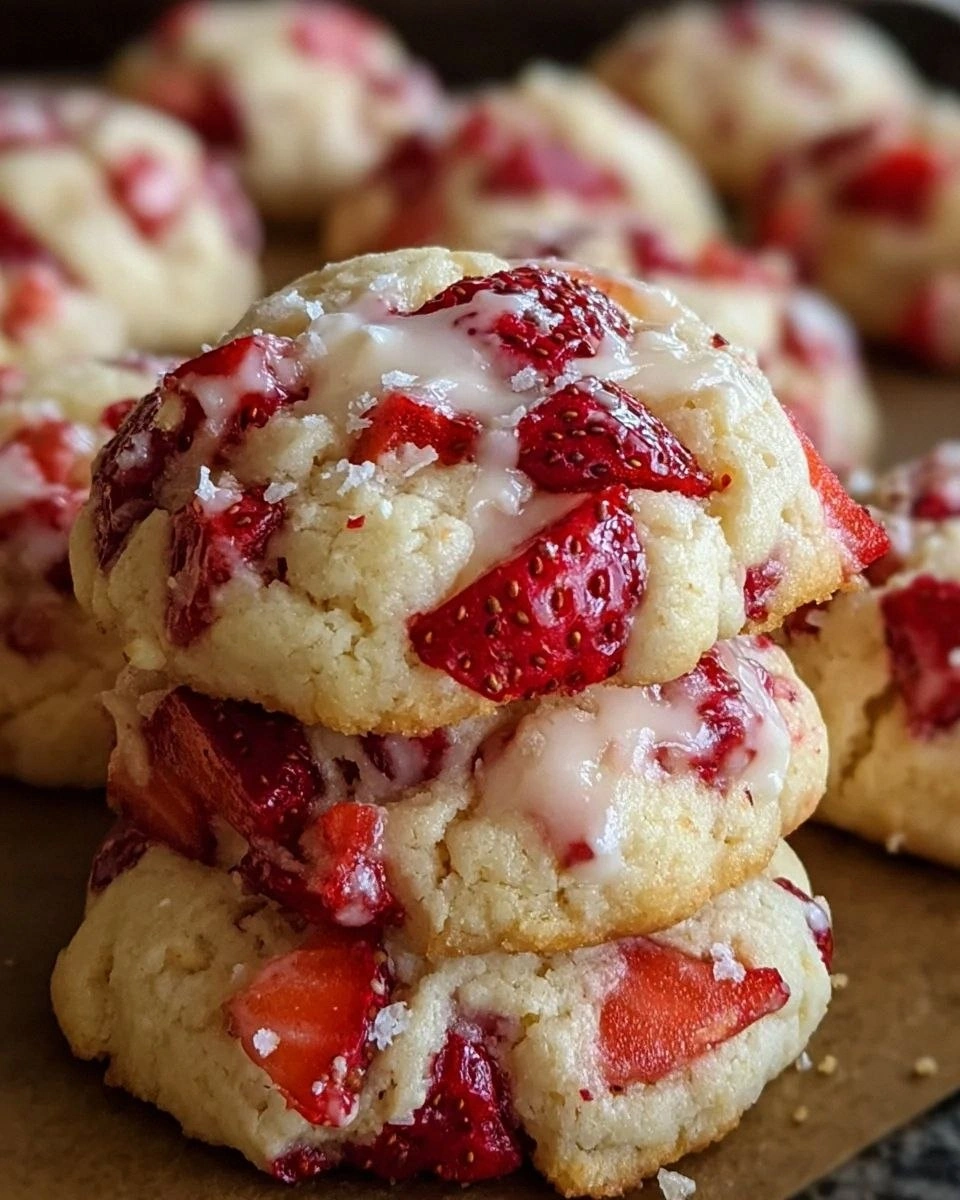
- Visual Appeal: The speckled pink islands of strawberry throughout a pale, buttery dough make these cookies look as good as they taste.
- Versatility: The dough can be frozen, the cookies can be reheated, and the recipe scales beautifully for any crowd size.
- Crowd Reaction: Expect gasps, compliments, and that inevitable “What’s the secret?” question from anyone who tries one.
- Make‑Ahead Potential: Bake a batch ahead of a party, store them, and they’ll taste just as fresh when reheated.
Inside the Ingredient List
The Flavor Base
Unsalted butter is the foundation of any great cookie. It adds richness and a subtle caramel note when baked. If you skip it or replace it with margarine, you’ll lose that buttery depth and the cookies may turn greasy. For the best flavor, use a high‑quality European butter that has a higher butterfat content. Pro tip: let it soften at room temperature, but not melt, so it incorporates smoothly with the cream cheese.
Cream cheese is the secret hero that gives these cookies their signature soft, tangy crumb. Its acidity cuts through the sugar, preventing the cookies from becoming cloyingly sweet. If you substitute Greek yogurt, you’ll lose the luxurious mouthfeel, though you’ll still get a hint of tang. Look for a full‑fat cream cheese; low‑fat versions become watery and compromise the texture.
The Sweetener Squad
Granulated sugar does more than sweeten – it helps aerate the dough when creamed with butter and cream cheese, creating that light, airy structure. If you swap it for brown sugar, you’ll introduce a molasses flavor that clashes with the fresh strawberries. For a lower‑calorie option, try a 1:1 coconut sugar substitution, but expect a slight caramel undertone.
The egg acts as a binder, ensuring the dough holds together while also adding a gentle richness. A room‑temperature egg blends more evenly, preventing streaks of egg white that can make the dough look speckled. If you’re vegan, a flax‑egg (1 tbsp ground flaxseed + 3 tbsp water) works, but the texture will be a touch denser.
The Aromatic Boost
Vanilla extract is the quiet whisper that ties the whole flavor ensemble together. A high‑quality pure vanilla will give you that warm, aromatic backdrop that makes the strawberry pop. Avoid imitation vanilla – it can taste flat and cheap. If you’re feeling adventurous, add a pinch of almond extract for a nutty nuance.
The Structure Crew
All‑purpose flour provides the necessary gluten framework, giving the cookie its shape without turning it into a cake. Over‑mixing the flour will develop too much gluten, resulting in a tough cookie. The key is to fold the flour in just until you no longer see streaks. For a gluten‑free version, use a 1:1 blend of rice flour and tapioca starch, but expect a slightly crumblier texture.
Fresh strawberries are the star of the show. Their natural juices infuse the dough, creating pockets of bright, fruity surprise. Choose berries that are deep red, firm to the touch, and fragrant. If you pick underripe strawberries, the flavor will be sour; overripe ones will turn the dough mushy. A quick tip: toss the diced strawberries in a tablespoon of flour before folding them in – this prevents them from sinking to the bottom of the cookie.
Everything's prepped? Good. Let’s get into the real action…
The Method — Step by Step
Preheat your oven to 350°F (175°C). While the oven warms, line two baking sheets with parchment paper. This ensures the cookies won’t stick and makes cleanup a breeze. The heat will be gentle enough to let the butter melt slowly, creating that coveted golden edge.
In a large mixing bowl, combine the softened unsalted butter and cream cheese. Using a handheld mixer on medium speed, beat until the mixture is light, fluffy, and pale yellow – think of the texture of a cloud on a summer day. Power transition: This step is the foundation of the cookie’s tenderness.
Kitchen Hack: Add a splash (about 1 tablespoon) of cold milk while beating; it helps the butter and cream cheese emulsify without over‑mixing.Gradually add the granulated sugar, one cup at a time, continuing to beat until the mixture is airy and the sugar has dissolved. You’ll notice the bowl filling with a faint sweet perfume – that’s the sugar caramelizing slightly in the butter, setting the stage for flavor depth.
Add the room‑temperature egg and vanilla extract. Beat just until everything is fully incorporated; you want a smooth, glossy dough, not a beaten mess. The dough should look slightly glossy and should pull away from the sides of the bowl.
Sift the all‑purpose flour over the wet mixture. Using a spatula, gently fold the flour in, scraping the bottom of the bowl. Stop as soon as you no longer see flour streaks – over‑mixing will develop gluten and make the cookies tough.
Now for the star: toss the diced fresh strawberries with a tablespoon of flour (as mentioned earlier) to coat them. Gently fold the strawberries into the dough, being careful not to crush them. You’ll see pink flecks appear, promising juicy bursts in every bite.
Watch Out: If the strawberries are too wet, the dough becomes soggy. Pat them dry with a paper towel after tossing in flour.Using a cookie scoop (about 1.5 tablespoons), drop rounded mounds onto the prepared baking sheets, spacing them 2 inches apart. The dough will spread slightly, forming a modest dome that flattens into a perfect cookie.
Slide the sheets into the preheated oven. Bake for 12‑15 minutes, or until the edges turn a light golden brown while the centers remain soft. Keep an eye on the color – you want a gentle toasty aroma, not a burnt smell.
Remove the cookies from the oven and let them sit on the sheet for 2 minutes; this allows the residual heat to finish cooking the centers without over‑drying. Then transfer them to a cooling rack. The cookies will firm up just enough to hold their shape while staying tender inside.
While the cookies cool, the kitchen will be filled with a sweet‑tart perfume that makes you want to dive right in. Picture yourself pulling this out of the oven, the whole kitchen smelling incredible, and then taking that first warm bite – the cream cheese melting against the strawberry jam‑like pockets. I dare you to taste this and not go back for seconds.
That's it — you did it. But hold on, I've got a few more tricks that'll take this to another level...
Insider Tricks for Flawless Results
The Temperature Rule Nobody Follows
Never bake cookies straight from a cold fridge. Let the dough rest at room temperature for 10‑15 minutes before scooping. This small pause lets the butter soften just enough to spread evenly, giving you that perfect balance of crispy edges and chewy centers. A friend once baked the dough straight from the fridge and ended up with flat, hard cookies – let’s just say it didn’t end well.
Why Your Nose Knows Best
Instead of relying solely on a timer, trust the scent. When the cookies start to emit a toasty, buttery aroma and the edges turn a light amber, they’re ready. Over‑baking can dry out the strawberry pieces, turning them into leathery bits. This sensory cue is the secret weapon of seasoned bakers.
The 5‑Minute Rest That Changes Everything
After mixing the dough, let it rest for five minutes before adding the strawberries. This short rest hydrates the flour, reducing the likelihood of a gummy texture once the berries are folded in. It also gives the cream cheese a moment to settle, preventing it from separating during baking.
The “Don’t Over‑Mix” Myth
Many bakers think vigorous mixing leads to fluffier cookies. In reality, over‑mixing creates gluten strands that make the final product tough. Stop mixing as soon as the flour disappears, and you’ll retain that melt‑in‑your‑mouth softness.
The Cool‑Down Trick
Once the cookies have cooled on the rack, place the container upside down for a few minutes. This creates a slight vacuum that keeps the cookies from absorbing moisture from the air, preserving their crisp edges for longer.
Creative Twists and Variations
This recipe is a playground. Here are some of my favorite ways to switch things up:
Lemon‑Zest Surprise
Add the zest of one lemon and replace half the strawberries with lemon curd. The citrus brightens the tang of the cream cheese and gives a refreshing lift that’s perfect for spring brunches.
Chocolate‑Swirl Delight
Swirl in ¼ cup of melted dark chocolate before baking. The chocolate pairs beautifully with strawberry, creating a classic flavor duo that will win over any chocolate lover.
Nutty Crunch Variation
Fold in ½ cup toasted chopped almonds or pistachios. The nuts add a satisfying crunch that contrasts the soft crumb, making each bite more interesting.
Vegan Friendly
Swap the butter for coconut oil, use a plant‑based cream cheese, and replace the egg with a flax‑egg. The flavor profile stays similar, though the texture becomes slightly denser.
Spiced Autumn Edition
Add a pinch of ground cinnamon and a dash of nutmeg to the flour. Pair with frozen cranberries instead of strawberries for a cozy, fall‑time treat.
Storing and Bringing It Back to Life
Fridge Storage
Place cookies in an airtight container lined with parchment paper. They’ll stay fresh for up to five days. If you notice the edges hardening, pop the container in the fridge for a few minutes before serving – the slight chill revives the buttery crunch.
Freezer Friendly
Arrange cookies in a single layer on a baking sheet, freeze until solid, then transfer to a zip‑top freezer bag. They keep for up to three months. When you’re ready, let them thaw at room temperature for 15 minutes, then give them a quick 5‑minute bake at 300°F to refresh the crust.
Best Reheating Method
To bring a refrigerated or frozen cookie back to its peak, preheat the oven to 325°F, place the cookie on a parchment‑lined tray, and add a tiny splash (about 1 teaspoon) of water next to it. Cover loosely with foil and heat for 5‑7 minutes. The steam generated re‑hydrates the crumb, making it soft again without drying out the edges.