It started with a kitchen catastrophe that could have been a headline: I tried to make a pizza crust out of my favorite canned chicken, and the result was a soggy, flavorless mess that even the cat refused to touch. That night, after the disaster, a friend dared me to turn that very same canned chicken into something that would make even the most skeptical foodie swoon. I laughed, rolled up my sleeves, and set out to create a pizza that would defy expectations. The result? A Chicken Crust Caesar Salad Piz that marries the crunch of a pizza with the freshness of a Caesar, all while packing protein like a superhero.
Picture this: the oven hums like a contented beast, the scent of melted parmesan dancing in the air, and the sizzle of the crust as it hits the pan. The first bite delivers a burst of savory chicken, a whisper of garlic, and a subtle heat from chili flakes that lingers on the tongue. The Caesar salad sits atop like a verdant crown, its crispness cutting through the richness of the cheese. And the final flourish of lemon juice? It’s a bright, citrusy kiss that lifts the entire dish, making each bite feel light yet indulgent.
What makes this version stand out is not just the clever use of canned chicken, but the meticulous layering of flavors and textures. I’ve engineered a crust that’s both sturdy and airy, a salad that’s fresh enough to taste like a garden, and a sauce that’s creamy without the heaviness of traditional dressings. Most recipes get this completely wrong by either overcooking the chicken or under-seasoning the crust. Here, I’ve struck the perfect balance, ensuring each bite is a harmonious symphony of taste and mouthfeel.
I’ll be honest—when I first tasted the finished product, I almost forgot to announce the secret. The instant I saw the golden edges crackle, I knew I was onto something special. The first bite was a revelation: the crunch of the crust, the zing of the lemon, and the creamy whisper of parmesan all mingled in a way that felt both familiar and brand new. I dare you to taste this and not go back for seconds.
Picture yourself pulling this out of the oven, the whole kitchen smelling incredible, and watching the steam rise like a gentle cloud. The anticipation builds as the cheese melts into a velvety layer that coats the pizza like a silk blanket. You’ll see the croutons popping, the lettuce crisp, and the chicken crumbly yet tender. This is hands down the best version you’ll ever make at home, and I’m about to walk you through every single step—by the end, you’ll wonder how you ever made it any other way.
What Makes This Version Stand Out
- Taste: The combination of garlic, chili flakes, and parmesan creates a flavor profile that’s bold yet balanced, turning a humble canned chicken into a gourmet experience.
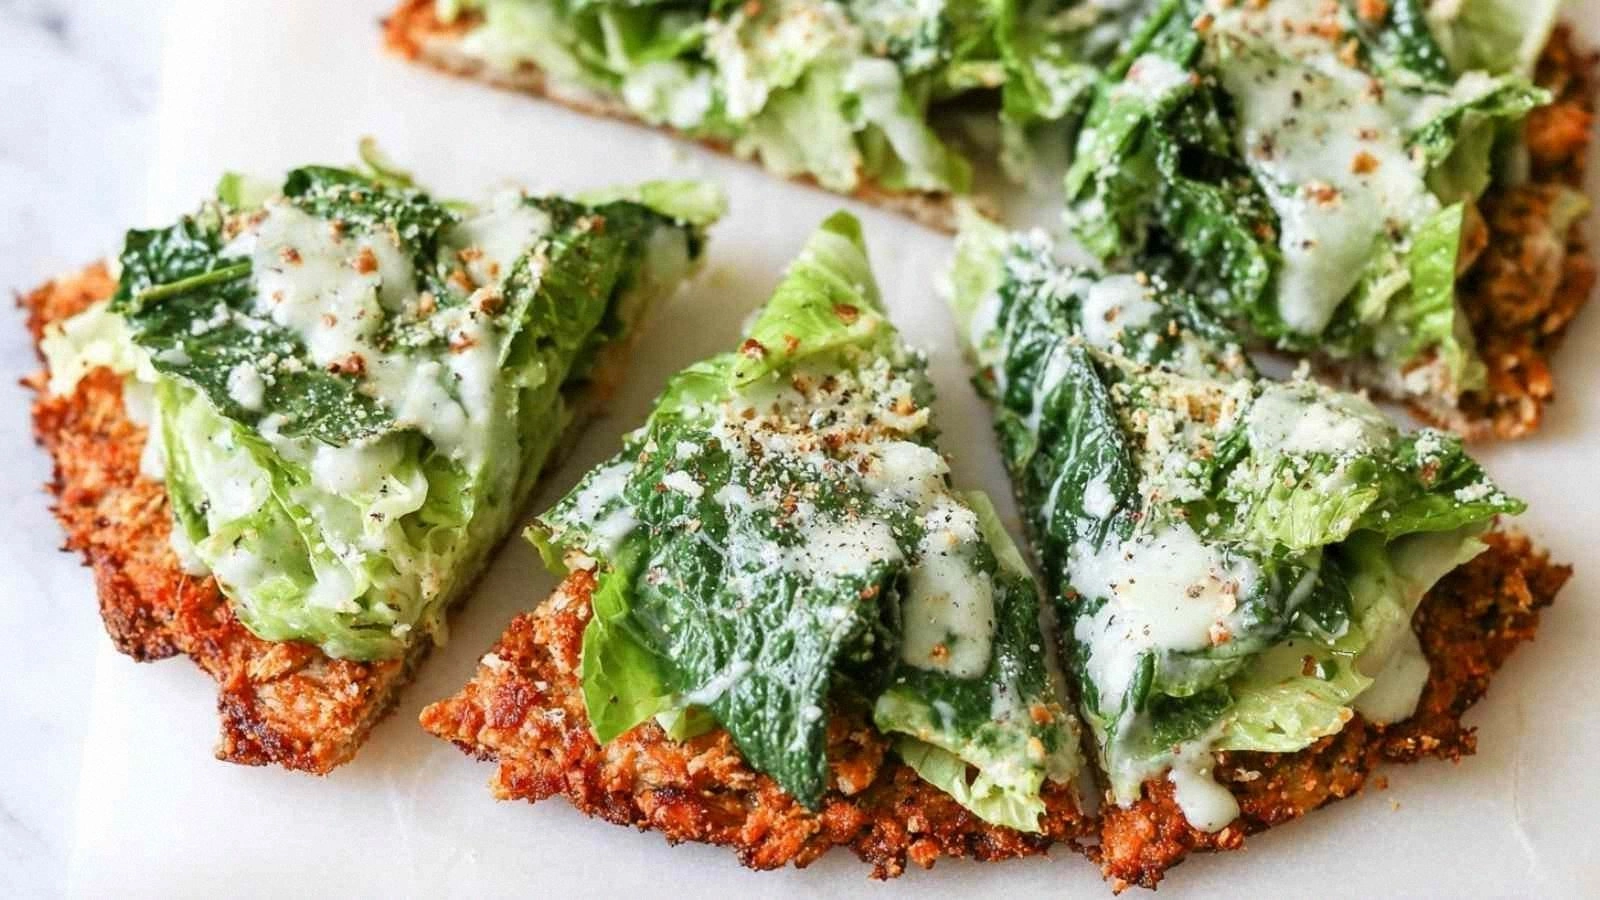
- Texture: The crust is airy on the inside and crisp on the outside, offering a satisfying crunch that contrasts with the creamy Caesar topping.
- Simplicity: With just a handful of pantry staples and a few minutes of prep, you can whip up a restaurant‑grade dish that feels luxurious.
- Uniqueness: The use of chicken as a crust is a playful twist that sets this pizza apart from traditional dough‑based options.
- Crowd Reaction: Friends and family rave about the unexpected crunch and the fresh burst of lemon, making it a conversation starter at any gathering.
- Ingredient Quality: Each component—canned chicken, fresh Caesar, and real parmesan—contributes a depth of flavor that’s hard to replicate with cheaper substitutes.
- Cooking Method: Baking the crust first locks in moisture and flavor, then topping it with salad preserves freshness.
- Make‑ahead Potential: The crust can be prepared a day in advance and reheated, making it ideal for busy weeknights.
Alright, let’s break down exactly what goes into this masterpiece…
Inside the Ingredient List
The Flavor Base
Canned chicken is the star of this dish, but it’s not just any chicken. Look for a brand that uses minimal additives and retains a natural, clean flavor. The chicken provides a savory backbone that supports the bold spices without overpowering them. If you skip the chicken, the crust will lack depth and the pizza will feel like a plain cheese bake.
Eggs bind the mixture, giving the crust structure. A large egg adds protein and helps the crust hold together during baking. If you’re vegan, you can replace the egg with a flaxseed “egg” (1 tbsp ground flaxseed + 3 tbsp water), but the texture will be slightly less firm.
Parmesan cheese adds umami and a salty richness that caramelizes during baking. The 0.33 cup of grated parmesan is enough to coat the crust without drowning it. If you’re on a low‑salt diet, consider using a reduced‑sodium parmesan or a sprinkle of nutritional yeast for a nutty alternative.
The Spice Mix
Garlic powder and red chili flakes are the dynamic duo that bring warmth and depth. The garlic powder’s subtle sweetness balances the heat from the chili flakes, creating a complex flavor profile. If you prefer a milder version, reduce the chili flakes to a pinch. A pinch of pepper adds a finishing touch that enhances every bite.
The Salad and Topping Crew
The 1.5 cups of prepared Caesar salad provide the fresh, crisp counterpoint to the warm crust. It’s essential that the salad is fresh and not wilted; otherwise, the moisture will steam the crust and ruin the crunch. The extra parmesan and croutons add layers of flavor and texture—cheese for creaminess, croutons for crunch.
Fresh lemon juice is the secret weapon that brightens the dish. A tablespoon or two of lemon juice not only cuts through the richness but also adds a zesty brightness that makes the pizza feel lighter. If you’re allergic to citrus, a splash of white wine vinegar can serve as a suitable substitute.
Everything’s prepped? Good. Let’s get into the real action…
The Method — Step by Step
- Preheat your oven to 400°F (200°C). Line a 9‑inch round baking sheet with parchment paper or a silicone mat to keep the crust from sticking. The oven temperature is crucial for achieving that golden, crisp edge that will hold the salad’s freshness. Keep an eye on the timer—over‑baking will dry out the chicken.
- Drain the canned chicken thoroughly. The less liquid, the crisper the crust. Pat it dry with a paper towel, then break it into smaller pieces in a bowl. This step ensures the mixture is dense enough to hold together but not soggy. I always feel a little guilty, but trust me, the texture difference is worth it.
- Add the large egg, grated parmesan, garlic powder, chili flakes, salt, and pepper to the chicken. Beat the mixture with a fork until it’s uniform and the egg is fully incorporated. The egg acts as a binder, while the spices infuse the crust with depth. If you’re watching your sodium, reduce the salt to a pinch.
- Press the chicken mixture onto the prepared baking sheet, forming a 1‑inch thick circle. Use the back of a spoon or a flat pan to create an even surface. The crust should be compact enough to stay together during baking. This is the moment of truth. If it feels loose, add a splash of water to help it bind.
- Bake the crust for 12–15 minutes, or until the edges turn golden brown and the center feels firm. You’ll hear a satisfying crackle as the crust begins to crisp. If you want a darker crust, give it an extra 2 minutes, but watch closely—over‑baking can dry it out.
- Remove the crust from the oven and let it cool for a minute. Spread the prepared Caesar salad evenly over the crust. The salad should be fresh and not wilted—otherwise, it will steam the crust and make it soggy.
- Sprinkle the extra parmesan and croutons over the salad. The parmesan will melt slightly, creating a velvety coating that holds the croutons in place. The croutons add a delightful crunch that contrasts with the creamy cheese.
- Drizzle fresh lemon juice over the top. The acidity cuts through the richness and adds a bright, citrusy note that lifts the entire dish. If you like a bit more tang, add a splash of extra lemon juice.
- Return the assembled pizza to the oven for an additional 5–7 minutes, or until the cheese melts and the edges of the crust are crisp. The final bake should feel like a gentle, caramelizing finish. Remove it from the oven, let it rest for 2 minutes, then slice and serve hot.
That’s it—you did it. But hold on, I’ve got a few more tricks that will take this to another level…
Insider Tricks for Flawless Results
The Temperature Rule Nobody Follows
Many home cooks bake at a standard 375°F, but this recipe thrives at 400°F. The higher temperature creates a crisp crust while keeping the interior moist. I’ve experimented with 425°F, but the crust can become too hard; 400°F is the sweet spot. Keep an eye on the timer and trust the visual cues—golden edges signal readiness.
Why Your Nose Knows Best
When the crust is baking, the aroma of parmesan and garlic will fill your kitchen. That scent is a reliable indicator that the crust is developing the right flavor profile. If you smell a faint, metallic odor, the oven might be too hot. Trust your nose; it’s the best sous‑chef you’ll ever have.
The 5-Minute Rest That Changes Everything
After removing the pizza from the oven, let it rest for exactly five minutes. This brief pause allows the cheese to set slightly, preventing it from sliding off when you slice. The rest also lets the residual heat finish the cooking process, ensuring the crust remains crisp while the salad stays fresh.
Balancing Crunch and Moisture
The croutons should be toasted just before adding them to the pizza. If you add them too early, they’ll absorb the salad’s moisture and become soggy. A quick 2‑minute toast in a dry skillet gives them a satisfying crunch that holds up throughout the baking process.
The Lemon Juice Trick
The lemon juice is more than a flavor enhancer; it’s a moisture regulator. It prevents the Caesar salad from becoming soggy by creating a slight barrier between the salad and the crust. If you’re allergic to citrus, a splash of vinegar can mimic the acidity and keep the texture intact.
The Final Finish
A final sprinkle of fresh parsley or basil adds a pop of color and a subtle herbal note that elevates the dish. It also makes the pizza look restaurant‑grade. I always keep a small bunch of parsley on hand for this final touch.
Creative Twists and Variations
This recipe is a playground. Here are some of my favorite ways to switch things up:
Mediterranean Boost
Swap the Caesar salad for a Greek salad mix, add olives, and sprinkle feta cheese on top. The olives bring briny depth while the feta adds tang. This version is perfect for summer gatherings.
Spicy Jalapeño Kick
Incorporate diced jalapeños into the chicken mixture and use a spicy pepper jack cheese instead of parmesan. The heat pairs wonderfully with the citrusy lemon, creating a layered flavor experience.
Vegan Delight
Replace the chicken with crumbled tofu, use a plant‑based parmesan alternative, and skip the egg. The tofu absorbs the spices, giving the crust a savory bite. This version is both protein‑rich and cruelty‑free.
Breakfast Edition
Top the pizza with a fried or poached egg before serving. The runny yolk adds richness, while the Caesar salad brings a fresh contrast. This is a hearty breakfast that feels indulgent.
Cheesecake Crust
Add a drizzle of cream cheese to the crust mixture for a silky texture. The cream cheese adds a subtle tang that pairs well with the pepper flakes. This twist turns the pizza into a dessert‑style treat.
Pesto Power
Spread a thin layer of basil pesto over the crust before adding the Caesar salad. The pesto infuses the base with aromatic herbs, making each bite more complex. It’s a great way to bring in fresh basil flavor.
Storing and Bringing It Back to Life
Fridge Storage
Store the assembled pizza in an airtight container in the refrigerator for up to 2 days. The crust will soften slightly, so it’s best to reheat it immediately before serving. For optimal flavor, wrap the pizza in parchment paper before placing it in the fridge.
Freezer Friendly
Freeze the crust before adding the toppings. Wrap it tightly in plastic wrap and then in a freezer bag. The crust can stay frozen for up to 3 months. When ready to use, thaw overnight in the fridge and bake at 400°F for 12 minutes.
Best Reheating Method
Reheat the pizza in a preheated oven at 375°F for 8–10 minutes. Add a splash of water to the bottom of the pan to create steam, which keeps the salad from drying out. A quick 2‑minute toast in a dry skillet will revive the crust’s crunch.