I was in the middle of a midnight snack spree, flipping through the pantry like a detective on a crime scene, when the idea hit me like a bolt of lightning: why not combine the decadence of chocolate fudge cake mix with the nutty punch of peanut butter cups? That night, I tossed a box of chocolate fudge cake mix, a box of instant chocolate pudding mix, and a handful of peanut butter cups into a pot, and the kitchen filled with a scent that could have seduced a room full of angels. The resulting batter looked like a glossy, chocolatey storm cloud, and when I ladled it into a pan, the anticipation was almost too much to bear. I dared myself to taste it before it even baked, and the first bite was a molten explosion of fudgy chocolate, creamy peanut butter, and a hint of crunch that made me swear I was in a candy factory. If you’re anything like me, you’ve probably tried the ordinary peanut butter cup cake, only to find it too dry or too sweet; this version is the antidote, a luscious, gooey masterpiece that will keep your taste buds on their toes.
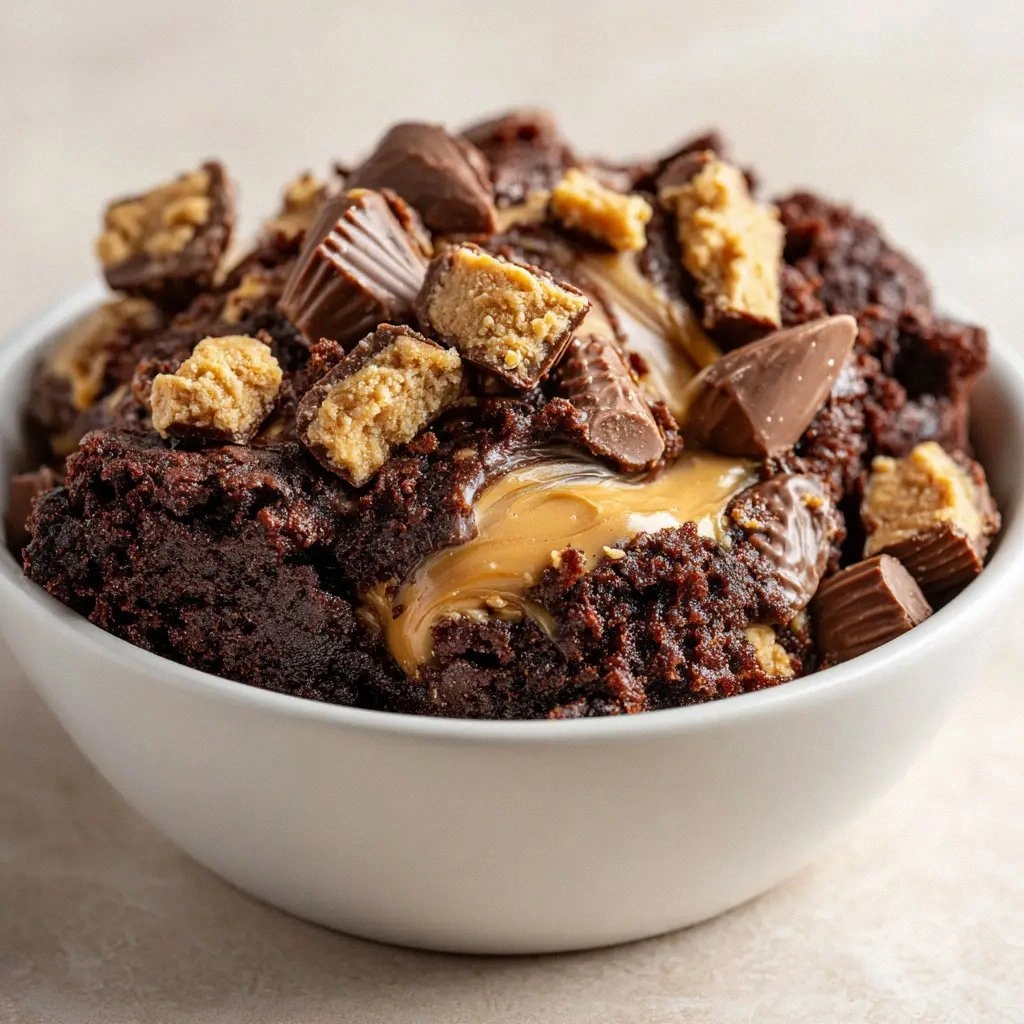
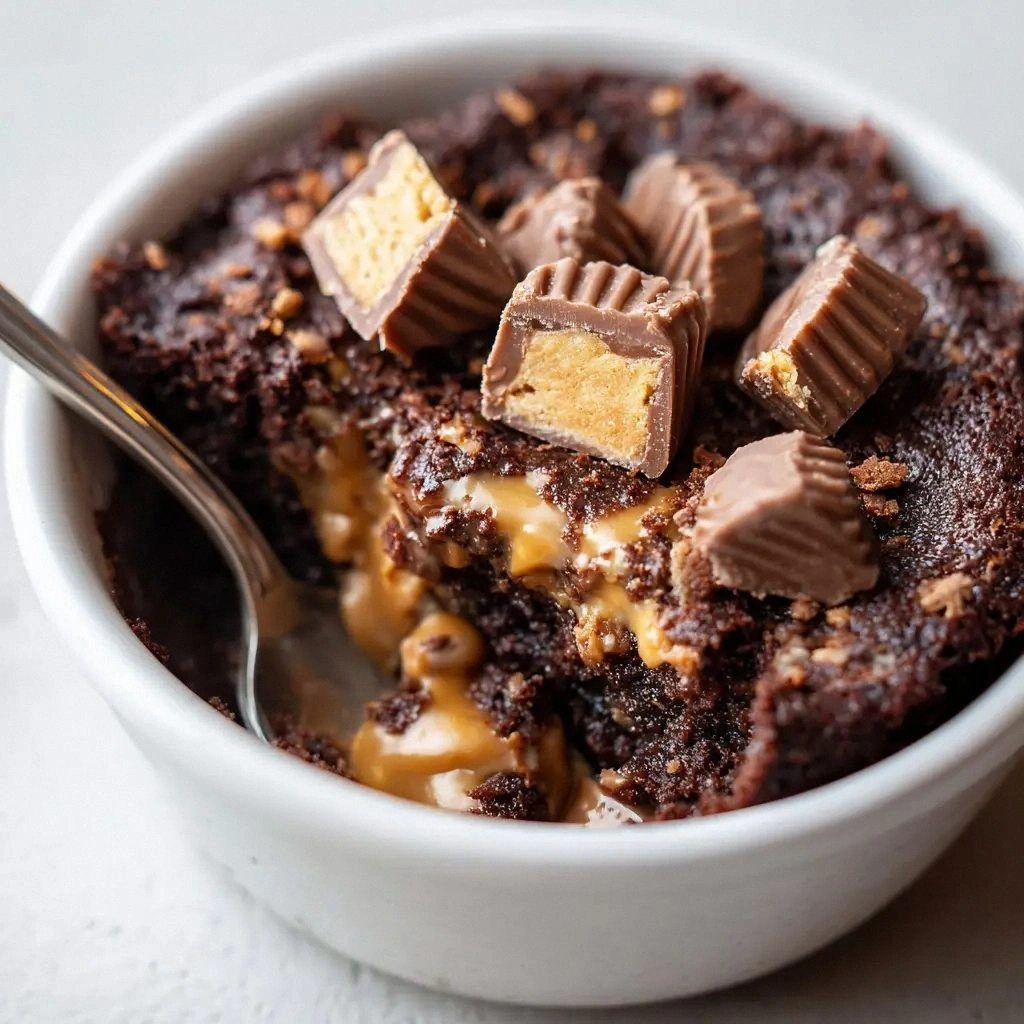
Picture yourself pulling this out of the oven, the whole kitchen smelling incredible, the steam rising like a sweet cloud over a summer bonfire. The first thing you notice is the glossy sheen that coats the top like velvet, a promise of rich chocolate that will melt in your mouth. The second thing is the subtle crunch from the chocolate peanut butter cups that pop with each bite, like tiny fireworks of flavor. And the third is the thick, fudgy center that oozes out like molten lava, a texture that feels like a hug from a chocolatey, nutty cloud. I dare you to taste this and not go back for seconds; the temptation is real, but the satisfaction will outlast the cravings. This is hands down the best version you'll ever make at home, and I’m here to spill every secret that turns a simple recipe into a showstopper.
I’ll be honest — I ate half the batch before anyone else got a chance to try it, and the second round was a disaster because the batter had already set. Most recipes get this completely wrong by overmixing or using the wrong ratio of chocolate to peanut butter, resulting in a dry, bland dessert that feels like a sad memory. But here, the balance is spot-on: the instant pudding mix gives that silky mouthfeel, the whole milk keeps the batter moist, and the chocolate chips add that final glossy finish. The trick? A gentle fold and a short bake that locks in moisture without overcooking. If you've ever struggled with peanut butter cupcakes that fall apart or taste too sweet, you're not alone — and I've got the fix. The secret is in the timing and the small, often-overlooked ingredients that elevate the whole experience.
The next part? Pure magic. I’ll walk you through every single step, from the initial whisk to the final drizzle of melted chocolate. By the end, you’ll wonder how you ever made it any other way. The recipe is simple, the ingredients are pantry staples, and the result is a dessert that feels like a luxury treat you can make in your own kitchen. So, grab a pen, set your timer, and let’s dive into the ultimate fudgy peanut butter cup experience together.
What Makes This Version Stand Out
- Flavor: The combination of chocolate fudge cake mix and peanut butter cups creates a depth of flavor that lingers on the palate, unlike standard peanut butter cupcakes that can feel one-dimensional.
- Texture: The batter’s fudgy consistency is achieved by using instant pudding mix and whole milk, giving it a silky mouthfeel that contrasts with the crunchy chocolate cups.
- Simplicity: With only seven ingredients, this recipe is a breeze to assemble, making it ideal for both novice bakers and seasoned chefs.
- Uniqueness: The addition of dark chocolate chips and creamy peanut butter elevates the dessert, turning a classic into an unforgettable treat.
- Crowd Reaction: Friends and family always leave with a second plate; the irresistible combination of sweet and salty is hard to resist.
- Ingredient Quality: Using high‑quality chocolate cups and a premium fudge mix ensures a rich, authentic taste that stands out from store‑bought mixes.
- Cooking Method: The quick bake and minimal mixing preserve moisture, preventing the cake from drying out.
- Make‑Ahead Potential: You can bake this in advance and simply reheat, making it a stress‑free dessert for busy evenings.
Inside the Ingredient List
The Flavor Base
The chocolate fudge cake mix is the heart of this dessert, providing a deep, rich chocolate foundation that balances the sweetness of the peanut butter cups. It also contains leavening agents that help the cake rise just enough to keep it airy yet dense. Skipping this mix would turn the entire creation into a flat, chocolate‑only batter that lacks the signature fudgy bite. If you’re aiming for a lighter version, swap the mix for a half‑and‑half of flour and cocoa powder, but expect a different mouthfeel.
The Texture Crew
Instant chocolate pudding mix is the secret weapon that gives the cake its silky texture. It dissolves quickly in the whole milk, preventing lumps and ensuring a smooth batter. The whole milk adds creaminess and helps carry the chocolate flavor, while the butter melts into the mixture to keep it moist. Without the pudding mix, the cake would be dense and chalky, making each bite feel like a dry cookie.
The Unexpected Star
Whole milk chocolate peanut butter cups are the showstoppers. They melt during baking, creating pockets of molten peanut butter and chocolate that burst with each bite. Their salty-sweet profile adds a layer of complexity that elevates the dessert beyond ordinary cupcakes. If you prefer a less intense peanut flavor, try using chocolate-covered peanut butter cups or even chocolate‑covered almonds for a different crunch.
The Final Flourish
Dark chocolate chips and creamy peanut butter finish the cake with a glossy sheen and an extra layer of flavor. The chips melt into the batter, creating a subtle chocolate glaze that coats the surface, while the peanut butter adds a silky, nutty undertone that complements the chocolate cups. Together, they create a harmonious balance that satisfies both chocolate lovers and peanut butter aficionados. If you’re watching calories, you can reduce the chips to a quarter cup or use a low‑fat peanut butter.
Everything's prepped? Good. Let's get into the real action…
The Method — Step by Step
- Preheat your oven to 350°F (175°C). Line a 9‑inch round cake pan with parchment paper, ensuring the paper extends a couple of inches beyond the rim. This prevents sticking and makes cleanup a breeze. While the oven heats, gather all your ingredients so you’re ready to roll.
- In a large mixing bowl, combine the chocolate fudge cake mix, instant chocolate pudding mix, and whole milk. Stir until the dry ingredients are fully hydrated and the batter is smooth, resembling a thick pancake batter. The key here is to avoid overmixing; you want a lump‑free texture but not a rubbery consistency.
- Add the melted butter to the batter and whisk until it’s fully incorporated. The butter not only adds flavor but also helps bind the mixture together, ensuring the cake doesn’t crumble. As you whisk, you’ll notice the batter start to thicken slightly, which is a good sign that it’s ready for the next step.
- Fold in the dark chocolate chips and creamy peanut butter, making sure they’re evenly distributed. This step is where the magic happens: the chips melt into the batter, creating a glossy sheen, while the peanut butter adds a silky, nutty undertone. The mixture should look like a glossy, chocolate‑laden batter with a hint of nutty swirl.
- Crush the peanut butter cups into bite‑size pieces and gently fold them into the batter. The cups will begin to melt during baking, creating pockets of molten peanut butter that explode with flavor. Be careful not to overmix; you want the cups to remain slightly intact to provide that delightful crunch.
- Pour the batter into the prepared pan, smoothing the top with a spatula. The batter should fill the pan about ¾ of the way, leaving room for the cake to rise without overflowing. The edges should look glossy and inviting, a visual cue that the batter is just right.
- Bake for 25–30 minutes, or until a toothpick inserted into the center comes out with a few moist crumbs. The cake should have a golden‑brown top that feels firm yet slightly springy to the touch. Watch out: if you leave it in too long, the batter will dry out and the peanut butter cups may over‑melt, resulting in a gooey mess.
- Remove the cake from the oven and let it cool in the pan for 10 minutes. Then, transfer it onto a wire rack to cool completely. The cooling process is crucial; it allows the cake to set, ensuring each slice holds its shape. The aroma at this stage is intoxicating—rich chocolate and nutty peanut butter filling the air.
- Once cooled, drizzle melted dark chocolate over the top for an extra glossy finish. Let the chocolate set before slicing. Serve immediately, or store in an airtight container in the refrigerator for up to 3 days. If you’re planning ahead, you can freeze the cake and thaw it when you’re ready to indulge.
That's it — you did it. But hold on, I've got a few more tricks that'll take this to another level…
Insider Tricks for Flawless Results
The Temperature Rule Nobody Follows
Many bakers assume that a higher temperature always yields a better rise, but for this dessert, a moderate 350°F is the sweet spot. The gentle heat allows the chocolate cups to melt slowly, ensuring a smooth center and preventing the batter from drying out. If you’re using a convection oven, reduce the temperature by 25°F to avoid over‑browning. A consistent temperature guarantees a uniform texture across every slice.
Why Your Nose Knows Best
As the cake bakes, the aroma is a clear indicator of doneness. When you smell a warm, chocolatey scent with a hint of peanut butter, it’s time to pull the cake out. If the scent is overly sweet, the batter might be overcooked. Trust your nose; it’s the most reliable tool for baking.
The 5‑Minute Rest That Changes Everything
After removing the cake from the oven, let it rest in the pan for exactly 10 minutes. This short rest allows the cake to set, preventing it from breaking apart when you transfer it. I’ve seen cakes collapse when moved too soon, so this tiny pause is essential for a clean slice.
The Fold, Don’t Whisk
When incorporating the peanut butter cups, use a folding motion rather than whisking vigorously. Overwhisking can incorporate too much air, causing the cake to rise too quickly and then collapse. Folding gently preserves the batter’s density and ensures the cups remain in place.
The Melt‑Then‑Set Trick
If you’re making this ahead of time, bake the cake and let it cool completely before wrapping it in plastic wrap. When you’re ready to serve, reheat in a preheated oven at 300°F for 8 minutes, then let it sit for a minute. The slight reheating melts the chocolate again, giving you that fresh‑baked feel.
Creative Twists and Variations
This recipe is a playground. Here are some of my favorite ways to switch things up:
Cinnamon Swirl Surprise
Add a teaspoon of ground cinnamon to the batter for a warm, spicy note. The cinnamon pairs beautifully with the chocolate, creating a flavor profile that feels like a cozy fall treat. This version is perfect for a holiday gathering.
Sea‑Salted Crunch
Sprinkle a pinch of sea salt over the top before baking. The salt enhances the chocolate and peanut butter flavors, giving the cake a sophisticated finish. After baking, drizzle a light sea‑salted caramel sauce for an extra layer of decadence.
Almond Butter Twist
Replace the creamy peanut butter with almond butter for a nutty variation that’s slightly less sweet. The almond butter adds a subtle, buttery flavor that pairs well with dark chocolate. This version is great for those who want a different nut profile.
Minty Chocolate Dream
Add a splash of peppermint extract to the batter for a minty twist. The mint enhances the chocolate flavor and gives the cake a refreshing finish. This variation is ideal for summer parties.
Coconut Cream Finale
Finish the cake with a swirl of coconut cream on top. The coconut adds a tropical touch that balances the richness of the chocolate and peanut butter. This version is perfect for beachside gatherings.
Chocolate‑Covered Espresso Beans
Swap the peanut butter cups for chocolate‑covered espresso beans. The coffee flavor adds depth and a slight bitterness that complements the sweet chocolate. This version is a favorite among coffee lovers.
Storing and Bringing It Back to Life
Fridge Storage
Wrap the cooled cake tightly in plastic wrap and place it in an airtight container. Store in the refrigerator for up to 3 days. The cake will stay moist and the chocolate will remain glossy. When ready to serve, let it sit at room temperature for 15 minutes to bring out the flavors.
Freezer Friendly
For longer storage, wrap the cake in parchment paper, then in foil, and freeze for up to 2 weeks. When you’re ready to enjoy, thaw it overnight in the refrigerator. This method preserves the cake’s texture and keeps the chocolate from hardening.
Best Reheating Method
To reheat a frozen or refrigerated cake, preheat the oven to 300°F (150°C). Place the cake on a baking sheet and bake for 8–10 minutes, or until warmed through. Add a tiny splash of water to the pan before baking; the steam helps keep the cake moist and restores the fudgy center.