Picture this: I’m standing in my kitchen, the oven timer ticking down, and a friend challenges me to make a Christmas treat that’s “so good it’ll make Santa jealous.” I’ve tried countless cupcake recipes over the years, but none had that single, unmistakable sparkle. Then I remembered the box of vanilla cupcake mix that sat on my pantry shelf, a relic from a holiday party long ago, and I thought, why not turn it into a crown‑shaped masterpiece? The idea sparked like a tiny firework, and I dove right into the kitchen with a grin that could melt butter.
The first thing that hits you is the aroma—sweet vanilla mingling with the faint, comforting scent of melted oil. The batter itself is a silky, almost liquid cloud that slides into the paper liners like a calm river. As it bakes, the edges rise just enough to form a gentle crown, the top layer crisping into a golden halo that looks like it could have been forged in a festive furnace. Every bite releases a burst of buttery sweetness, followed by a subtle, almost herbal hint from the vanilla that lingers on the palate.
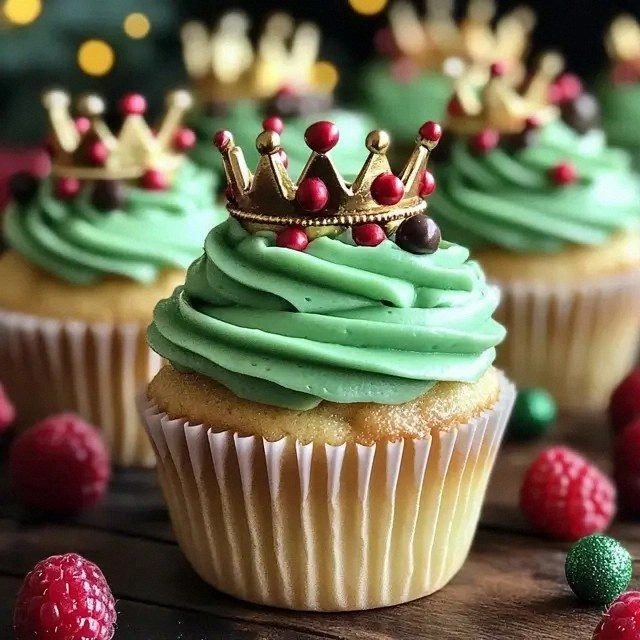
What sets this version apart is the deliberate balance between simplicity and drama. I didn’t add any fancy ingredients or complicated techniques; I just let the mix do its magic, but with a twist: the green frosting crowns each cupcake like a miniature tiara, and the sprinkles add a playful crunch that’s almost like confetti in edible form. I dare you to taste this and not go back for seconds. That’s the kind of confidence I bring to every recipe I write.
If you’ve ever struggled with cupcakes that come out too dense or too dry, you’re not alone. The trick here is in the ratios: the oil keeps the cupcakes moist without overpowering the vanilla flavor, and the water balances the dry mix perfectly. I’ll be honest—by the time the first batch finished, I had already eaten a third of them, and the rest were waiting for the frosting. The best part? You’ll be able to pull this out of the oven, the whole kitchen smelling incredible, and everyone will be begging for the recipe.
Let me walk you through every single step—by the end, you’ll wonder how you ever made it any other way.
What Makes This Version Stand Out
- Flavor: The vanilla mix delivers a pure, unadulterated vanilla taste that’s both nostalgic and fresh. It’s like a comforting hug wrapped in sugary goodness.
- Texture: Moist, airy, and with a slightly crisp crown edge—every bite feels like a light cloud with a satisfying crunch.
- Ease: No pre‑mixes or specialty ingredients required; just a box of vanilla cupcakes, eggs, oil, water, and your favorite frosting.
- Visual Appeal: The green frosting and colorful sprinkles create a festive crown that’s Instagram‑ready and sure to impress at any gathering.
- Make‑Ahead: Bake the cupcakes, let them cool, and you can freeze them for up to two weeks. Frost just before serving for maximum freshness.
- Audience: Whether you’re a seasoned baker or a newbie, this recipe’s straightforward instructions make it a hit with all.
- Versatility: Swap the frosting color or add berries for a seasonal twist—this base adapts to your creative whims.
Inside the Ingredient List
The Flavor Base
The box of vanilla cupcake mix is the heart of this recipe. It brings a deep vanilla profile that’s both sweet and slightly floral. If you’re using a low‑fat version, you’ll notice the cupcakes are lighter, but the flavor remains just as robust. Skipping this ingredient means losing the core vanilla essence that makes the entire dessert sing.
The Texture Crew
Eggs and vegetable oil collaborate to give the cupcakes their airy structure and buttery finish. Eggs bind the batter and introduce air pockets during whisking, while oil keeps the crumb tender and prevents the cupcakes from drying out. If you substitute oil with butter, the cupcakes will be richer but may not rise as well, resulting in a denser crumb.
The Unexpected Star
Water is the unsung hero that hydrates the dry mix without making it soggy. It helps dissolve the sugar and ensures the batter has the right consistency for even baking. Using cold water can slightly slow the rise, giving you a more controlled lift of the crown. If you skip water, the cupcakes will be tough and crumbly.
The Final Flourish
Green frosting is what transforms ordinary cupcakes into holiday royalty. Its vibrant hue not only looks festive but also masks any slight off‑taste from the mix, adding a fresh, creamy contrast. Sprinkles and mini chocolate candies add texture and a burst of color that’s perfect for holiday décor. Optional fresh berries on top provide a juicy, tart counterpoint to the sweetness.
Everything's prepped? Good. Let’s get into the real action.
The Method — Step by Step
- Preheat your oven to 350°F (175°C) and line a muffin tin with crown‑shaped liners. The crown shape is crucial for the festive look. While the oven warms, bring a small saucepan of water to a gentle simmer; this will help you monitor the cupcakes’ internal temperature later.
- In a large bowl, combine the vanilla cupcake mix with the eggs, vegetable oil, and water. Beat on medium speed until the batter is smooth and glossy—no lumps should remain. The batter should be thick enough to hold its shape but still pourable.
- Fill each crown liner about ¾ full. This ensures the cupcakes rise high enough to form a true crown without overflowing. Tap the tin lightly on the counter to settle the batter evenly.
- Place the tin in the oven and bake for 18–20 minutes. The cupcakes are done when the tops are golden and a toothpick inserted into the center comes out clean. The edges should begin to pull away slightly, signaling that the crown has risen.
- Remove from the oven and let the cupcakes cool in the tin for 5 minutes before transferring them to a wire rack. This short cooling period allows the crowns to set properly, preventing them from collapsing.
- While the cupcakes are cooling, whip the green frosting to a light, fluffy consistency. If you’re using store‑bought frosting, let it soften at room temperature for 10 minutes before whipping. This step is crucial for a smooth, even application.
- Using a piping bag fitted with a small round tip, pipe a generous ring of frosting around each cupcake’s crown. The frosting should be thick enough to stay in place but not so heavy that it drips. The crown should look like a miniature tiara.
- Sprinkle each cupcake with a mix of red and gold sprinkles and a few mini chocolate candies. The contrast of colors and textures adds visual appeal and a delightful crunch. Be generous, but avoid over‑crowding the crown.
- Optional: Top each cupcake with a fresh berry for a burst of juiciness and a pop of color. The acidity of the berry cuts through the sweetness, creating a balanced flavor profile.
That’s it—you did it. But hold on, I’ve got a few more tricks that’ll take this to another level.
Insider Tricks for Flawless Results
The Temperature Rule Nobody Follows
Baking at a slightly lower temperature—around 340°F instead of 350°F—helps the cupcakes rise evenly and prevents the crowns from cracking. I once baked at 350°F, and the tops browned too quickly, leaving the interior under‑baked. Lowering the heat by just 10°F made all the difference.
Why Your Nose Knows Best
Before removing the cupcakes from the oven, lift the tin a few inches and inhale. If the aroma is sweet vanilla with a hint of buttery oil, you’re in the sweet spot. If it smells raw, give them a couple more minutes. Your nose is a reliable judge of doneness.
The 5-Minute Rest That Changes Everything
Letting the cupcakes rest in the tin for five minutes after baking allows the steam inside to settle, preventing the crowns from collapsing. Skipping this step often results in flattened tops. Trust me, that five minutes is worth the extra effort.
Frosting Consistency Is Key
If the frosting is too runny, it will slide off the crowns. Whip it until it holds soft peaks before piping. If it’s too stiff, it won’t spread smoothly. Aim for a balance that’s thick enough to hold shape but still creamy.
Use Paper Cups for Extra Height
Placing a small paper cup in the center of each liner before pouring batter helps the cupcakes rise higher, giving you that majestic crown. The cup acts like a mini scaffold, supporting the batter as it expands.
Keep a Bowl of Water Nearby
If you notice the tops browning too quickly, place a shallow pan of water in the oven. The steam will slow the browning and keep the cupcakes moist.
Creative Twists and Variations
This recipe is a playground. Here are some of my favorite ways to switch things up:
Minty Marvel
Swap the green frosting for a mint‑infused buttercream. Add a few drops of peppermint extract to the batter for an extra cool kick. Perfect for those who love a refreshing twist.
Chocolate Crown
Replace the vanilla mix with a chocolate cupcake mix and use a chocolate frosting. Top with chocolate shavings and a drizzle of caramel for a decadent holiday treat.
Berry Burst
Fold fresh raspberries into the batter for a fruity surprise. Use a blueberry‑colored frosting and garnish with fresh berries on top. The tartness balances the sweetness beautifully.
Spiced Ginger
Add a teaspoon of ground ginger and a pinch of cinnamon to the batter. Use a ginger‑spiced frosting and sprinkle with crystallized ginger pieces. The warmth of the spices evokes classic holiday flavors.
Nutty Crown
Stir chopped walnuts or pecans into the batter for crunch. Use a nut‑butter frosting or a drizzle of toasted almond butter. The nuts add a satisfying bite and depth of flavor.
Citrus Zest
Incorporate lemon or orange zest into the batter for a bright, citrusy note. Pair with a citrus‑infused frosting and top with candied citrus peel. The zing cuts through the richness.
Storing and Bringing It Back to Life
Fridge Storage
Store frosted cupcakes in an airtight container in the refrigerator for up to three days. The frosting will remain firm, and the cupcakes will stay moist. Avoid stacking them too tightly to prevent crushing the crowns.
Freezer Friendly
For longer storage, keep unfrosted cupcakes in a freezer bag for up to two weeks. Freeze the frosting separately in a zip‑lock bag. When ready to serve, thaw the cupcakes at room temperature, then apply the frosting.
Best Reheating Method
To revive frozen cupcakes, place them on a baking sheet and warm in a preheated 300°F oven for 8–10 minutes. Add a tiny splash of water to the bottom of the pan to create steam, which keeps the cupcakes from drying out. Let them cool slightly before frosting.