I still remember the Halloween when my famous pumpkin bars turned into a crumbly disaster. I'd promised my niece and nephew something spectacular, but halfway through mixing, I realized I was out of pumpkin puree. Panic mode activated. The kids were arriving in two hours, my kitchen looked like a flour bomb exploded, and I was frantically Googling substitutions while my partner tried to calm me down with promises that "nobody really cares about dessert anyway." Spoiler alert: they absolutely care.
That's when I stumbled upon an old recipe for cheesecake brownies I'd scribbled in the margins of a cookbook years ago. The original was basic, but I had cream cheese, cocoa powder, and a cabinet full of food coloring just begging to be used. What started as a desperate improvisation became the stuff of family legend. Those swirled, spooky brownies disappeared faster than free candy on October 31st, and I've been perfecting them ever since.
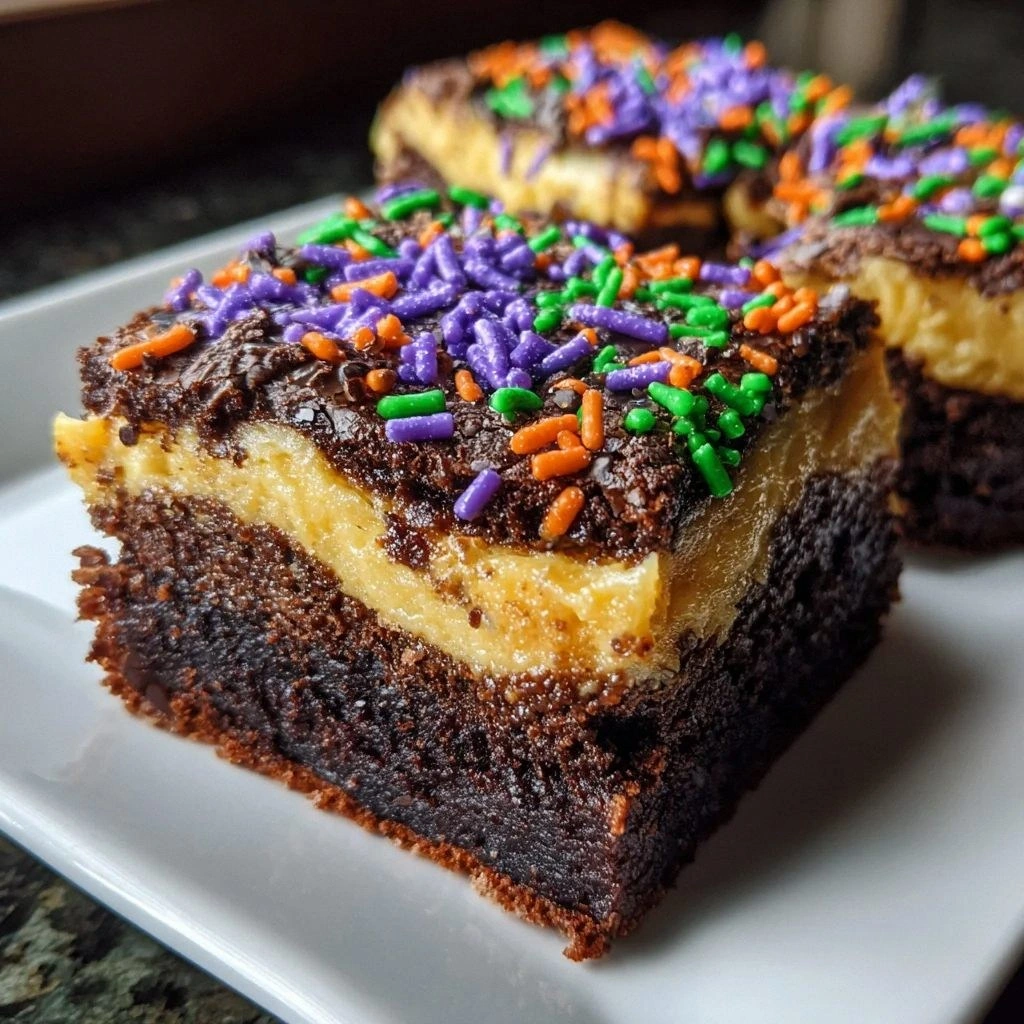
Picture this: fudgy chocolate brownie base so rich it makes your teeth ache in the best possible way, topped with a silky cheesecake layer that's been transformed into a canvas of orange, purple, and green swirls. The cream cheese layer bakes up with the slightest crackle on top, giving way to a perfectly smooth interior that contrasts beautifully with the dense, almost truffle-like brownie beneath. When you cut into them, each piece reveals a unique pattern — no two brownies ever look the same, making them feel almost magical.
What makes these Halloween cheesecake brownies absolutely irresistible is the way the tangy cream cheese cuts through the intense chocolate, creating a flavor balance that keeps you coming back for "just one more bite" until suddenly the entire pan has vanished. The food coloring is purely for fun, but let me tell you, watching kids' eyes light up when they see those vibrant swirls is worth the extra five minutes of effort. Trust me, this recipe will become your new Halloween tradition, and you'll find yourself making excuses to whip up a batch long after the costumes are packed away.
What Makes This Version Stand Out
Flavor Bomb: Most cheesecake brownies taste like someone got confused about what dessert they were making. Not these. The special dark cocoa powder creates a brownie layer that's so intensely chocolatey it borders on sinful, while the cream cheese layer gets just enough sugar to balance without becoming cloying. The result? A perfect sweet-tart dance that makes your taste buds do a happy little jig.
Texture Paradise: Here's where most recipes fail — they either overbake the cheesecake until it's rubbery, or underbake the brownie until it's a gooey mess. I've cracked the code with precise temperatures and timing that give you the fudgiest brownie base while maintaining that cloud-like cheesecake topping. The contrast is pure magic, like biting into a chocolate cloud resting on a chocolate trampoline.
Visual Drama: Let's be honest — half the fun of Halloween food is the visual impact. Those dramatic swirls of orange, purple, and green aren't just pretty; they tell a story. Each brownie becomes a unique piece of edible art, making them perfect for Instagram or just watching kids' faces light up. Plus, the colors stay vibrant even after baking, something that took me three failed attempts to perfect.
Beginner-Friendly: Despite looking like they came from a professional bakery, these brownies are surprisingly forgiving. No water baths, no complicated techniques, no need for specialty pans. If you can stir and swirl, you can nail this recipe. I've watched kitchen-phobic friends master these on their first try, much to their own amazement.
Make-Ahead Magic: Halloween parties are chaotic enough without worrying about dessert. These brownies actually taste better after a day in the fridge, making them the perfect prep-ahead treat. The flavors meld and intensify, while the texture becomes even more luxurious. Bake them Tuesday, serve them Saturday, and watch everyone think you're a pastry wizard.
Customizable Canvas: Once you master the base recipe, you can adapt it for any holiday or occasion. Christmas? Swap in red and green. Birthday? Use their favorite colors. The technique stays the same while the presentation possibilities are endless, making this your new go-to impressive dessert.
Guaranteed Crowd Pleaser: I've never met anyone who could resist these brownies. Even the "I don't like cheesecake" people end up converting after one bite. They satisfy both the chocolate addicts and the creamy dessert lovers, making them perfect for potlucks where you're never quite sure what people prefer.
Inside the Ingredient List
The Chocolate Foundation
Sugar isn't just about sweetness here — it's the backbone that creates that shiny, crackly top on your brownies. I've tried reducing the sugar for "healthier" versions, and let me tell you, it's not worth it. You end up with dry, sad brownies that taste like disappointment. The sugar creates moisture, structure, and that gorgeous crust that shatters perfectly when you cut into them.
Special dark cocoa powder is the secret weapon that separates good brownies from legendary ones. It's more intensely flavored than regular cocoa, giving you that deep, almost black chocolate color that screams Halloween. If you can't find it, regular unsweetened cocoa works, but you'll miss that rich complexity that makes people close their eyes and sigh after the first bite.
The Texture Team
All-purpose flour is the reliable friend that holds everything together, but too much will turn your brownies into cake. I've perfected the ratio here to give you structure without dryness. If you're going gluten-free, a 1:1 blend works beautifully — just make sure it contains xanthan gum for that perfect chew.
Vegetable oil is my go-to for the fudgiest texture possible. Butter gives great flavor but can create a drier brownie if you're not careful. The oil keeps everything moist and tender, even if you accidentally overbake by a minute or two. Plus, it lets the chocolate flavor really shine without competing.
The Flavor Enhancers
Vanilla extract might seem optional, but leaving it out is like forgetting to season your food. It deepens the chocolate flavor and adds that bakery-fresh taste that makes people ask for your secret. Use the real stuff here — imitation vanilla will make your brownies taste like a scratch-and-sniff sticker.
Salt is the unsung hero that makes everything else taste more like itself. Just a pinch transforms the chocolate from sweet to complex, adding layers of flavor that keep people guessing. Skip it and your brownies will taste flat and one-dimensional, like they're missing something you can't quite identify.
The Cheesecake Stars
Cream cheese is obviously crucial, but the temperature matters more than you think. Cold cream cheese won't blend smoothly, leaving you with white flecks that never incorporate. Too warm and it becomes runny, making your swirls disappear into the brownie. Aim for soft enough to leave an imprint, but not so soft it's melting.
Food coloring is where the magic happens. Gel colors give you vibrant hues without adding extra liquid, keeping your cheesecake layer perfectly thick. Liquid food coloring works in a pinch, but you'll need more of it, which can thin out your cheesecake. Start with less than you think you need — you can always add more, but you can't take it away.
The Method — Step by Step
- Preheat your oven to 325°F (not the usual 350°F — trust me on this one). Line your 9x13 pan with parchment paper, leaving overhang on the sides so you can lift out the brownies later. Spray with nonstick spray, especially in the corners where brownie bits like to hide. This lower temperature is the secret to perfectly set cheesecake without overbaking your brownie base.
- Start with the brownie batter: whisk together your sugar, special dark cocoa powder, flour, salt, and baking powder in a large bowl. Make sure to break up any cocoa lumps — they love to hide in corners and create bitter pockets. In a separate bowl, beat your eggs with vanilla until they're light and frothy, about 2 minutes. This step adds air that gives you that perfect crackly top.
- Pour the oil into your dry ingredients and mix until it looks like wet sand. Add your egg mixture and stir just until combined — overmixing develops gluten and gives you tough brownies. The batter should be thick and glossy, like melted chocolate ice cream. Let it rest while you make the cheesecake layer; this brief pause lets the flour hydrate and creates a better texture.
- For the cheesecake layer, beat your softened cream cheese until it's completely smooth and fluffy, about 3 minutes. Add sugar and beat until dissolved, then mix in the egg until just combined. The key is incorporating air for lightness without overmixing, which can cause cracks. Divide this mixture into three bowls and tint each with your Halloween colors — orange, purple, and green.
- Spread your brownie batter evenly in the prepared pan. It should be thick enough that you need to use an offset spatula to coax it into corners. Drop spoonfuls of your colored cheesecake mixtures randomly over the top, then use a toothpick or skewer to create dramatic swirls. Don't overdo it — you want distinct color patterns, not muddy brown.
- Bake for 28-32 minutes, but start checking at 25. The edges should look set and slightly puffed, while the center should still jiggle just a bit when you shake the pan. This is crucial — if you wait until a toothpick comes out clean, you've overbaked. The center will continue cooking from residual heat, giving you that perfect fudgy texture.
- Cool completely in the pan on a wire rack — I know it's torture, but cutting warm brownies is a rookie mistake. They'll fall apart and you'll lose those gorgeous swirl patterns. Once cool, use the parchment overhang to lift them out, then chill for at least 2 hours. This step firms up the cheesecake layer and makes cutting clean slices possible.
- When you're ready to serve, use a sharp knife dipped in hot water and wiped clean between cuts. This gives you those bakery-perfect edges that make people think you bought them from a professional. Cut into 24 squares for a party, or 12 if you're feeling generous. Store any leftovers in the fridge, though honestly, leftovers are theoretical with these brownies.
Insider Tricks for Flawless Results
The Temperature Rule Nobody Follows
Room temperature ingredients aren't just a suggestion — they're the difference between smooth, professional-looking cheesecake swirls and a lumpy mess that looks like it came from a toddler's art project. Take everything out of the fridge at least two hours before you start, or use my microwave trick: cream cheese gets 10-second bursts until soft, eggs go in warm water for 5 minutes, and oil should be liquid but not hot.
Why Your Nose Knows Best
Here's a secret that took me years to figure out: your nose is the best timer for these brownies. When you start smelling chocolate wafting from the oven, start checking. The aroma molecules release when the brownies hit the perfect temperature, usually about 2-3 minutes before they're actually done. It's like having a sixth sense for baking, and once you learn to trust it, you'll never overbake again.
The 5-Minute Rest That Changes Everything
After you pull the pan from the oven, let it rest on a wire rack for exactly 5 minutes, then gently tap the bottom. This releases any trapped air bubbles in the cheesecake layer and prevents those annoying cracks that ruin your swirl patterns. It's a small step that takes almost no time but makes a huge difference in the final appearance.
The Secret Ingredient Swap
If you want to take these brownies to another level, replace two tablespoons of the vegetable oil with strong coffee. Not only does it enhance the chocolate flavor (coffee and chocolate are best friends), but it also adds depth that makes people ask what your secret is. Don't worry — it won't taste like coffee, just more intensely chocolatey.
Creative Twists and Variations
This recipe is a playground. Here are some of my favorite ways to switch things up:
The Christmas Classic
Swap the orange, purple, and green for red and green food coloring, and add a teaspoon of peppermint extract to the cheesecake layer. Top with crushed candy canes instead of Halloween sprinkles. The mint-chocolate combination is refreshing and festive, perfect for holiday cookie exchanges where you want to stand out from the usual sugar cookies.
The Birthday Bash
Use the birthday person's favorite colors in the swirls, and add rainbow sprinkles to the brownie batter itself for a funfetti effect. Mix a tablespoon of birthday cake flavoring into the cheesecake layer for that nostalgic boxed-cake taste. Kids go absolutely wild for these at birthday parties.
The Sophisticated Adult
Replace the food coloring with natural alternatives: beet juice for burgundy, matcha powder for green, and blueberry juice for purple. The colors are more muted but elegant, and the subtle fruit flavors add complexity. Perfect for dinner parties where you want to impress without looking like you're trying too hard.
The Peanut Butter Lover
Drop spoonfuls of peanut butter on top of your cheesecake layer before swirling. Use a knife to create marbled patterns that incorporate both the colors and peanut butter. The salty-sweet combination is absolutely addictive, especially if you sprinkle chopped peanuts on top for crunch.
The Mint Chocolate Dream
Add a quarter teaspoon of mint extract to your brownie batter, and use only green food coloring in the cheesecake layer. Top with Andes mints chopped into quarters. These taste like Thin Mints in brownie form and are perfect for St. Patrick's Day or any time you need a refreshing chocolate fix.
The Salted Caramel Deluxe
Drizzle homemade caramel sauce over the cheesecake layer before swirling, then add a sprinkle of flaky sea salt on top. The sweet-salty combination with the tangy cream cheese is pure heaven. These disappear faster than the original version, if you can believe it.
Storing and Bringing It Back to Life
Fridge Storage
These brownies keep beautifully in the fridge for up to 5 days, making them perfect for make-ahead entertaining. Store them in an airtight container with parchment paper between layers to prevent sticking. The flavors actually intensify after the first day as the chocolate and cream cheese meld together. Pro tip: let them sit at room temperature for 15 minutes before serving — the texture improves dramatically.
Freezer Friendly
These freeze like champions for up to 3 months. Cut them into squares first, then wrap each piece individually in plastic wrap before placing in a freezer bag. This way you can grab a single brownie whenever the craving strikes. Thaw overnight in the fridge, or if you're impatient (like me), microwave for 20-30 seconds until just barely warm. The cheesecake layer stays creamy even after freezing.
Best Reheating Method
If you must reheat (though they're best at room temperature), wrap individual brownies in damp paper towels and microwave for 10-15 seconds. The steam keeps the cheesecake layer from getting rubbery. For a crowd, place them in a 250°F oven for 5-7 minutes. Never reheat more than once — the texture suffers, and you'll lose those beautiful swirls.