Picture this: you’re in the middle of a hectic weeknight, the fridge is a sad gray of leftovers, and the only thing that can lift the mood is a batch of fresh, buttery rolls that smell like a summer picnic. I was on a mission to rescue the evening with something that could be whipped up in under 45 minutes, and I stumbled upon a recipe that turned out to be the culinary equivalent of a surprise party for your taste buds.
I set the timer, tossed a head of garlic into the pan, and watched it sizzle with a hiss that sounded more like applause than a kitchen mishap. The aroma that rose was a deep, earthy sweetness that made me forget about the looming deadline at work. I could hear the dough rise like a quiet crescendo, and I knew I was about to create something that would make everyone at the table ask for seconds. If you’ve ever been tempted to order takeout, this is the moment you’ll realize that a few simple ingredients can outshine even the most expensive delivery.
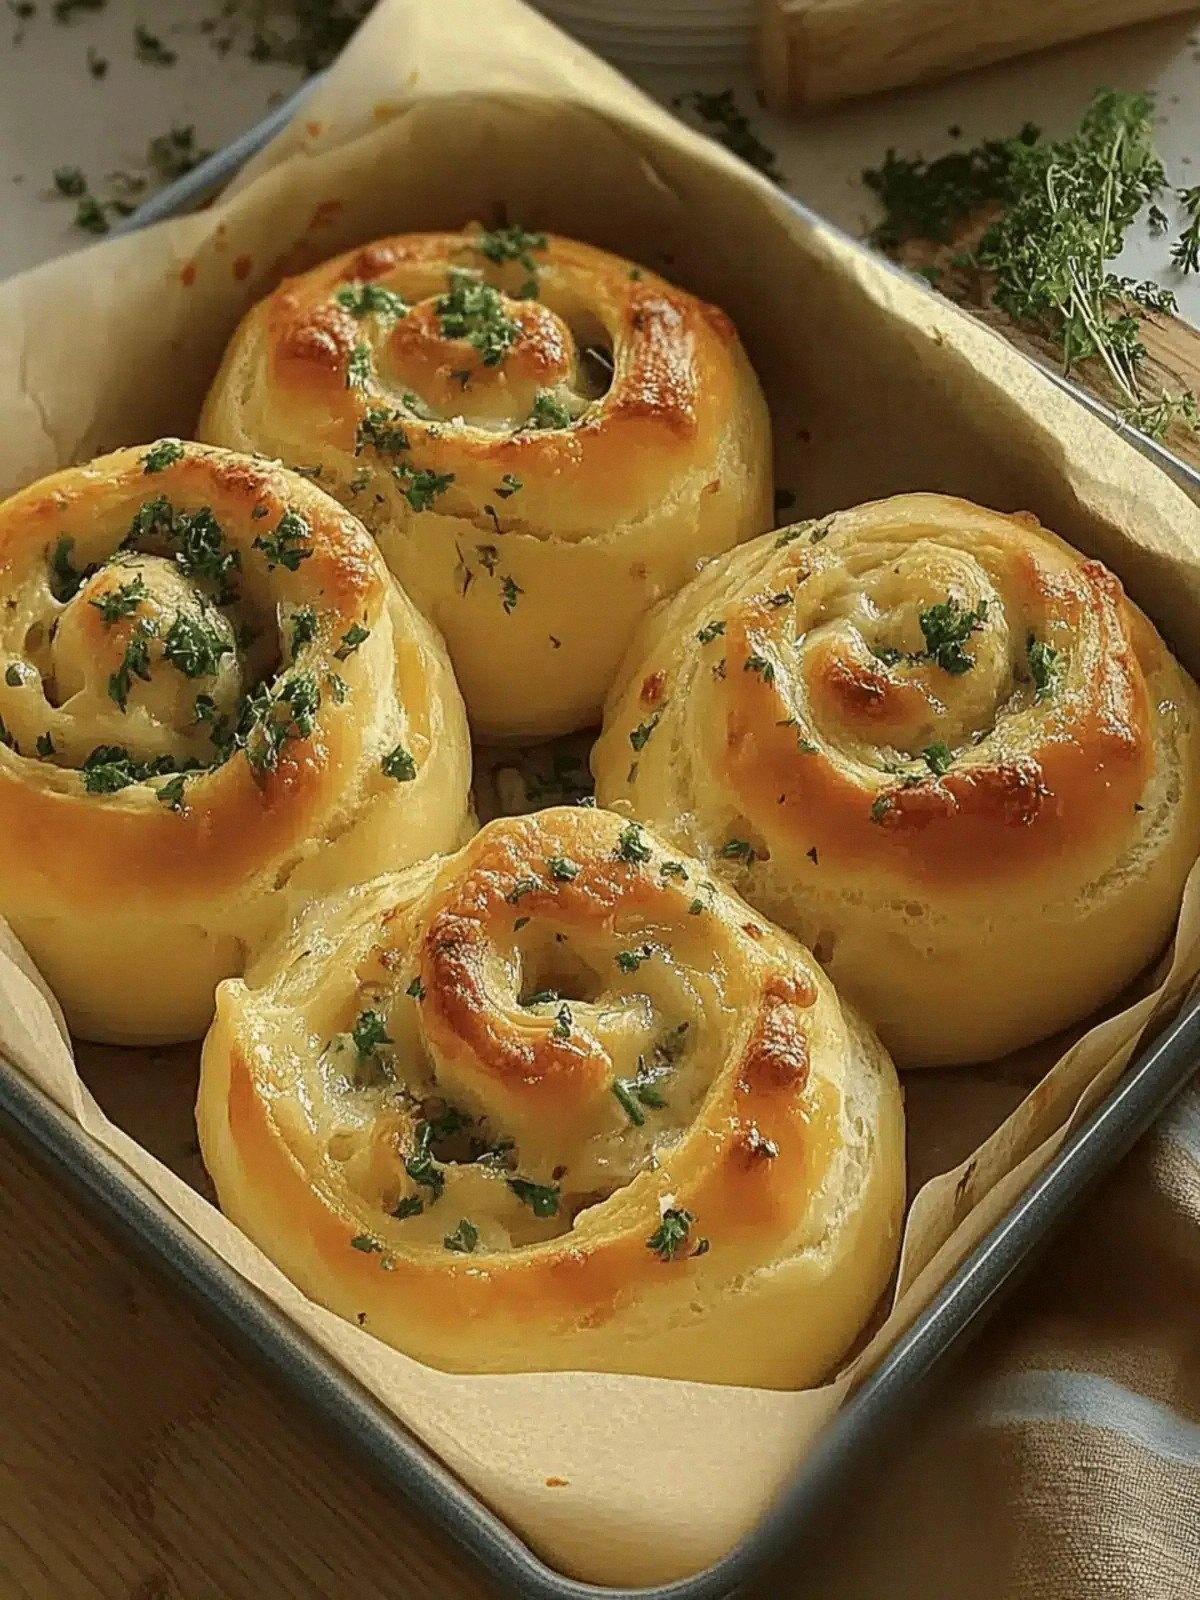
What makes this version stand out is not just the buttery texture or the melty mozzarella, but the way each element is elevated by a subtle twist: honey for a caramelized finish, parsley for a fresh pop, and a generous amount of garlic that infuses the dough without overpowering. It’s a recipe that’s as forgiving as it is impressive—perfect for novice bakers and seasoned chefs alike. I dare you to taste this and not go back for seconds.
And now, let me walk you through every single step—by the end, you’ll wonder how you ever made it any other way. Picture yourself pulling these golden rolls out of the oven, the whole kitchen smelling incredible, and the first bite feeling like a hug from the inside. This is hands down the best version you'll ever make at home.
What Makes This Version Stand Out
- Flavor: The honey subtly sweetens the dough, creating a caramelized crust that balances the savory mozzarella and garlicky undertones.
- Texture: A combination of all-purpose and bread flour gives the rolls a chewy interior while maintaining a tender crumb.
- Butter: The softened butter is folded into the dough, ensuring each roll is decadently moist without being greasy.
- Garlic: Using a whole head of garlic rather than minced gives a mellow, aromatic depth that permeates the entire batch.
- Parsley: The chopped parsley not only adds a splash of color but also a bright, herbaceous finish that lifts the richness.
- Ease: The recipe requires minimal equipment—just a bowl, a rolling pin, and a baking sheet—making it accessible for any kitchen.
- Crowd‑pleaser: Whether served at a game night or a family dinner, the rolls become the star of the table, drawing compliments from every guest.
- Make‑ahead: The dough can be refrigerated overnight, allowing you to bake fresh rolls at the last minute with zero prep.
Alright, let's break down exactly what goes into this masterpiece...
Inside the Ingredient List
The Flavor Base
The honey and warm milk form the sweet, tender foundation of the dough. Honey not only sweetens but also contributes to a golden, slightly crisp crust. Warm milk activates the yeast and creates a soft, airy crumb. If you skip the honey, the rolls lose that subtle caramelized edge and become a plain, doughy experience.
The Texture Crew
All-purpose flour gives structure, while bread flour adds chewiness. The ratio of 3 cups AP to 1 cup bread ensures the rolls rise beautifully without becoming too dense. The softened butter, folded in just before kneading, adds richness and a melt-in-your-mouth softness. Omit the butter and the rolls will be dry, lacking that buttery sheen that makes them irresistible.
The Unexpected Star
Mozzarella cheese is the secret to that gooey, stringy interior. Using a high-moisture mozzarella keeps the rolls from drying out during baking. If you replace it with cheddar, the flavor will shift to sharper, but the texture will still be delightful. The key is to melt the cheese evenly; otherwise, you’ll end up with pockets of uncooked cheese.
The Final Flourish
Fresh garlic and chopped parsley add a punch of aroma and a pop of color. The garlic should be roasted to soften its bite, allowing its sweetness to shine. Parsley not only brightens the visual appeal but also offers a subtle herbal note that balances the richness. If you’re allergic to dairy, try a dairy-free cheese alternative, but be prepared for a slightly different melt.
Everything's prepped? Good. Let's get into the real action...
The Method — Step by Step
- In a small saucepan, gently heat the warm milk with the honey until the honey dissolves. Stir until the mixture is silky and fragrant. This step ensures the yeast gets a warm, sweet environment to activate. Keep the mixture at a comfortable 110°F; if it gets too hot, the yeast will die.
- Sprinkle the active dry yeast over the milk mixture and let it sit for 5–7 minutes until frothy. The froth signals that the yeast is alive and ready to work. If no froth appears, the yeast might be old and should be replaced.
- In a large mixing bowl, combine the all-purpose flour, bread flour, and salt. Stir to distribute the salt evenly—salt is the flavor enhancer that brings out the dough’s potential. Add the frothy yeast mixture, softened butter, and egg yolks. Mix until a shaggy dough forms.
- Knead the dough on a lightly floured surface until it’s smooth and elastic—about 8–10 minutes by hand. The dough should pass the windowpane test: stretch a small piece; if it forms a translucent thin film without tearing, you’re good. If it’s sticky, add a tablespoon of flour at a time.
- Place the dough in a lightly oiled bowl, cover with a damp cloth, and let it rise in a warm spot for 1 hour or until doubled in size. The rise gives the rolls their airy interior. If you’re short on time, a 30‑minute quick rise in a microwave with a warm cup of milk works as a hack.
- While the dough is rising, roast the garlic head in a preheated 400°F oven for 20 minutes or until soft. Peel the cloves and mash them into a paste with a pinch of salt. The roasted garlic provides a mellow sweetness that complements the cheese.
- Punch down the dough and divide it into 12 equal pieces. Roll each piece into a ball, then flatten slightly. Place the balls on a parchment-lined baking sheet, spacing them about 2 inches apart. This spacing allows the rolls to rise without merging.
- Brush each roll lightly with melted butter, then sprinkle generously with mozzarella and a spoonful of the roasted garlic paste. Finish with a dusting of chopped parsley. The butter coating gives a golden crust, while the cheese melts into a luscious center.
- Bake at 425°F for 15–18 minutes, or until the rolls are golden brown and the cheese has bubbled. The aroma that fills the kitchen at this point is irresistible. Once baked, let the rolls cool on a rack for 5 minutes before serving.
- Serve warm, perhaps with a side of marinara or a simple olive oil and balsamic dip. These rolls are best enjoyed fresh, but they hold up well for a short time at room temperature. If you’re craving a second round, they’re still delicious—though they’ll be a bit firmer.
That's it — you did it. But hold on, I've got a few more tricks that'll take this to another level...
Insider Tricks for Flawless Results
The Temperature Rule Nobody Follows
Many bakers think room temperature is fine, but the dough actually thrives at 75°F. If your kitchen is cooler, let the dough sit in a slightly warmer spot or preheat the oven to 200°F for 10 minutes before baking. This trick gives the rolls a crispier crust while keeping the inside soft.
Why Your Nose Knows Best
Trust your sense of smell during the rise. If the dough starts to smell yeasty or slightly sweet, it’s ready. Overproofing will produce a sour aroma and a dough that collapses. A quick sniff can save you from a batch of flat rolls.
The 5-Minute Rest That Changes Everything
After shaping the rolls, let them rest for 5 minutes before baking. This brief pause allows the gluten to relax, preventing the rolls from shrinking during the bake. It also lets the cheese melt evenly, creating that perfect gooey center.
Keep the Butter Warm
Warm butter is easier to brush and creates a smoother, shinier crust. If the butter is too cold, it will leave streaks and may not melt uniformly. A quick melt in the microwave or on the stove is all you need.
Use Fresh Garlic
The fresher the garlic, the more vibrant the flavor. Old, dried garlic can become bitter, especially when roasted. Aim for cloves that are firm and have a bright white interior.
Add a Splash of Water Before Reheating
If you’re reheating leftovers, drizzle a tablespoon of water over the rolls before placing them in a preheated oven at 350°F for 5 minutes. The steam restores moisture, keeping the rolls from drying out.
Creative Twists and Variations
Mediterranean Melt
Swap mozzarella for feta and add sun‑dried tomatoes and olives. This variation gives a briny, tangy profile that complements the buttery dough. Guests will love the Mediterranean flair.
Cheddar & Chive
Replace mozzarella with sharp cheddar and sprinkle chopped chives over the top. The sharpness of cheddar adds depth, while chives bring a fresh onion note. It’s a classic comfort food twist.
Herb‑Infused
Add dried thyme and oregano to the dough for an aromatic lift. Finish with a drizzle of olive oil and a sprinkle of fresh rosemary. The herbaceous aroma makes these rolls a standout side dish.
Sweet & Salty
Incorporate chopped dried apricots into the dough and sprinkle a pinch of sea salt on top before baking. The dried fruit adds a hint of sweetness, while the salt enhances the overall flavor.
Vegan Version
Use a plant‑based milk, vegan butter, and dairy‑free mozzarella. The texture remains the same, and the flavor is just as rich. This version is perfect for plant‑based diners.
Cheese Crust
Brush the tops with a mixture of melted butter and grated Parmesan before baking. The Parmesan creates a crisp, savory crust that pairs well with the gooey interior.
Storing and Bringing It Back to Life
Fridge Storage
Store leftover rolls in an airtight container at room temperature for up to 3 days. The rolls stay fresh because the butter and cheese create a moisture‑retaining environment. Avoid refrigeration, which can dry them out.
Freezer Friendly
Wrap individual rolls tightly in plastic wrap and place them in a freezer bag. They can be frozen for up to 2 months. When you’re ready, thaw at room temperature for 30 minutes before reheating.
Best Reheating Method
Preheat your oven to 350°F. Place the rolls on a baking sheet and bake for 5–7 minutes. For extra crispness, finish with a quick blast on the broiler for 30 seconds. A splash of water before reheating will keep them moist.