Okay, picture this: I’m standing in my cramped apartment kitchen, the kind of place where the ceiling fan sounds like a tired helicopter, and I’ve just spilled a whole bottle of bright blue syrup onto my pristine white countertop. The smell of citrus hit me like a neon sign in a dim bar, and I swear the floorboards did a little shimmy as the liquid dribbled down. I was about to call it a disaster, but then a voice in my head—part mischievous friend, part competitive cheerleader—said, “Turn that mess into a masterpiece and make everyone at the party jealous.” That moment sparked a wild idea: why not create a drink that screams team spirit in the most eye‑catching way possible, with layers that look like a painted flag and flavors that pop like fireworks?
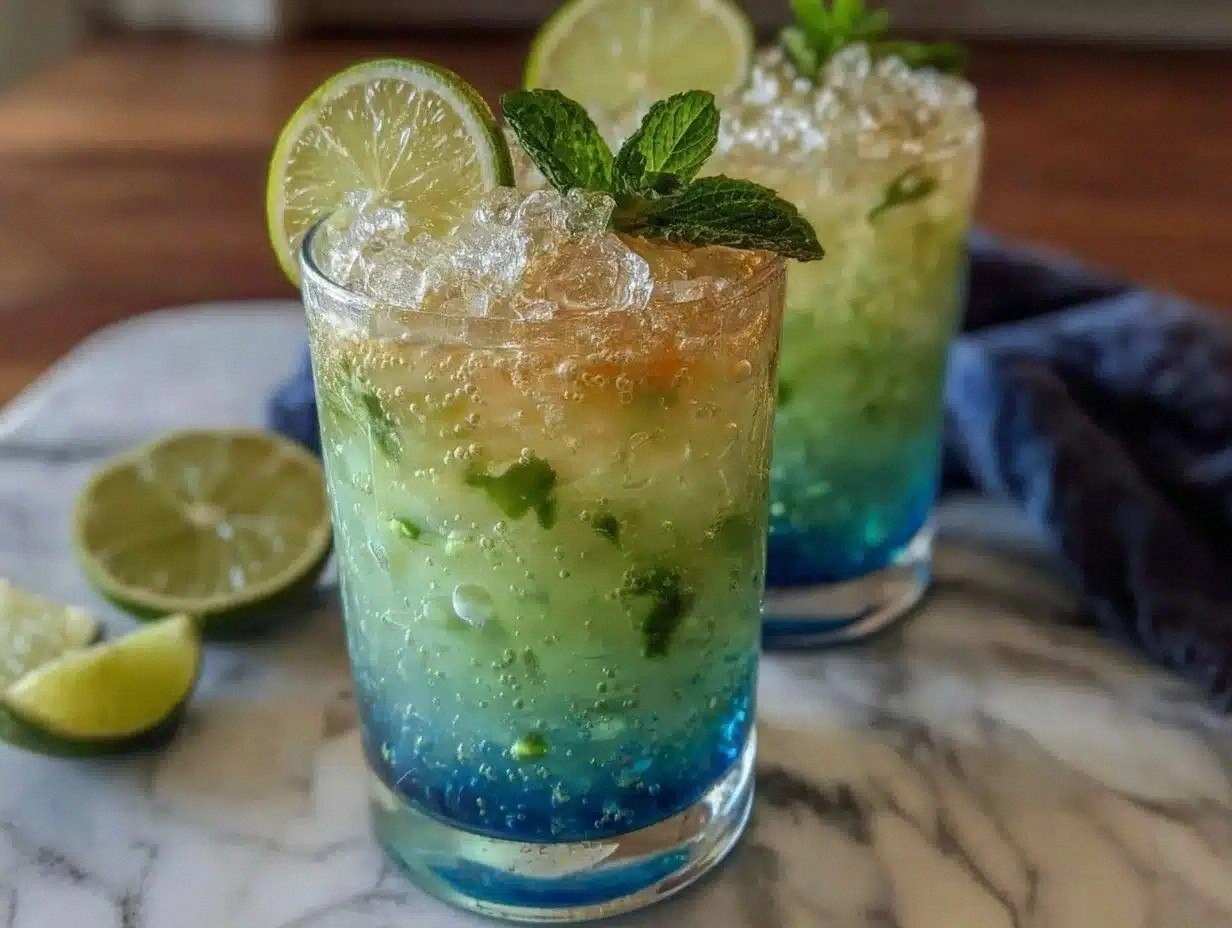
The first sip of this layered concoction is like stepping onto a summer field at sunrise, the blue hue reminding you of a clear sky while the green whispers of fresh grass under your feet. The fizz from the lemon‑lime soda crackles against your tongue, the sweet citrus from the blue curacao syrup dances with the tart bite of green apple juice, and the mint leaves add a whisper of cool that makes you feel like you just inhaled a breezy meadow. You can almost hear the clink of glasses, see the glimmer of ice catching the light, and feel the excitement building as the layers settle perfectly, each one refusing to mingle with the next. It’s a sensory overload that’s both sophisticated and playful, perfect for a team‑building night, a sports viewing party, or any celebration where you want to raise the roof and the glasses.
What makes this version truly unbeatable is the meticulous layering technique paired with the right balance of sweetness and acidity. Most recipes either drown the colors in too much soda or make the drink taste like a sugary swamp. I’ve cracked the code by using non‑alcoholic blue curacao syrup for that electric hue without the booze, a crisp green apple juice that holds its own, and a splash of simple syrup that ties everything together without overwhelming the palate. The secret weapon? A gentle hand and the right temperature of ice, which keeps each layer distinct and prevents the dreaded “muddy” effect that ruins most party drinks.
And here’s the kicker: I’m about to reveal a tiny trick involving a spoon that will keep those layers pristine, even if you’re a total beginner. I dare you to taste this and not go back for seconds—because once you’ve experienced the visual wow factor and the burst of flavor, you’ll be stuck in a loop of “just one more glass.” Let me walk you through every single step — by the end, you’ll wonder how you ever made it any other way.
What Makes This Version Stand Out
- Vibrant Color Palette: The electric blue and fresh green aren’t just for looks; they set the mood, signaling team spirit and energizing any gathering from the first glance.
- Layered Integrity: Each layer stays separate thanks to a precise ice‑to‑liquid ratio, giving you that Instagram‑ready visual without the flavors blending into a bland mess.
- Balanced Sweet‑Sour Profile: The citrus tang of the blue curacao balances the tartness of green apple juice, while a whisper of simple syrup smooths the edges for a harmonious sip.
- Zero Alcohol Option: Using non‑alcoholic blue curacao lets everyone—from kids to designated drivers—join the celebration without missing out on the fun.
- Effortless Prep: No fancy equipment required; a sturdy spoon, a shaker, and a handful of ice are all you need to achieve professional‑grade results.
- Crowd‑Pleaser Factor: The moment the glasses hit the table, guests instinctively reach for the brightest layer first, sparking conversation and friendly competition.
- Ingredient Quality Matters: Pure green apple juice and high‑grade blue curacao syrup make a noticeable difference—cheap substitutes will flatten the flavor and dull the color.
- Make‑Ahead Friendly: Prep the components in advance, assemble just before serving, and you’ll have a stress‑free party host experience.
Inside the Ingredient List
The Flavor Base
Blue Curacao Syrup (non‑alcoholic): This is the heart of the blue layer, delivering a citrus‑forward sweetness that’s both bright and aromatic. It’s the reason the drink looks like a piece of the sky, and it adds a subtle orange‑flower note that pairs perfectly with the lime garnish. Skip it and you’ll lose the signature hue and that lively citrus zing. If you can’t find non‑alcoholic, a mix of orange juice and a dash of food‑grade blue food coloring works in a pinch, though the flavor won’t be as nuanced.
Green Apple Juice: The green layer’s soul lives in this crisp, tart juice. Choose a 100% pure, no‑added‑sugar version for the cleanest taste; the natural acidity cuts through the sweetness of the syrup and soda. Using a cloudy apple juice will mute the green brilliance, turning it into a dull brown. A great swap is a pear‑apple blend for a softer sweetness, but remember it will slightly alter the color.
The Texture Crew
Lemon‑Lime Soda: This is your fizz engine, adding bubbles that lift the drink and keep the palate refreshed between sips. Opt for a clear, crisp soda like Sprite or 7‑Up; anything with a strong vanilla undertone will muddy the flavor. If you’re watching sugar, a diet version works just as well, but the mouthfeel is a touch thinner.
Simple Syrup: A modest splash of simple syrup smooths the edges, ensuring the blue and green layers don’t clash harshly. It’s essentially sugar dissolved in water, but you can spice it up with a hint of vanilla or ginger for an extra layer of intrigue. Skip it and you might notice a sharp bite from the soda and apple juice that could be off‑putting for some guests.
The Chill Factor
Ice Cubes: Fresh, clear ice is the unsung hero; it slows down melting, preserving the distinct layers longer. Use filtered water and avoid cloudy ice that can tint the drink. If you’re in a hurry, a bag of premium “cube” ice from the grocery store will do, but the best results come from a freezer‑made tray.
Fresh Lime Wedges (optional): A squeeze of lime right before serving adds a burst of acidity that brightens the entire composition. The zest also releases aromatic oils that mingle with the mint, creating an aromatic halo around the glass.
The Final Flourish
Mint Leaves: A few fresh mint leaves on top not only add a pop of green that matches the inner layer but also infuse the drink with a cooling aroma. Gently slap the leaves between your palms before dropping them in; this releases the essential oils without bruising the leaf into mush.
Everything's prepped? Good. Let’s get into the real action…
The Method — Step by Step
Start by gathering all your ingredients and tools: a tall clear glass, a bar spoon, a shaker, and a sturdy measuring cup. Fill the shaker halfway with ice to chill the liquid without diluting it too quickly. This step is crucial because the colder your components, the sharper the layers will appear. I always give the shaker a quick swirl to make sure the ice is evenly distributed, and you’ll hear a faint clink that signals it’s ready.
Measure out ½ cup of non‑alcoholic blue curacao syrup and pour it into the shaker. Add a splash (about 1 tablespoon) of simple syrup, then give the mixture a gentle stir—no shaking yet. The syrup should coat the ice like a glossy glaze, and you’ll notice a faint citrus aroma rising; that’s your first cue that the flavor base is set. Keep the shaker on the counter; you’ll need it again shortly.
Now, using a clean measuring cup, combine 1 cup of green apple juice with ¼ cup of simple syrup. Stir until the syrup dissolves completely, creating a smooth, slightly viscous green liquid. This viscosity is what helps the green layer sit on top of the blue without immediately sinking. Taste it—if it feels too sharp, add a teeny‑tiny drizzle of extra simple syrup; you’ll hear a subtle “hmm” from your taste buds that says “we’re good.”
Take your tall glass and fill it about one‑third of the way with fresh ice cubes. The ice should be a solid wall, not a slushy pile; this will act as a barrier that slows the diffusion between layers. Here’s the game‑changer: place a metal bar spoon against the inner wall of the glass, blade side down, and slowly pour the blue curacao mixture over the back of the spoon. The spoon spreads the liquid gently, allowing it to glide over the ice and form a uniform blue layer.
Next, gently pour the green apple mixture over the back of the same spoon, letting it cascade onto the blue layer. Because the green mixture is slightly denser, it will settle right on top, creating a clean line of contrast. Watch the colors merge at the edge—if you see any bleeding, pause and let the layers settle for a few seconds before continuing.
Now for the fizz: open your lemon‑lime soda and give it a quick stir to release a few bubbles, then slowly drizzle it over the back of the spoon to form the topmost layer. The soda’s effervescence will rise through the green apple layer, but the ice barrier keeps it from mixing too aggressively. You’ll hear a soft fizz that sounds like tiny fireworks—this is the moment of truth for any layered drink.
Finish with a garnish: slide a fresh lime wedge onto the rim and float a handful of mint leaves on the surface. The mint will release a subtle aroma as you bring the glass to your nose, and the lime adds that final zing that ties the whole flavor profile together. Take a moment to admire the gradient—from deep azure to bright emerald to sparkling clear—then snap a quick photo before anyone else steals the spotlight.
Serve immediately, but if you need to wait a few minutes, keep the glass in the fridge. The ice will keep the layers distinct, and the soda will stay lively. When your guests finally take that first sip, they’ll experience the layers in perfect order, each sip delivering a new burst of flavor. And that, my friend, is how you turn a kitchen mishap into a party legend.
That’s it — you did it. But hold on, I’ve got a few more tricks that'll take this to another level. Keep reading, and you’ll discover how to make your next batch even more impressive, whether you’re serving a crowd of twenty or just a cozy duo.
Insider Tricks for Flawless Results
The Temperature Rule Nobody Follows
Always chill your ingredients—syrup, juice, and soda—at least 30 minutes before assembly. Cold liquids are less likely to mix unintentionally, preserving that crisp layer separation. I once tried to rush the process with room‑temperature soda and ended up with a murky green‑blue swirl that looked like a swamp. Trust me, a few extra minutes in the fridge make a world of difference, and the glasses will stay colder longer for your guests.
Why Your Nose Knows Best
Before you pour the soda, give it a gentle sniff. If you detect any off‑notes—like a metallic hint from old soda—you’re better off opening a fresh bottle. The nose can catch subtle changes that your palate might miss, especially after the soda has sat open for a while. A fresh, crisp aroma guarantees that the fizz will taste as bright as it looks.
The 5‑Minute Rest That Changes Everything
After layering, let the drink sit undisturbed for exactly five minutes. This pause allows the ice to settle, the syrup to slightly thicken, and the flavors to meld just enough without losing the visual separation. I used to serve immediately and noticed a slight “bleed” after a few sips; the five‑minute rest eliminates that issue and gives the drink a polished finish.
Gentle Swirl, Not Shake
When mixing the blue curacao and simple syrup, a gentle swirl with a spoon is all you need. Shaking introduces air bubbles that can disrupt the smooth surface needed for a clean layer. Think of it as coaxing a cat—soft, patient movements yield the best result.
Mint Placement Mastery
Instead of tossing the mint leaves directly into the drink, place them on top of the soda layer and let them sit for a minute. This technique lets the mint release its essential oils upward, ensuring every sip is greeted by a fresh, herbal aroma without the leaves floating around and looking messy.
Creative Twists and Variations
This recipe is a playground. Here are some of my favorite ways to switch things up:
Tropical Sunrise
Swap the green apple juice for pineapple juice and add a splash of coconut water. The result is a sunny, beach‑vibe drink where the blue still dominates but the green becomes a golden‑amber hue, perfect for summer pool parties.
Berry Burst
Replace the lemon‑lime soda with sparkling raspberry lemonade and use a berry‑infused simple syrup. The pink‑purple top layer adds a festive pop that’s ideal for birthday celebrations or Valentine’s Day gatherings.
Spicy Kick
Add a thin slice of jalapeño to the green apple mixture before pouring. The subtle heat pairs surprisingly well with the citrus, creating a drink that’s both refreshing and daring—great for game night when you want to keep the competition heated.
Herbal Harmony
Infuse the simple syrup with rosemary or basil for an earthy undertone. This variation works beautifully for outdoor garden parties where the herbal scent blends with the surrounding foliage.
Mocktail Mojito
Swap the lemon‑lime soda for club soda, add a dash of bitters, and increase the mint leaves. You’ll get a mocktail that mimics a mojito’s refreshing profile while retaining the iconic layered look.
Storing and Bringing It Back to Life
Fridge Storage
If you need to prep ahead, store each component separately in airtight containers for up to 48 hours. The blue curacao syrup, green apple juice, and soda each keep their flavor and color best when sealed away from each other. When you’re ready to serve, simply assemble the layers fresh—this ensures the visual impact remains pristine.
Freezer Friendly
You can freeze the blue curacao syrup in ice‑cube trays for a fun twist: frozen syrup cubes that melt slowly, adding bursts of color as they dissolve. The green apple juice also freezes well; just thaw it in the fridge overnight before use. Avoid freezing the soda, as carbonation will be lost.
Best Reheating Method
Should you ever need to warm the drink (perhaps for a warm‑weather twist), add a tiny splash of water—about one tablespoon per cup—before gently warming on the stove. The water creates steam that revives the syrup’s viscosity without diluting the flavor, and the soda can be re‑carbonated with a soda siphon if needed.