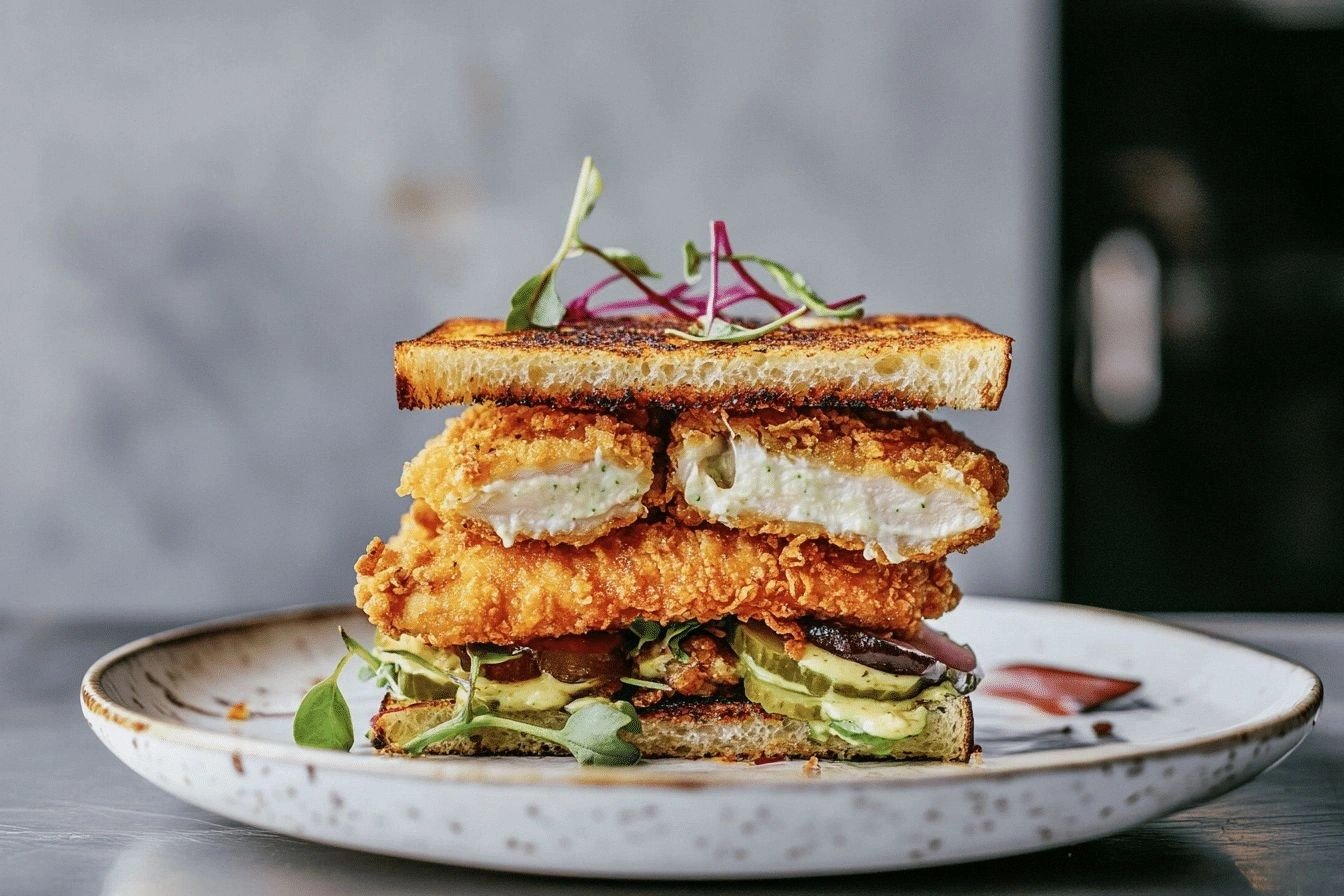
It started with a kitchen catastrophe that I still laugh about. I was halfway through a weeknight dinner, flipping a chicken breast that had somehow turned into a greasy, soggy mess, and my friend dared me to make the crispiest chicken sandwich ever. I rolled up my sleeves, grabbed my trusty skillet, and set the tone for what would become the ultimate version of a humble sandwich. The scent of sizzling oil and the sound of a perfectly crisped crust were the first notes of a symphony I was about to conduct. That moment of triumph felt like a small victory over culinary mediocrity, and I knew I had to share the secret.
Picture the scene: a bright kitchen, the aroma of Dijon mustard mingling with the buttery scent of mayo, the gentle hiss of oil on high heat, and the anticipation of a sandwich that could change your life. I swear, the first bite was a revelation—juicy, tender chicken with a crust that cracked like a brittle shell, followed by a creamy, tangy sauce that coated the meat like velvet. I was so enamored that I almost didn’t let my friends taste it until they begged for seconds. I dare you to taste this and not go back for seconds.
What sets this recipe apart is the meticulous layering of flavors and textures that I discovered after countless trials. The brine, infused with Dijon mustard, mayo, and buttermilk, does more than just season; it tenderizes and infuses the chicken with a savory depth that no plain salt and pepper can match. The flour coating, seasoned to perfection, creates a golden, crunchy shell that holds the moisture inside while delivering a satisfying snap that shatters like thin ice. Most recipes get this completely wrong; they either leave the chicken dry or the coating soggy. Here’s what actually works: a balanced brine, a dry coating, and precise frying technique.
And there’s a twist that most sandwich lovers never consider: the brine is not just a flavor enhancer—it’s a moisture lock that keeps the chicken juicy even after frying. The Dijon and mayo combo creates a subtle, complex tang that pairs beautifully with the buttery crunch. I’ll be honest—my first batch was so good that I ate half the sandwich before anyone else got a bite. Picture yourself pulling this out of the skillet, the whole kitchen smelling incredible, the heat of the pan still radiating, and the anticipation of that first golden bite. Okay, ready for the game-changer? By the end of this guide, you’ll wonder how you ever made it any other way.
What Makes This Version Stand Out
Alright, let’s break down exactly what goes into this masterpiece. The following points explain why this sandwich is hands down the best version you'll ever make at home.
- Taste: The brine infuses the chicken with a savory, tangy depth that elevates every bite, while the mayo adds a creamy, silky finish that lingers on the palate.
- Texture: A crisp, crackling crust that shatters with a satisfying snap, contrasted with tender, juicy meat that practically melts in your mouth.
- Convenience: The method is straightforward, with minimal prep and a single skillet, making it perfect for busy weeknights.
- Uniqueness: The Dijon–mayo brine is an unexpected twist that sets this sandwich apart from classic fried chicken recipes.
- Audience Appeal: From kids who love the crunch to adults craving a gourmet sandwich, this recipe satisfies a wide range of tastes.
- Ingredient Quality: Using fresh, high‑quality chicken, real Dijon mustard, and whole‑grain flour ensures a superior flavor profile.
- Cooking Method: The double‑brining technique locks in moisture, while the flour coating creates a golden, flavorful crust.
- Make‑ahead Potential: The chicken can be brined and coated a day ahead, making it ideal for meal prep and entertaining.
Inside the Ingredient List
The Flavor Base
The Dijon mustard and mayo are the heart of this brine. Dijon adds a sharp, peppery kick that cuts through the richness of the mayo, creating a balanced flavor that lingers. Mayonnaise, on the other hand, provides a creamy texture that coats the chicken, keeping it moist during frying. If you skip this duo, the sandwich will taste flat and lack that signature tang. For a dairy‑free version, swap mayo for a plant‑based alternative, but keep the Dijon to preserve the depth.
The Tenderizer
Buttermilk is the secret agent that breaks down proteins, ensuring the chicken stays succulent. Its acidity also helps the flour adhere better, giving a tighter, crunchier crust. If you’re not a fan of buttermilk, a splash of milk with a tablespoon of vinegar will do the trick. Remember, the longer the chicken sits in the brine, the more tender it becomes—so don’t rush this step.
The Texture Crew
Flour is the hero that turns a simple chicken breast into a crispy masterpiece. A light dusting of flour, seasoned with salt, pepper, paprika, and garlic powder, creates a golden shell that locks in juices. Skip the flour, and you’ll end up with a soggy, greasy chicken that feels like a disappointment. If you’re watching carbs, try a low‑carb flour blend or a crushed almond flour for a different texture.
The Final Flourish
Vegetable oil is the medium that brings everything together. The high smoke point of vegetable oil allows for a steady, medium‑high heat that crisps the coating without burning. Use enough oil to cover the bottom of the skillet—about 1/2 inch deep—to ensure even frying. For a healthier version, consider a light spray of oil or a quick pan‑fry with a minimal amount of oil.
Everything's prepped? Good. Let's get into the real action.
The Method — Step by Step
- Begin by whisking together 2 tablespoons Dijon mustard, 3 tablespoons mayonnaise, and 1 cup buttermilk in a shallow bowl. The mixture should be smooth and slightly thick; this is your brine. Add a pinch of salt and pepper to taste, but remember you’ll season the coating separately. This step is crucial—if the brine is too thin, the chicken won’t absorb enough flavor.
- Place the chicken breasts in the bowl, ensuring each piece is fully submerged. Cover with plastic wrap and refrigerate for at least 1 hour, preferably 2 hours, to allow the flavors to penetrate the meat. The longer you brine, the more tender and flavorful the chicken will be. I always keep a timer on my phone to avoid over‑brining, which can make the meat mushy.
- While the chicken is brining, prepare your coating. In a separate shallow dish, combine 2 cups all‑purpose flour with 1 teaspoon salt, 1 teaspoon black pepper, 1 teaspoon paprika, and 1 teaspoon garlic powder. Toss the flour until the seasonings are evenly distributed. This dry mix will give your chicken that golden, crackling exterior.
- Remove each chicken breast from the brine, letting excess drip off. Pat dry with paper towels to ensure the flour sticks. Then, dredge the chicken in the seasoned flour, pressing the coating onto the surface. Shake off any excess flour before placing the chicken in a hot skillet. The skillet should be preheated to medium‑high heat; a drop of water should sizzle immediately.
- Add 1 cup of vegetable oil to the skillet, enough to coat the bottom. When the oil shimmers, carefully lay the coated chicken breasts in the pan. Avoid overcrowding; if necessary, cook in batches. The chicken should sizzle loudly, and the coating will begin to turn golden brown within 3–4 minutes per side. Flip only once to preserve the crispness.
- After flipping, let the chicken cook for another 4–5 minutes until the internal temperature reaches 165°F (74°C). The crust should be a deep, golden brown, and the juices should run clear. If you’re cooking a thicker breast, you may need to reduce the heat slightly to avoid burning the exterior while the interior cooks.
- Once cooked, transfer the chicken to a wire rack set over a baking sheet to drain excess oil. Let it rest for 5 minutes; this allows the juices to redistribute and the crust to firm up slightly, ensuring every bite stays crisp.
- While the chicken rests, toast the buns lightly in a separate pan or toaster. Toasting adds a buttery crunch and prevents the buns from becoming soggy when you add the juicy chicken.
- Assemble the sandwich: place a generous slice of lettuce and tomato on the bottom bun, add the crispy chicken breast, then top with the other bun. The lettuce and tomato provide a fresh, crisp contrast to the rich, buttery chicken, creating a harmonious bite.
- Serve immediately, ideally with a side of sweet potato fries or a crisp salad. The combination of crunchy, juicy, and creamy elements makes this sandwich a crowd‑pleaser that feels like a gourmet treat.
That's it—you did it. But hold on, I've got a few more tricks that'll take this to another level. These insider tips will help you avoid common pitfalls and elevate the flavor profile even further.
Insider Tricks for Flawless Results
The Temperature Rule Nobody Follows
Many cooks assume that high heat is always best for frying, but the truth is a moderate, steady heat ensures an even crust without burning. Set your skillet to medium‑high and use a thermometer to keep the oil between 350–375°F. If you’re new to oil temperatures, a simple test is to drop a small piece of flour in; if it sizzles immediately and browns in about 30 seconds, you’re at the right temperature.
Why Your Nose Knows Best
Before you flip the chicken, listen to the aroma. A golden crust emits a nutty, caramelized scent. If the smell is too metallic or you notice a faint chemical odor, the oil is too hot. Trust your nose; it’s a reliable indicator of doneness.
The 5-Minute Rest That Changes Everything
Letting the chicken rest on a wire rack for five minutes is more than a courtesy—it allows the juices to redistribute and the crust to set. Skipping this step often results in a soggy sandwich because the juices seep into the bread. Patience pays off.
Double‑Coat for Extra Crunch
If you’re a crunch aficionado, try a double‑coat technique: dip the brined chicken in beaten egg before the flour. The egg creates a barrier that locks in moisture and gives the coating a thicker, crunchier profile.
Keep the Oil Clean
After each batch, strain the oil through a fine sieve to remove flour bits. Reusing oil can lead to off‑flavors and a burnt taste. If you’re cooking multiple batches, keep a separate container of fresh oil ready.
Creative Twists and Variations
This recipe is a playground. Here are some of my favorite ways to switch things up:
Spicy Sriracha Mayo
Swap regular mayo for a spicy sriracha mayo to add a kick. The heat pairs beautifully with the tangy Dijon, creating a flavor explosion that will keep you reaching for more.
Herbed Parmesan Crust
Incorporate grated Parmesan and fresh herbs like thyme or oregano into the flour mixture. This gives the crust a savory, umami depth that’s reminiscent of Italian breaded chicken.
Smoky Chipotle Brine
Add a teaspoon of chipotle powder to the brine for a smoky, earthy undertone. This variation works wonderfully for grill‑style versions or when you’re craving a bold, smoky flavor.
Low‑Carb Almond Flour Coat
Replace all‑purpose flour with almond flour for a low‑carb, gluten‑free version. The almond flour gives a slightly nutty flavor and a crisp, golden crust that’s just as satisfying.
Breakfast‑Style Brisket
Use a brisket cut instead of chicken breast and brine it overnight. The result is a hearty, savory sandwich that’s perfect for brunch or a filling lunch.
Cheesy Melt
Add a slice of cheddar or mozzarella on top of the hot chicken before assembling. The cheese will melt into the juicy interior, creating a gooey, indulgent bite.
Storing and Bringing It Back to Life
Fridge Storage
Store the assembled sandwiches in an airtight container in the refrigerator for up to 2 days. Keep the buns separate until you’re ready to eat to prevent them from becoming soggy. The chicken will stay juicy, but the crust may soften slightly.
Freezer Friendly
For longer storage, wrap the chicken breasts individually in foil and place them in a freezer bag. Freeze for up to 3 months. Thaw overnight in the refrigerator before reheating.
Best Reheating Method
Reheat the chicken in a skillet over medium heat for 3–4 minutes, or in a preheated oven at 350°F for 10 minutes. Add a splash of water to the pan before heating to create steam, which helps restore the crispy crust. Then, assemble the sandwich fresh to maintain texture.