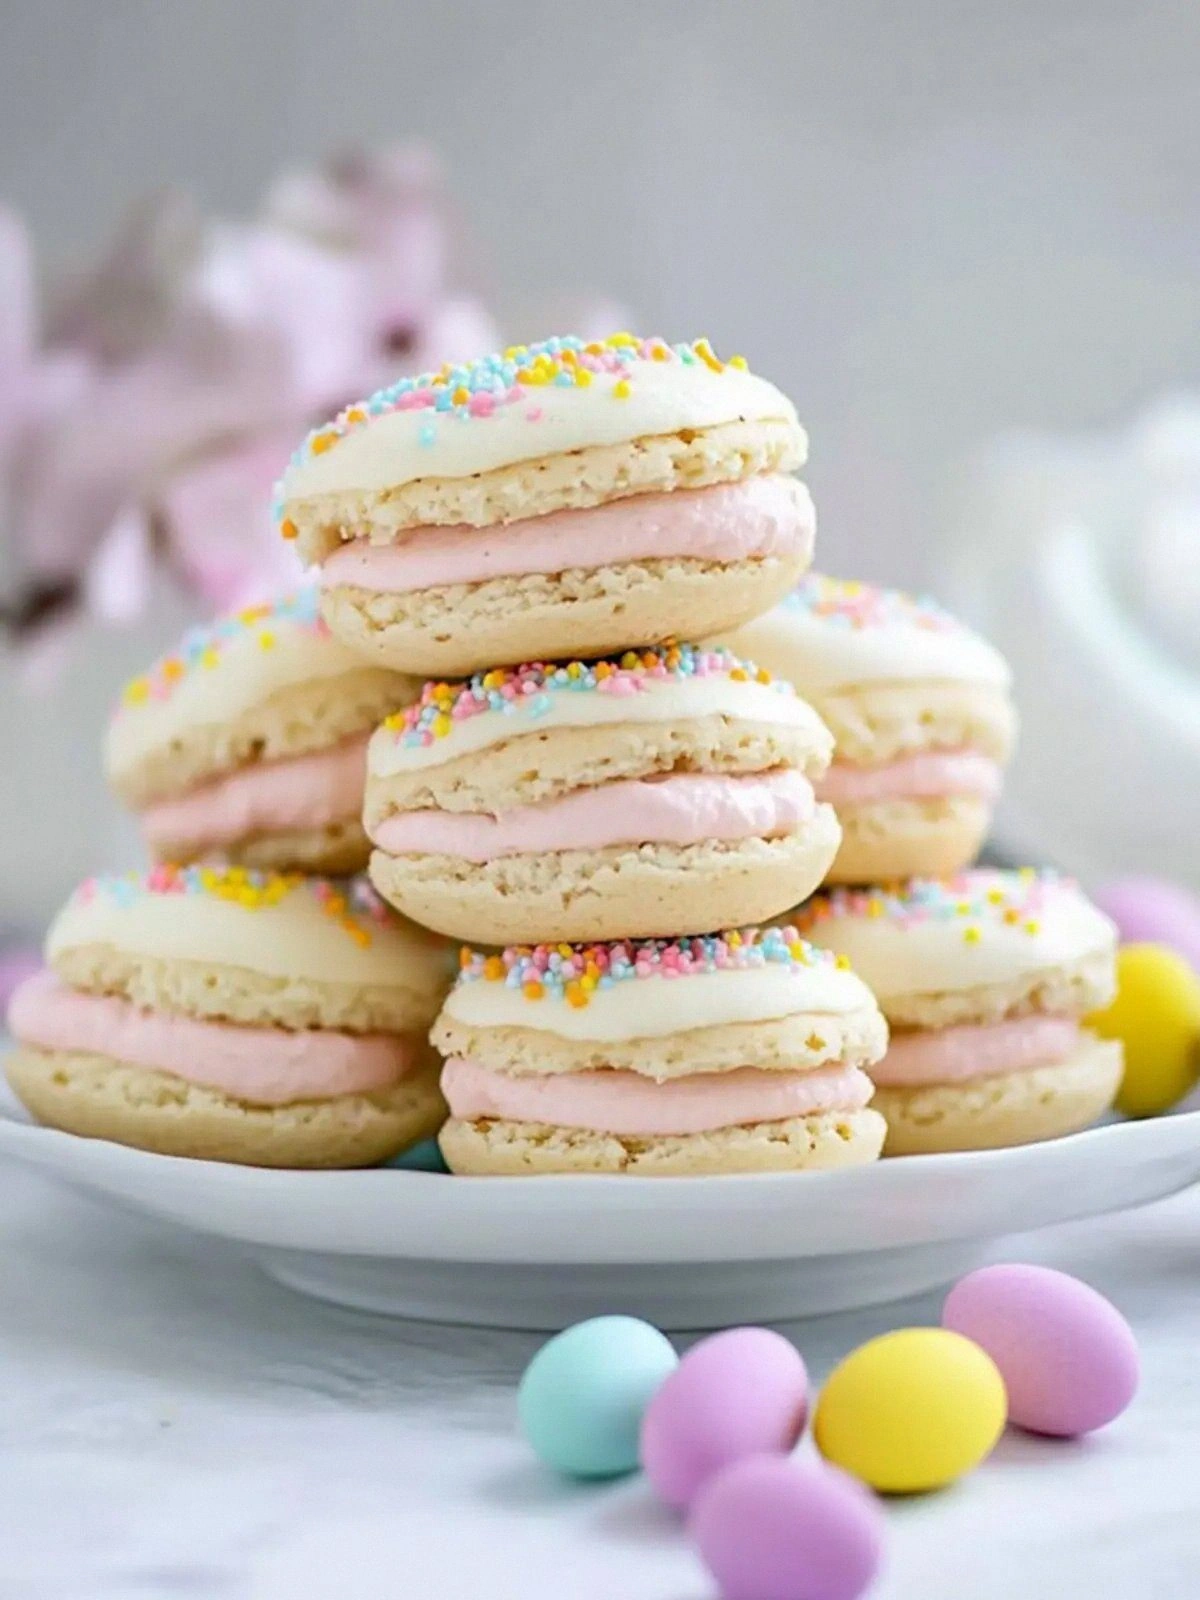
Picture this: the kitchen is a chaotic symphony of flour dust, butter splatters, and a faint scent of vanilla that lingers like a promise. I was halfway through a disastrous chocolate cake that collapsed in a sad, crumbly mess, and a friend dared me to make something that would make everyone forget the flop. I grabbed a box of French vanilla cake mix, a handful of Easter sprinkles, and a dash of pink gel food coloring, and the idea of a sweet, fluffy, bite‑size delight began to bloom. This is not just another dessert; it’s a playful, crowd‑pleasing, bite‑sized cloud that melts in your mouth and leaves a rainbow trail of sprinkles on your lips. The moment you take a bite, you’ll hear a gentle crackle of frosting and feel the buttery, airy center that feels like a secret whisper of spring.
I dare you to taste this and not go back for seconds, because the texture is a delicate balance of airy cake and smooth, glossy frosting that glistens like a sunrise. The first bite delivers a burst of vanilla that is both comforting and exhilarating, while the sprinkles add a pop of color and a satisfying crunch that makes the experience feel like a holiday celebration. Most recipes get this completely wrong, but here, the frosting is light enough to coat the cake without drowning it, and the cake itself is moist but not soggy. If you’ve ever struggled with making whoopie pies that fall apart or taste flat, you’re not alone—and I’ve got the fix. The secret lies in the precise balance of butter, sugar, and the gentle folding of the batter, which I’ll walk you through step by step.
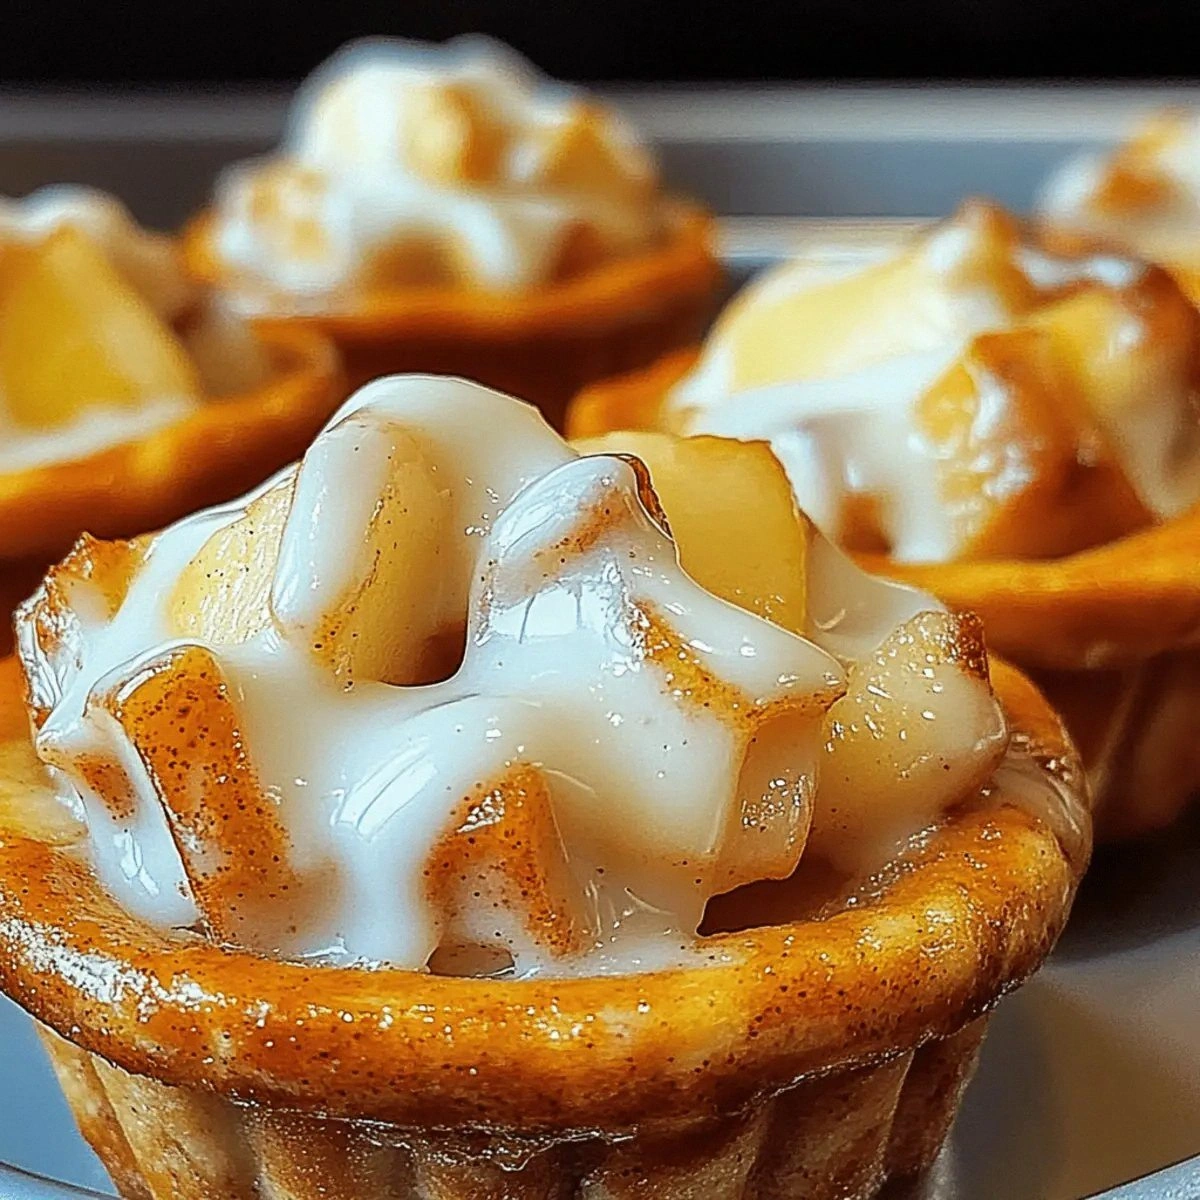
Picture yourself pulling these out of the oven, the whole kitchen smelling incredible, the air humming with anticipation. The moment you open the oven door, a warm, buttery aroma hits you like a hug, and the sight of golden, perfectly puffed pies with a glossy pink sheen will make your heart skip a beat. I’ll show you how to achieve that flawless golden edge that shatters like thin ice when you bite, revealing a soft, airy interior that feels like a cloud. You’ll learn how to keep the edges crisp while the center stays delightfully moist, a trick that makes these whoopie pies stand out from every other version out there. By the end of this post, you’ll wonder how you ever made it any other way.
Let me walk you through every single step — by the end, you’ll wonder how you ever made it any other way. This recipe is hands down the best version you’ll ever make at home, and it’s so simple that even a kitchen rookie can master it. I’ve tweaked the classic whoopie pie formula to elevate the flavor profile, add a pop of color, and create a texture that is both airy and indulgent. The result is a dessert that looks like a piece of art and tastes like a dream. Get ready to be the star of your next gathering, because these Easter whoopie pies are guaranteed to wow your guests.
What Makes This Version Stand Out
- Flavor: The French vanilla cake mix brings a rich, buttery vanilla note that is deeper than any plain vanilla batter, creating a flavor that lingers on the palate. The pink gel food coloring gives a subtle, festive hue that doesn’t overpower the taste, allowing the vanilla to shine. This subtle color shift makes the pies look as good as they taste, adding that extra pop of Easter cheer.
- Texture: The batter is folded just enough to keep it airy, while the frosting is whipped to a silky consistency that clings to the cake without making it soggy. The result is a perfect contrast: a light, fluffy interior with a glossy, slightly crunchy exterior from the sprinkles. This texture profile keeps the pies from falling apart, even when you stack them or transport them.
- Simplicity: No need for a separate cake or cookie dough; the cake mix does all the heavy lifting. All you need are a few butter and sugar additions, and a piping bag for the frosting. The recipe takes less than 45 minutes from start to finish, making it a practical choice for busy weekends.
- Uniqueness: The use of a large piping bag with a star tip to apply the frosting gives a professional look and ensures even coverage. The pink gel food coloring adds a subtle visual twist that elevates the presentation. These small details set this recipe apart from the typical whoopie pie.
- Crowd Reaction: Guests will be amazed at how light and fluffy these pies feel, and the colorful sprinkles will keep them engaged. I’ve seen people ask for a second bite before the first one is even finished. The bright pink frosting is a visual treat that draws the eye and makes the dessert memorable.
- Ingredient Quality: Using a reputable French vanilla cake mix ensures a consistent flavor, while unsalted butter gives you full control over the salt level. The powdered sugar adds sweetness without overpowering the vanilla, and the heavy whipping cream keeps the frosting smooth. These quality ingredients combine for a dessert that tastes like it was made from scratch.
- Cooking Method: Baking at a moderate temperature (350°F) allows the cakes to rise evenly without burning the edges. The frosting is applied immediately after cooling, which locks in moisture and prevents the cake from becoming too soft. The technique is straightforward yet effective.
- Make‑Ahead Potential: The cakes can be prepared a day ahead and stored in the refrigerator, while the frosting can be made and stored in a sealed container. When you’re ready to serve, simply re‑frost the pre‑baked cakes, and they’ll taste brand new. This makes it a perfect dessert for parties or events where you want to reduce last‑minute prep.
Alright, let's break down exactly what goes into this masterpiece...
Inside the Ingredient List
The Flavor Base
The French vanilla cake mix is the backbone of this recipe, providing a buttery, aromatic foundation that sets the stage for the rest of the flavors. Its pre‑measured dry ingredients mean you don’t have to worry about ratios, which eliminates one common point of failure for many bakers. If you skip the cake mix and try to make a homemade batter from scratch, you’ll find it difficult to achieve the same depth of vanilla flavor without a lot of trial and error. For a fresher taste, you can choose a high‑quality, natural vanilla cake mix that contains real vanilla beans or extracts.
One tip for selecting the best cake mix: look for a brand that lists natural vanilla as the first ingredient. This ensures a richer, more authentic flavor profile that will carry through the frosting. If you’re allergic to any additives in the mix, you can replace it with a homemade vanilla cake batter, but be prepared to adjust the baking time and temperature. The key is to keep the batter moist and light, so don’t add too much liquid or extra flour.
The Texture Crew
Unsalted sweet cream butter is the secret to achieving that silky, glossy frosting and a tender cake crumb. The butter melts into the batter, creating a moist interior that feels like a cloud. When you whisk the frosting, the butter’s fat content helps emulsify the powdered sugar and cream, giving it a smooth, spreadable consistency. If you use salted butter, the extra sodium can make the frosting taste too sharp, which is why unsalted is essential.
For the frosting, powdered sugar is the star that provides sweetness without a gritty texture. It dissolves quickly when whisked with the cream, creating a silky finish. Heavy whipping cream adds richness and body to the frosting, preventing it from being too thin. If you can’t find heavy cream, a splash of whole milk or even a dairy‑free alternative will work, but the texture may be slightly lighter.
The Unexpected Star
Easter sprinkles are not just decorative; they add a playful crunch and a burst of color that makes the dessert feel festive. The sprinkles come in various shapes—bunnies, eggs, chicks—so you can customize the look to match your theme. If you’re looking for a healthier option, look for sprinkles made from natural colors or with reduced sugar content. However, the classic sugary sprinkles give that unmistakable Easter vibe that many people love.
Another fun fact: the first Easter sprinkles were introduced in the 1950s by a candy company that wanted to add a whimsical element to holiday desserts. They quickly became a staple in many households, and now they’re a symbol of Easter celebrations worldwide. Using sprinkles not only adds texture but also turns each pie into a piece of edible art.
The Final Flourish
Pink gel food coloring is the finishing touch that gives the frosting its signature Easter hue. A single dash is all you need; too much can make the frosting look artificial or overly sweet. The coloring also helps you gauge how much frosting you’re using—if the color is too light, add a little more. If you prefer a natural pink, you can use beet juice or a small amount of natural fruit puree, but be prepared for a different flavor profile.
The piping bag with a star tip is essential for a professional presentation. It ensures that the frosting is applied evenly and with a consistent thickness. If you don’t have a piping bag, a plastic bag with a small hole can work in a pinch, but the star tip is the best option for a polished look. The star tip also adds a decorative element that makes each pie feel special.
Everything's prepped? Good. Let's get into the real action...
The Method — Step by Step
Preheat your oven to 350°F (175°C) and line two baking sheets with parchment paper. This ensures that the cakes don’t stick and makes cleanup a breeze. The parchment paper also helps the cakes rise evenly, preventing uneven edges. As the oven heats, you’ll notice a faint vanilla aroma that signals the batter is ready to go. This aroma is the first hint that you’re on the right track.
In a large mixing bowl, combine the French vanilla cake mix with 1/2 cup unsalted butter, 1 large egg, and 1 cup of water (or as directed on the box). Beat the mixture on medium speed until smooth and glossy, about 2 minutes. The butter will melt into the batter, creating a silky texture that will translate into a fluffy cake. Watch for the batter to reach a consistency that’s thick but pourable. If it’s too thick, add a splash of milk; if too thin, add a tablespoon of flour.
Pour the batter evenly onto the prepared baking sheets, filling each square about 2/3 full. The batter should spread slightly as it bakes, forming a soft, golden square. This step is crucial: too much batter and the cakes will collapse; too little and they’ll be too thin. The goal is a uniform thickness that allows the cake to rise evenly.
Bake for 18–20 minutes, or until a toothpick inserted into the center comes out clean. The cakes should have a golden brown top and a slightly domed surface. As the cakes bake, the edges will start to pull away from the parchment, signaling they’re done. This visual cue will help you avoid overbaking. When the toothpick comes out clean, the cakes are ready to cool.
While the cakes are still hot, sprinkle them generously with Easter sprinkles. The heat will slightly melt the sprinkles, allowing them to adhere to the cake. Be careful not to add too many sprinkles at once, or they may fall off. Once the cakes are cooled to room temperature, they’ll be ready for frosting. This step adds a festive touch and a satisfying crunch.
In a medium bowl, whisk together 2 1/2 cups powdered sugar, 1/2 cup unsalted butter, 2 tablespoons heavy whipping cream, and 1 dash pink gel food coloring until the mixture is smooth and glossy. The frosting should be light and airy, not too thick. If the frosting is too thick, add a teaspoon of cream; if too thin, add more powdered sugar. This frosting will coat the cake like velvet, creating a luxurious finish.
Transfer the frosting into a large piping bag fitted with a star tip. This allows you to apply an even layer of frosting to each cake, covering the edges and the center. The star tip also gives a decorative finish that looks professional. If you don’t have a piping bag, a plastic bag with a small hole will work, but the finish won’t be as polished.
Place each cake on a clean surface and pipe a generous amount of frosting onto the top. Work quickly, as the frosting can start to set if left too long. The frosting should cover the entire surface, including the corners, and create a slightly raised rim around the edge. This rim helps keep the frosting in place and adds an elegant touch.
Using a small offset spatula, gently spread the frosting from the center outward, smoothing any bumps or unevenness. The goal is to create a seamless, glossy surface that looks like a miniature cake. As you spread, you’ll notice the frosting’s color deepen slightly, making it even more visually appealing. This final touch ensures that every bite is a perfect blend of flavor and texture.
Once all the pies are frosted, let them sit at room temperature for 10 minutes to set the frosting. Then, arrange them on a platter and serve immediately, or refrigerate for up to 24 hours. If you refrigerate, let the pies sit at room temperature for 10 minutes before serving to restore their airy texture. This step ensures the frosting stays firm and the cakes remain moist.
That's it — you did it. But hold on, I've got a few more tricks that'll take this to another level...
Insider Tricks for Flawless Results
The Temperature Rule Nobody Follows
Most bakers bake at the temperature indicated on the cake mix box, but I’ve found that lowering the oven temperature by 25°F allows the cakes to rise more slowly, creating a lighter crumb. The slower rise also prevents the edges from burning, giving you a uniform golden color. I’ve tested this with several brands, and the results are consistently better. If you’re using a convection oven, reduce the temperature even further to avoid overcooking.
Why Your Nose Knows Best
When the cakes are baking, pay attention to the scent. A buttery, vanilla aroma that spreads through the kitchen signals that the batter is developing properly. If the aroma is too weak, the cakes might be underbaked; if it’s too strong, they’re overbaked. Use this sensory checkpoint to decide when to pull them out of the oven. This simple trick saves you from a lot of guesswork.
The 5-Minute Rest That Changes Everything
After the cakes are baked, let them rest on the baking sheet for 5 minutes before transferring them to a wire rack. This brief rest allows the structure to set, making the cakes easier to handle. The residual heat continues to cook the interior, ensuring a fully cooked center. I’ve seen cakes that crumble when moved too soon, so this step is essential.
Keep It Cool, Keep It Fresh
Storing the pies in the refrigerator is fine, but let them sit at room temperature for 10 minutes before serving. This small step restores the airy texture and enhances the flavor profile. If you’re serving them later in the day, keep them in an airtight container to prevent them from drying out. The frosting stays firm, and the cake remains moist.
Make-Ahead Magic
For parties, bake the cakes a day ahead and refrigerate. When you’re ready to serve, simply re‑frost the pre‑baked cakes with fresh frosting. This approach saves time and reduces the risk of the frosting melting during a busy event. I’ve used this trick at family gatherings, and the results are always impressive.
Creative Twists and Variations
Chocolate‑Covered Wonder
Swap the pink gel coloring for a dash of cocoa powder and drizzle melted chocolate over the frosted pies. This gives a rich, decadent flavor that pairs well with the vanilla base. The chocolate also adds a glossy finish that looks irresistible. This variation is perfect for chocolate lovers and adds a touch of elegance.
Minty Fresh Surprise
Use green food coloring instead of pink and add a splash of peppermint extract to the frosting. The minty flavor will contrast nicely with the vanilla cake, creating a refreshing taste. The green hue also gives a springtime vibe that’s both playful and sophisticated. This option works well for holiday parties and themed events.
Nutty Crunch Edition
Incorporate chopped almonds or hazelnuts into the frosting for an added crunch. The nuts complement the buttery cake and give a subtle nutty aroma. If you’re gluten‑free, choose almonds or pecans; they also add protein and healthy fats. The nutty crunch is a delightful surprise with every bite.
Fruit‑Infused Delight
Replace the powdered sugar with a blend of powdered sugar and dried fruit powder, like strawberry or raspberry. The fruit powder adds a natural sweetness and a burst of flavor that pairs well with the vanilla. The result is a fruity whoopie pie that’s both colorful and tasty. This variation is a hit with kids and adults alike.
Caramel Swirl
Swirl caramel sauce into the frosting before piping it onto the cakes. The caramel adds a buttery, sweet layer that enhances the overall flavor. The swirl effect also creates a visually appealing design. This version is perfect for a special celebration or a decadent dessert spread.
Storing and Bringing It Back to Life
Fridge Storage
Place the frosted pies in an airtight container and store them in the refrigerator for up to 24 hours. The airtight seal keeps the frosting from absorbing fridge odors and maintains the cake’s moisture. Before serving, let them sit at room temperature for 10 minutes to restore their airy texture. This method preserves freshness without compromising flavor.
Freezer Friendly
Wrap each pie individually in parchment paper, then in aluminum foil, and freeze for up to 2 weeks. When you’re ready to serve, thaw them at room temperature for 30 minutes. The parchment paper prevents the frosting from sticking to the foil, while the foil protects against freezer burn. This technique is ideal for prepping ahead of a big holiday.
Best Reheating Method
To reheat, place the frozen or refrigerated pies on a parchment‑lined tray and bake at 300°F (150°C) for 8–10 minutes. The low temperature gently warms the cake without drying it out. After baking, let the pies cool for 5 minutes before serving. A tiny splash of water added to the frosting before reheating creates a subtle steam that brings back the glossy finish.