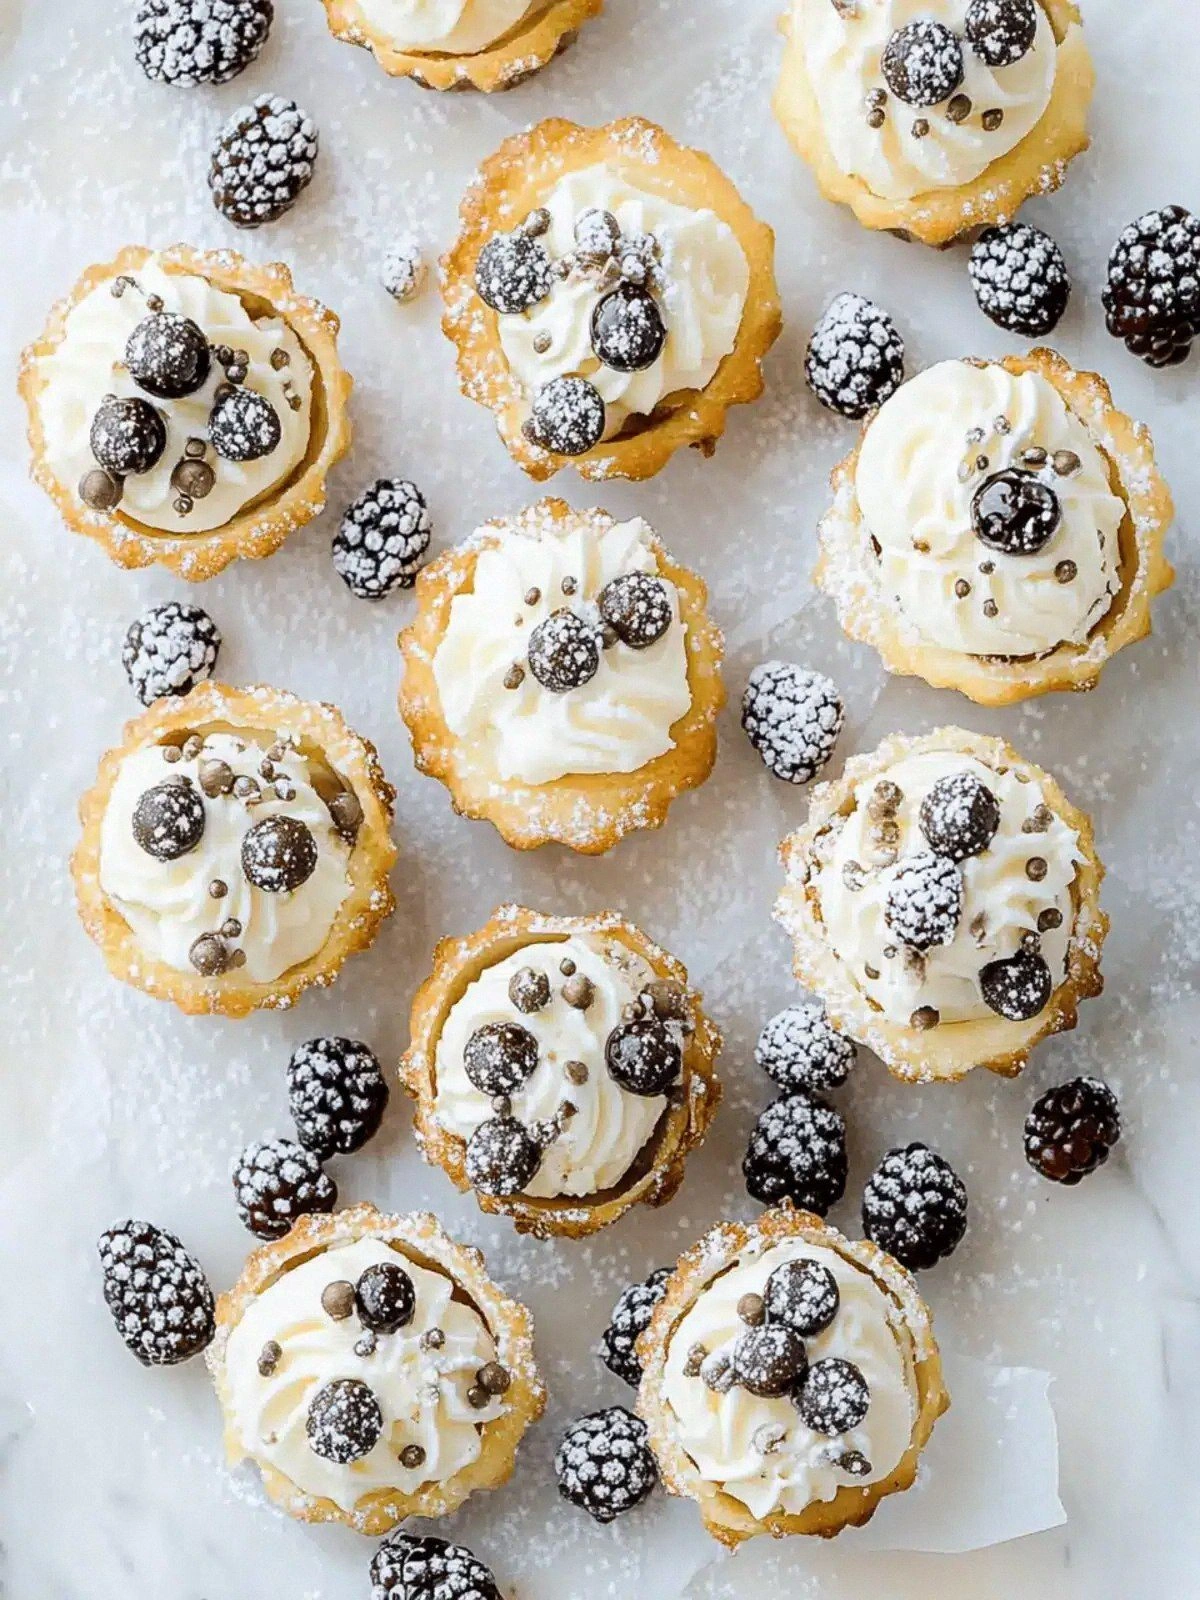
Mini Cannoli Bites: Your New F
It started with a midnight craving that turned into a kitchen catastrophe. I was halfway through a batch of homemade dough when the timer on the oven went off, and the pie crusts collapsed into a soggy, unappetizing mess. I stared at the ruined dough, feeling a mix of disappointment and a sudden spark of curiosity. That moment, I vowed to reinvent the classic cannoli in bite‑sized, foolproof form, so that even the most novice baker could achieve that signature crunch and creamy filling without the usual mishaps.
The first time I tasted a bite, the aroma of toasted pastry hit my nose like a warm hug, and the faint scent of vanilla drifted in, promising sweetness without overpowering. The sound was unmistakable: a crisp snap as the shell met the tongue, followed by the gentle, almost silky release of the ricotta‑mascarpone mixture. The texture was a delightful contrast—crisp on the outside, airy and velvety on the inside, with chocolate chips popping like tiny bursts of joy. I could hear the faint crackle of the oven door closing, a subtle reminder that the magic was just beginning.
This version stands out because it eliminates the usual pitfalls—over‑baking, under‑filling, and uneven distribution—by using a pre‑made pie crust that provides a consistent, buttery base. The filling blends whole‑milk ricotta and mascarpone for a creamy richness that doesn’t overwhelm, while the powdered sugar and vanilla give it a subtle sweetness that feels indulgent yet balanced. The mini chocolate chips add a crunchy surprise that elevates the bite without making it too heavy. The result is a bite that feels like a personal indulgence, yet is simple enough to whip up in under thirty minutes.
I dare you to taste this and not go back for seconds. Picture yourself pulling this out of the oven, the whole kitchen smelling incredible, and the first bite delivering a symphony of crunch and cream. This is hands down the best version you'll ever make at home. Let me walk you through every single step — by the end, you'll wonder how you ever made it any other way.
What Makes This Version Stand Out
- Texture: The pre‑made pie crust delivers a consistently crisp shell that shatters like thin ice, ensuring every bite starts with a satisfying crunch before revealing the luscious filling.
- Flavor Balance: A harmonious blend of ricotta and mascarpone provides creamy depth without the heaviness of traditional cannoli, while powdered sugar and vanilla keep the sweetness just right.
- Convenience: By using a ready‑made crust, you skip the time‑consuming dough preparation, making this dessert ideal for busy evenings or last‑minute gatherings.
- Visual Appeal: The glossy chocolate chips create an eye‑catching contrast, making each bite look as good as it tastes.
- Scalability: The recipe scales effortlessly for parties or solo snacking; the ingredient list is flexible enough to adjust portions without compromising quality.
- Make‑Ahead Potential: You can prepare the shells and fillings separately, store them, and assemble just before serving, saving precious minutes on the day of the event.
- Minimal Skill Requirement: Even if you’re a beginner, the straightforward assembly and baking steps ensure consistent results every time.
Alright, let's break down exactly what goes into this masterpiece...
Inside the Ingredient List
The Flavor Base
Whole milk ricotta is the heart of the filling, offering a mild, slightly tangy profile that balances the richness of mascarpone. Its creamy consistency allows the filling to glide smoothly into the shells without becoming clumpy. If you skip ricotta, the filling loses its airy texture, becoming dense and less forgiving. A suitable swap is Greek yogurt, which adds tang and a protein boost, but be sure to strain it first to avoid excess liquid. When buying ricotta, choose a brand with a fat content of 1% to 2% for the best mouthfeel; the lower the fat, the lighter the bite.
The Texture Crew
Mascarpone cheese brings a buttery, luxurious mouthfeel that elevates the filling into a decadent experience. Its high fat content smooths the ricotta, creating a silky base that melts on the tongue. If you omit mascarpone, the filling will taste more like plain ricotta and lack that velvety finish. A common alternative is cream cheese, but it has a tangier flavor profile; mixing it with a splash of milk can bring it closer to mascarpone’s texture. For those seeking a dairy‑free version, coconut cream can be used, but adjust the sweetness accordingly.
The Unexpected Star
Mini chocolate chips are more than just a garnish; they add a subtle crunch and a burst of cocoa flavor that cuts through the sweetness of the filling. They also help anchor the filling, preventing it from sliding out of the shell. If you prefer a different chocolate experience, try dark chocolate chips or even a swirl of melted chocolate in the filling. If you’re avoiding sugar, consider using sugar‑free chocolate chips, but remember to increase the powdered sugar slightly to maintain balance.
The Final Flourish
Powdered sugar and vanilla extract work in tandem to sweeten the filling without overwhelming the delicate flavors of the cheeses. Powdered sugar dissolves quickly, ensuring a smooth consistency, while vanilla adds depth and warmth. Skipping the vanilla will leave the filling tasting flat; likewise, using too much powdered sugar can make it cloyingly sweet. A good rule of thumb is to use a pinch of salt to balance sweetness, but this recipe keeps it simple with just the vanilla. For a citrus twist, add a splash of lemon zest to the filling for a bright, zesty contrast.
Everything's prepped? Good. Let's get into the real action...
The Method — Step by Step
- Preheat the Oven: Set your oven to 375°F (190°C). Let the heat settle for a few minutes before placing the trays inside. The consistent temperature ensures even baking of the pastry shells, preventing any soggy spots. While the oven warms, gather all your ingredients so you can work without interruption.
- Prepare the Filling: In a medium bowl, combine the ricotta and mascarpone until smooth. Add the powdered sugar and vanilla, whisking until the mixture is silky and free of lumps. Taste the filling; if it feels too thick, add a tablespoon of milk to loosen it. This step is crucial for a filling that spreads easily into the shells without spilling.
- Cut the Pie Crust: Lay the pre‑made pie crust flat on a lightly floured surface. Using a small cookie cutter or a glass, cut out circles about 2 inches in diameter. If you prefer a slightly thicker shell, press the edges to seal them; this helps the filling stay contained. For a perfectly round shape, use a sharp knife to trim any uneven edges.
- Fill the Shells: Spoon a generous amount of the ricotta mixture into each pastry circle, ensuring the filling reaches the edges. The filling should be slightly domed, allowing room for the chocolate chips. If you want a more dramatic look, press a few chips into the top of each shell before baking.
- Bake the Bites: Arrange the filled shells on a parchment‑lined baking sheet, spacing them about an inch apart. Bake for 15–18 minutes, or until the pastry edges turn a light golden brown. Keep a close eye on the tops; they should not brown too quickly, or the filling may leak.
- Cool and Chill: Remove the tray from the oven and let the bites cool on a wire rack for 5 minutes. Then transfer them to a container lined with parchment and refrigerate for at least 30 minutes. Chilling allows the filling to set, giving each bite a firm, cohesive texture.
- Watch Out: Do not overfill the shells, or the ricotta mixture will leak and create a mess. Also, avoid baking at too high a temperature; a lower, steady heat ensures the pastry cooks through without burning the filling. The perfect bite has a crisp exterior and a creamy interior that stays intact until you take a bite.
- Serve and Enjoy: Arrange the chilled bites on a platter, optionally dusting them lightly with powdered sugar for an elegant finish. Serve immediately for the best texture, or keep them in an airtight container at room temperature for up to two days. When you take a bite, you’ll experience the satisfying snap of the pastry, followed by the smooth, sweet filling and the chocolate crunch.
That's it — you did it. But hold on, I've got a few more tricks that'll take this to another level...
Insider Tricks for Flawless Results
The Temperature Rule Nobody Follows
Many bakers bake cannoli shells at 400°F, but that can cause the filling to melt too quickly. Lowering the temperature to 375°F keeps the pastry crisp while giving the ricotta mixture time to set properly. I once tried 400°F and ended up with soggy shells that looked like they’d been left in a humid kitchen. The trick is to preheat the oven fully and avoid opening the door during the first 10 minutes.
Why Your Nose Knows Best
Before you remove the bites from the oven, pause and sniff the aroma. A faint buttery scent indicates the pastry is baking correctly; a strong, almost burnt smell means you need to lower the temperature or reduce the baking time. Your nose is a reliable guide for timing, especially when you’re working with a small batch.
The 5‑Minute Rest That Changes Everything
After removing the tray from the oven, let the bites rest on the rack for five minutes. This brief pause allows the shells to finish cooking internally, preventing them from cracking or becoming too soft when they cool. It also gives the filling a chance to firm up slightly, ensuring each bite holds its shape when served.
Use a Light Dusting of Cocoa Powder
For an extra layer of flavor, lightly dust the finished bites with unsweetened cocoa powder. The cocoa adds a hint of bitterness that balances the sweetness of the filling, creating a more sophisticated taste profile. It also gives the bites a subtle, chocolatey sheen that looks great on a dessert plate.
Store in a Cool, Dry Place
If you’re not serving immediately, keep the bites in an airtight container at room temperature for up to two days. Avoid refrigeration if you plan to serve them within 24 hours, as the pastry can become soggy. If you must refrigerate, let them sit at room temperature for 15 minutes before serving to restore the crispness.
Creative Twists and Variations
This recipe is a playground. Here are some of my favorite ways to switch things up:
Nutty Delight
Swap the mini chocolate chips for finely chopped pistachios or chopped walnuts. The nuts add a crunchy texture and a buttery flavor that complements the creamy filling. A pinch of sea salt on top enhances the nutty profile.
Minty Freshness
Infuse the filling with a teaspoon of finely grated fresh mint. The mint provides a refreshing contrast to the rich cheeses, making it perfect for a summer gathering. Pair it with a light dusting of powdered sugar for a balanced sweet‑mint experience.
Berry Burst
Fold in a handful of finely chopped dried cranberries or cherries into the ricotta mixture. The dried fruit adds a chewy texture and a tart burst that cuts through the sweetness. Garnish the finished bites with a few fresh berries for a pop of color.
Chocolate Ganache Swirl
Replace half of the chocolate chips with a swirl of dark chocolate ganache. The ganache adds depth and a glossy finish, turning each bite into a mini chocolate masterpiece. Use a toothpick to create a marbled effect before baking.
Spiced Caramel
Stir in a teaspoon of caramel sauce and a pinch of ground cinnamon into the filling. The caramel gives a buttery sweetness, while cinnamon adds warmth. Dust the finished bites with a light sprinkle of powdered sugar and a dash of cinnamon for a finishing touch.
Almond Joy
Blend in shredded coconut and chopped almonds into the ricotta mixture. The coconut adds a tropical note, while almonds provide crunch. Finish with a drizzle of melted chocolate for an indulgent twist.
Storing and Bringing It Back to Life
Fridge Storage
Place the cooled bites in an airtight container and refrigerate for up to two days. The pastry will stay crisp, and the filling will firm up slightly, giving each bite a more substantial mouthfeel. Let them sit at room temperature for 10 minutes before serving to restore a bit of the original crunch.
Freezer Friendly
Wrap each bite individually in parchment paper and place them in a freezer bag. Freeze for up to one month. When ready to serve, thaw at room temperature for 20 minutes. The pastry may soften slightly, but the filling remains creamy and delicious.
Best Reheating Method
To revive frozen or chilled bites, preheat your oven to 350°F (175°C). Place the bites on a parchment‑lined tray and bake for 5–7 minutes, just until the pastry feels warm and slightly crisp. A tiny splash of water on the tray before baking creates steam, preventing the shells from drying out and keeping the filling moist.