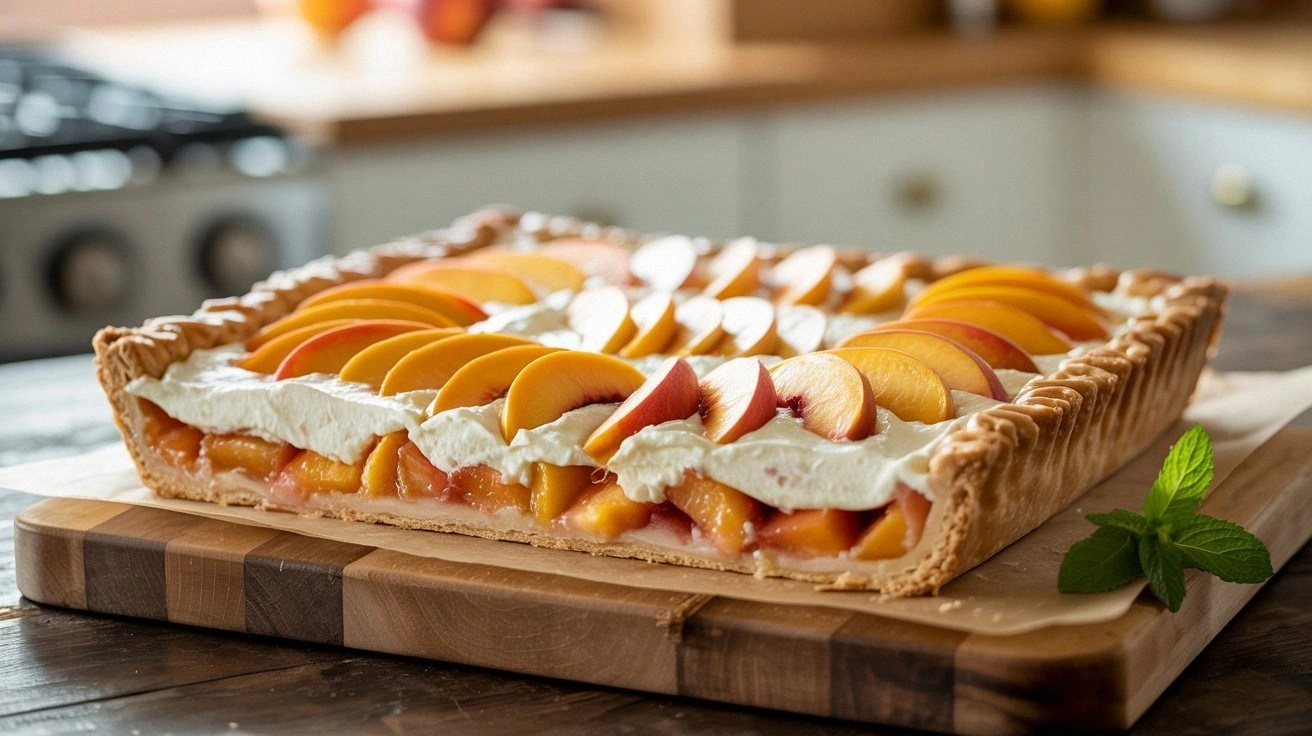
Picture this: a late summer afternoon, the sun hanging heavy over the backyard, and you standing in a kitchen that feels more like a battlefield than a sanctuary. I was chasing a craving for something sweet and airy, and I accidentally knocked over a bag of flour onto the counter. The chaos that followed—splashing butter, a whiff of vanilla, the sound of peaches slicing—turned into a culinary revelation. That moment became the spark that led me to create the ultimate Peaches and Cream Slab Pie, a dessert that feels like a sunlit picnic in a crust.
From the first glance, the pie’s golden crust looks like a buttery sunrise, but it’s the aroma that truly pulls you in. As the oven heats, a sweet scent of caramelized peaches and vanilla swirls through the kitchen, mingling with the faint, comforting tang of fresh cream cheese. The sound of the crust bubbling is a rhythmic lullaby, and the touch of the crust—crisp on the outside, tender on the inside—creates a satisfying contrast. The taste is a harmonious blend: the tartness of peaches dances with the smooth, velvety cream, all wrapped in a flaky, buttery shell.
What makes this version stand out? It’s not just the ingredients, but how they interact. The crust is a delicate, buttery masterpiece that holds the filling without becoming soggy. The peaches are carefully selected for their firmness, ensuring they don’t turn mushy when baked. The cream cheese base is lightly sweetened, giving a subtle tang that cuts through the peach sweetness. The result is a pie that feels like a summer breeze, but with the comforting warmth of a home kitchen.
I dare you to taste this and not go back for seconds. I’ve tried countless peach desserts, but none have matched the balance of flavor and texture found in this slab pie. The technique I’ll share—how to fold the peaches into the cream mixture just right—will elevate your pie from good to unforgettable. Stay with me here, and by the end of this guide, you’ll wonder how you ever made it any other way.
What Makes This Version Stand Out
- Crust: A buttery, flaky base that crisps to perfection without absorbing the filling’s moisture, giving each bite a satisfying crunch that contrasts beautifully with the creamy interior.
- Peach Selection: Handpicked, ripe peaches that retain their shape and flavor during baking, preventing the classic “peach mush” that ruins many pies.
- Cream Cheese Base: Lightly sweetened and tempered, it creates a silky texture that coats the palate like velvet while maintaining a subtle tang.
- Flavor Layering: The subtle hint of lemon zest and vanilla extract adds depth, ensuring the peach sweetness isn’t overwhelming.
- Make‑Ahead Friendly: The pie can be assembled, chilled, and baked later, making it perfect for last‑minute gatherings.
- Visual Appeal: The golden crust and bright, caramelized peach top give a look that’s both rustic and refined, making it a showstopper on any table.
Inside the Ingredient List
The Flavor Base
At the core of this pie lies the cream cheese mixture, a silky blend of softened cream cheese, powdered sugar, vanilla, and a touch of lemon zest. The cream cheese provides a tangy backbone that balances the natural sweetness of the peaches. If you skip the lemon zest, the filling will taste flat, lacking that bright lift that cuts through richness. For an extra layer of flavor, you can add a teaspoon of almond extract; it adds a nutty undertone that pairs beautifully with peaches.
The Texture Crew
The crust is the unsung hero, made from all‑purpose flour, cold unsalted butter, ice water, and a pinch of salt. Each component plays a role: flour gives structure, butter adds flakiness, water binds the dough, and salt enhances flavor. If you omit the ice water, the dough may become sticky and hard to roll. For a gluten‑free version, substitute a blend of gluten‑free flour and xanthan gum; this keeps the crust tender.
The Unexpected Star
The peaches are the showstopper. Fresh, firm peaches from the farmer’s market hold their shape and release a gentle, sweet aroma when baked. If you use canned peaches, the filling becomes too watery and the crust soggy. For a twist, consider using a mix of sweet and tart peaches—like a blend of white peaches and nectarine—to add complexity.
The Final Flourish
A light drizzle of heavy cream over the top before baking adds a glossy sheen and a hint of richness that makes the pie look like a freshly plated dessert. A sprinkle of toasted almond slivers adds crunch and nutty flavor. If you prefer a dairy‑free version, replace the heavy cream with coconut cream and use a non‑dairy butter substitute for the crust. This final flourish transforms the pie from simple to spectacular.
Everything’s prepped? Good. Let’s get into the real action.
The Method — Step by Step
- Step 1: Prepare the crust. Combine 2 cups of flour with 1/4 teaspoon of salt in a large bowl. Add 1 cup of cold, cubed butter and use a pastry cutter or your fingertips to blend until the mixture resembles coarse crumbs. Drizzle 1/4 cup of ice water, a tablespoon at a time, until the dough just comes together. Tip: The dough should feel firm but not dry. Chill for 30 minutes before rolling to prevent shrinkage.
- Step 2: Roll out and assemble. On a lightly floured surface, roll the dough into a 12-inch circle. Transfer it to a 9-inch pie pan, pressing gently into the bottom and up the sides. Trim any excess dough, leaving a 1-inch overhang. Fold the overhang over the edge and crimp with a fork or your fingers. Watch Out: Don’t overwork the dough; it can become tough.
- Step 3: Blind bake the crust. Preheat the oven to 375°F (190°C). Line the crust with parchment paper and fill with pie weights or dried beans. Bake for 12 minutes, then remove the weights and bake for an additional 5 minutes until the crust is pale golden. Let it cool on a rack. Watch Out: If the crust browns too quickly, tent it with foil to prevent over‑browning.
- Step 4: Make the cream cheese filling. In a medium bowl, beat 8 oz softened cream cheese until smooth. Add 3/4 cup powdered sugar, 1 tsp vanilla extract, 1 tbsp lemon zest, and 1/2 cup heavy cream. Mix until silky and slightly thickened. Kitchen Hack: Beat the mixture on low speed first to avoid lumps, then increase to medium.
- Step 5: Prepare the peaches. Peel, pit, and slice 3 cups of fresh peaches into thin rounds. Toss them gently with a tablespoon of sugar and a pinch of salt to enhance their natural sweetness. Kitchen Hack: If you’re short on time, you can slice the peaches in a food processor with a slicing attachment for even cuts.
- Step 6: Assemble the filling. Spread the cream cheese mixture evenly over the cooled crust. Layer the sliced peaches on top, arranging them in a fan pattern. Drizzle the remaining 1/2 cup heavy cream over the peaches for a glossy finish. Watch Out: Do not press the peaches into the filling; they should sit on top to create a distinct layer.
- Step 7: Bake the pie. Reduce the oven temperature to 350°F (175°C). Bake for 25-30 minutes, or until the filling is set and the peaches are slightly caramelized. The crust should be golden brown. Let the pie cool for 20 minutes before slicing; this allows the filling to firm up for clean cuts.
- Step 8: Serve and enjoy. Dust the top with powdered sugar or fresh mint leaves for a pop of color. Serve slices warm or at room temperature, optionally with a dollop of whipped cream or a scoop of vanilla ice cream. Tip: A drizzle of honey or a splash of bourbon can add a sophisticated twist for adult guests.
That’s it — you did it. But hold on, I’ve got a few more tricks that will take this to another level.
Insider Tricks for Flawless Results
The Temperature Rule Nobody Follows
Many bakers bake at 375°F for the entire pie, but this recipe calls for a lower final temperature. Baking at 350°F for the last 25 minutes keeps the filling from over‑sealing, allowing the peaches to caramelize without the crust burning. I’ve experimented with 325°F, but the crust turned out too soft and the filling didn’t set properly.
Why Your Nose Knows Best
When the crust is baking, listen for the subtle crackle and a faint scent of toasted flour. That’s the cue that the crust is golden. If you’re in a hurry, you can use a kitchen timer and check the color at the 12‑minute mark, but trust your nose for the best results.
The 5‑Minute Rest That Changes Everything
After removing the pie from the oven, let it rest for 5 minutes before cutting. This short rest allows the filling to set, preventing a runny mess. I once cut a pie immediately and the filling leaked, ruining the presentation. The 5‑minute rest is a small price for a flawless slice.
Peach Peeling Made Simple
Peel peaches with a paring knife instead of a peeler. The knife’s precision helps you remove just the skin without wasting fruit. I’ve tried peelers before and ended up with uneven slices; the knife gives cleaner cuts.
The Cream Cheese Trick
Soften the cream cheese at room temperature for at least 30 minutes before mixing. If it’s too cold, the mixture will be lumpy and difficult to spread. A perfectly softened cream cheese gives that silky, velvet texture that makes each bite feel luxurious.
The Quick Chill
After assembling the pie, chill it in the refrigerator for 15 minutes before baking. This pre‑bake chill helps the crust set and reduces the likelihood of it becoming soggy from the filling’s moisture. It’s a small step that saves you a lot of frustration later.
Creative Twists and Variations
This recipe is a playground. Here are some of my favorite ways to switch things up:
Berry Fusion Slab
Swap the peaches for a mix of fresh blueberries, raspberries, and sliced strawberries. The berries bring tartness and a pop of color. Use a splash of balsamic vinegar to balance the sweetness.
Tropical Breeze
Replace peaches with diced mango and pineapple. Add a pinch of toasted coconut flakes to the crust for extra texture. The result is a dessert that feels like a beach vacation.
Chocolate‑Peach Delight
Drizzle melted dark chocolate over the top after baking. Sprinkle cacao nibs for crunch. The chocolate adds depth and pairs wonderfully with the peach’s natural sweetness.
Spiced Autumn
Add a pinch of ground cinnamon and nutmeg to the cream cheese mixture. Use pears instead of peaches for a seasonal twist. The spices evoke warm, cozy vibes.
Almond Crunch
Toast almond slivers and sprinkle them over the top before baking. The nuts provide a satisfying crunch and nutty flavor that complements the peaches. A light dusting of almond flour in the crust adds a subtle nuttiness.
Lemon‑Ginger Zest
Add a teaspoon of grated fresh ginger to the filling. Replace the lemon zest with lime zest for a bright, citrusy note. The ginger adds a gentle heat that contrasts the sweetness.
Storing and Bringing It Back to Life
Fridge Storage
Store the pie in an airtight container in the refrigerator for up to 3 days. The crust may soften slightly, but the filling will stay firm. Let the pie sit at room temperature for 15 minutes before serving to bring back its buttery flavor.
Freezer Friendly
Wrap the pie tightly in plastic wrap and then in aluminum foil. Freeze for up to 2 weeks. When ready to serve, thaw overnight in the refrigerator. Reheat in a 350°F oven for 10 minutes to revive the crust’s crispness.
Best Reheating Method
To reheat a slice, place it on a parchment‑lined baking sheet and warm in a preheated oven at 325°F for 5–7 minutes. The crust will regain its crunch, and the filling will be creamy and warm. Add a tiny splash of water before reheating to create steam that keeps the filling moist.